
You’ve got a 10-minute vlog that could be a 6-minute banger, or maybe that slow-motion video of your kid’s soccer game needs to move faster. Whatever the reason, knowing how to speed up video on iPhone is a skill that’ll save you time and make your content snappier. The good news? Apple built this feature right into your phone—no fancy third-party apps required (though we’ll cover those too).
The native video editing tools on iPhone are genuinely solid. We’re talking about the Photos app, which most people overlook because they assume it’s just for browsing pictures. Spoiler alert: it’s way more powerful than that. Whether you’re trimming, cropping, or speeding up footage, your iPhone can handle it without breaking a sweat.
Using the Photos App to Speed Up Video
This is the fastest way to speed up video on iPhone, and honestly, it’s where most people should start. No learning curve, no extra downloads—just open the Photos app and go.
Here’s the process:
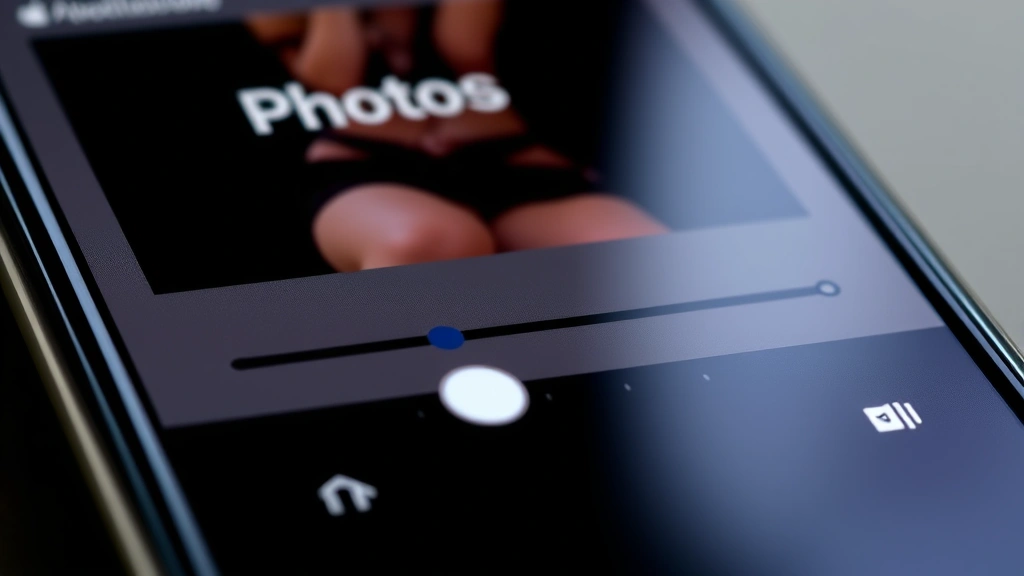
- Open the Photos app on your iPhone.
- Navigate to the video you want to edit. It can be a recently recorded video or something in your library.
- Tap Edit in the top-right corner. You’ll see a toolbar appear at the bottom of the screen.
- Look for the speed icon (it looks like a speedometer or gauge). Tap it.
- You’ll see speed options ranging from 0.5x to 2x. Slide left to slow down, right to speed up.
- Preview your changes by tapping the play button in the center of the video.
- Once you’re happy, tap Done to save your changes.
That’s it. Seriously. The Photos app lets you choose from preset speeds: 0.5x (half speed), 1x (normal), 1.25x, 1.5x, and 2x (double speed). Most people find 1.5x or 2x works best for removing dead air and keeping viewers engaged.
One thing to note: the Photos app saves your edits non-destructively, meaning your original video stays intact. If you change your mind later, just tap Edit again and adjust. This is different from some third-party apps that overwrite your original file.
Think of it like adjusting the volume on a speaker—you’re not destroying the audio, just changing how it plays back. The original stays safe in your library.
Adjusting Speed in iMovie on iPhone
If the Photos app feels too basic or you want more granular control over your how to speed up video on iPhone workflow, iMovie is the next logical step. It’s free, made by Apple, and gives you way more editing power.
Here’s how to speed up video in iMovie:
- Open iMovie on your iPhone (download it from the App Store if you don’t have it).
- Tap the + icon to create a new project, then select Movie.
- Choose Create Movie and select the video you want to edit from your library.
- Once your video appears on the timeline, tap it to select it.
- Tap the Speed icon (looks like a gauge or speedometer) at the bottom of the screen.
- Drag the slider to adjust speed. You can go from 0.5x all the way up to 2x, and iMovie even lets you fine-tune in smaller increments than the Photos app.
- Tap the checkmark to confirm your changes.
- Preview the video by tapping the play button.
- When you’re satisfied, tap Done, then Save to export your video.
iMovie is particularly useful if you’re doing more than just speeding up. Maybe you want to add transitions, background music, or text overlays. You can do all of that in the same app, which keeps your workflow streamlined. Plus, iMovie lets you work with multiple video clips in a single project, so you can speed up different sections at different rates if you need to.
The interface is intuitive enough that even if you’ve never edited video before, you’ll figure it out in minutes. The real power of iMovie is that it’s a bridge between simple and complex—more capable than Photos, but way less overwhelming than something like Adobe Premiere.
According to Family Handyman’s tech guides, understanding your phone’s built-in tools before jumping to third-party software is always the smarter play. Same philosophy applies here.
Third-Party Apps for Advanced Speed Control
Sometimes you need more than what Apple’s native tools offer. Maybe you want variable speed (different speeds at different parts of the video), or you need to export in a specific format. That’s where third-party apps come in.
Popular options for speeding up video on iPhone:
- Adobe Premiere Rush – This is the professional-grade option. Full video editing suite, precise speed control, multiple export formats. Fair warning: it’s a subscription service, but the free tier gives you enough to speed up videos.
- CapCut – Free and powerful. Originally designed for TikTok creators, but it works great for any video. Tons of speed options, plus filters and effects if you want them.
- Videoshop – Simple, fast, and does one thing well: edit video on your phone. Speed adjustment is straightforward, and the app doesn’t bog you down with unnecessary features.
- FiveActs – Another solid free option. Minimal learning curve, good speed controls, and it handles large files better than some competitors.
The advantage of third-party apps is flexibility. You can speed up portions of a video while keeping other parts at normal speed. You can also export in formats that the Photos app doesn’t support, which matters if you’re uploading to specific platforms or need compatibility with certain devices.
However—and this is important—most third-party apps require more processing power and battery. If your iPhone is already running hot or your battery is low, stick with the Photos app or iMovie. They’re optimized for your device and won’t drain your battery as fast.
Speed Up Video on iPhone Without Losing Quality
Here’s where people mess up: they speed up video and suddenly it looks like garbage. Pixelated, choppy, or just generally worse than the original. This happens because of how video compression and frame rates interact.
The real talk: Speeding up video will always result in some quality loss, but you can minimize it. Here’s how.
Understanding frame rates: Most iPhones shoot video at 30fps (frames per second) or 60fps. When you speed up a 30fps video to 2x, your phone has to interpolate frames—basically, it’s guessing what should happen between the frames that actually exist. This creates artifacts and loss of detail.
If you shot at 60fps, you have more data to work with, so the speed-up process is cleaner. If you know you’re going to speed up video later, shoot at 60fps when possible. This is especially important for action footage or anything with fast motion.
Best practices to maintain quality:
- Don’t go beyond 1.5x unless necessary. At 2x speed, the quality drop becomes noticeable. 1.25x or 1.5x usually looks clean and still feels faster.
- Avoid speeding up low-light footage. Videos shot in dim lighting already have more compression artifacts. Speeding them up amplifies the problem.
- Use the native apps first. Photos and iMovie use Apple’s optimized encoding. Third-party apps might look worse because they’re re-processing the video from scratch.
- Export at the highest quality setting available. When you save your edited video, choose 4K or 1080p, not 720p. More data = better results.
- Check your internet connection before uploading. A weak upload will compress your video further, making quality loss even more obvious. Wait until you’re on WiFi.
Think of it like upscaling an image—you can make something bigger, but you can’t add detail that wasn’t there. With video speed, you’re working with the frames you’ve got. The better your original footage, the better your sped-up version will be.
According to This Old House’s media production tips, understanding your source material before editing is half the battle. Same principle applies to video—know what you’re working with before you start speeding things up.
Common Mistakes When Speeding Up Videos
Even though speeding up video on iPhone is simple, people still manage to botch it. Let’s talk about what goes wrong and how to avoid it.
Mistake #1: Speeding up audio along with video
When you speed up video using the Photos app or iMovie, the audio speeds up too. This is fine for music or background noise, but if someone’s talking, they’ll sound like a chipmunk. If you need to speed up video but keep the audio at normal speed, you’ll need a third-party app like CapCut or Adobe Premiere Rush. They let you separate audio and video tracks, so you can adjust them independently.
Mistake #2: Not previewing before saving
Always play through your entire video after speeding it up. Sometimes the speed that looks good in a preview doesn’t feel right when you watch the whole thing. You might realize halfway through that 2x was too fast, and now you’ve already saved it. Take 30 seconds to preview. It’s worth it.
Mistake #3: Speeding up already-compressed video
If your video came from social media (like a TikTok or Instagram reel), it’s already been compressed heavily. Speeding it up further will make the quality drop obvious. If possible, work with the original, uncompressed file from your camera or phone storage.
Mistake #4: Forgetting about aspect ratio
When you speed up video in the Photos app, it maintains the original aspect ratio. But if you’re uploading to a specific platform (like Instagram Stories, which needs 9:16), you might need to crop or resize. Do this after speeding up, not before, to avoid re-processing the video multiple times.
Mistake #5: Overusing speed effects
Just because you can speed up video doesn’t mean you should. A 6-minute video sped up to 2x becomes 3 minutes, but it might feel rushed and hard to follow. Use speed intentionally—to cut out dead air, to make montages feel energetic, or to condense long processes into digestible chunks. Don’t speed up just to speed up.
Here’s a pro tip: if you’re editing content for YouTube or TikTok, check Bob Vila’s digital content guides for platform-specific best practices. Different platforms have different viewer expectations for pacing.
Exporting and Sharing Your Sped-Up Video
Once you’ve sped up your video, you need to get it out into the world. This is where things can get tricky if you’re not careful.
Exporting from Photos app:
When you edit a video in the Photos app and tap Done, your changes are automatically saved. But here’s the thing—it’s saving the edited version, not creating a separate file. If you want to share the sped-up version while keeping the original, you need to export it properly.
- Open the edited video in Photos.
- Tap the Share button (arrow pointing up).
- Choose your destination: Messages, Email, AirDrop, or a cloud service like Google Drive or Dropbox.
- Select the video quality. Choose High Quality or Maximum Quality if you care about preserving as much detail as possible.
- Send or save.
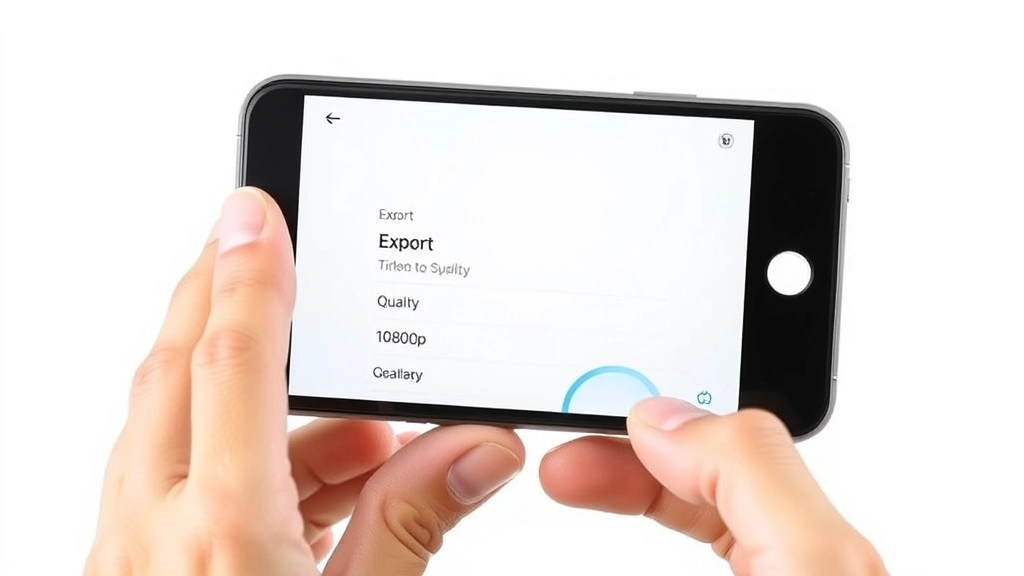
Exporting from iMovie:
iMovie gives you more control over the export process, which is both a blessing and a curse.
- Tap Done when you’re finished editing.
- Tap Save (or the share icon).
- Choose Save Video to save to your Photos library, or choose a specific app to share directly.
- Select your resolution: 720p, 1080p, or 4K. Higher resolution = larger file size = better quality. For most purposes, 1080p is the sweet spot.
- Tap Save and wait for the export to finish. This can take a few minutes depending on video length and your phone’s processing speed.
Important note: Exporting video uses a lot of battery and can get your phone hot. Do this while your iPhone is plugged in if possible, especially for longer videos.
Where to upload your sped-up video:
- YouTube – Accepts most formats. Recommended: 1080p MP4. Allows up to 12 hours per video.
- TikTok – Prefers vertical video (9:16 aspect ratio). Max file size: 287.6 MB. TikTok has built-in speed controls too, so you can speed up further if needed.
- Instagram – Stories need 9:16 ratio, Reels need 9:16 as well. Feed videos can be square or landscape. Max file size: 4GB.
- Facebook – Flexible with formats. Accepts pretty much anything. Max file size: 4GB.
One more thing: if you’re uploading to multiple platforms, export once at the highest quality, then let each platform handle the compression. Don’t re-export multiple times from your phone—each re-export degrades quality.
Pro Tip: If you’re speeding up video for social media, add captions. Fast-paced content with captions keeps viewers engaged and increases watch time. Most platforms have built-in caption tools, or you can use a free service like accessibility resources to understand captioning best practices.
Frequently Asked Questions
Can I speed up video on iPhone without using the Photos app?
– Yes, absolutely. iMovie is a free alternative, and there are tons of third-party apps like CapCut, Adobe Premiere Rush, and Videoshop. The Photos app is the simplest option, but not the only one. Choose based on how much control you need and whether you’re doing other editing tasks.
Does speeding up video reduce quality?
– Yes, but it depends on how much you speed it up and what quality you started with. Speeding up to 1.25x or 1.5x usually looks fine. Going to 2x will show noticeable quality loss, especially if your original video was shot at 30fps or in low light. Shooting at 60fps before editing helps minimize quality loss.
Can I speed up only part of a video?
– Not with the Photos app—it speeds up the entire video. But iMovie and third-party apps like CapCut let you split your video into segments and speed up individual sections. This is useful for montages or when you want to slow down important moments while speeding up filler.
What’s the fastest speed I can use?
– The Photos app maxes out at 2x speed. iMovie and third-party apps sometimes go higher (up to 4x or even 8x), but anything beyond 2x usually looks choppy and hard to follow. Stick with 2x or lower for most content.
Will speeding up video make the audio sound weird?
– Yes. When you speed up video in the Photos app or iMovie, the audio speeds up proportionally. Dialogue becomes high-pitched and fast. If you need to speed up video while keeping audio normal, use a third-party app that lets you separate audio and video tracks. Alternatively, you could mute the audio and add music or voiceover separately.
Can I undo the speed change after I’ve saved it?
– If you edited in the Photos app, yes—just open the video again, tap Edit, and adjust the speed back to 1x. If you exported from iMovie, you’ll need to re-import the original video and edit it again. Always keep your original files. Never edit the only copy you have.
What’s the best speed for YouTube videos?
– It depends on content. Tutorial videos often work at 1.25x to keep viewers engaged without feeling rushed. Montages and action clips can go to 1.5x or 2x. Talking-head content (like vlogs) usually stays at normal speed. Test different speeds and see what feels right for your specific video.
Does speeding up video use a lot of battery?
– Editing in the Photos app uses minimal battery. Exporting from iMovie or third-party apps uses significantly more. If you’re doing heavy editing, plug your phone in. Don’t rely on battery power for exports—you might run out of juice mid-process and corrupt your file.
Can I speed up a video that’s already been uploaded to social media?
– Technically, yes, but the quality will be poor because the video is already compressed. Always work with the original, uncompressed file from your phone’s camera roll. If you only have the social media version, it’s better to re-shoot than to edit a compressed copy.


