If you’ve ever inherited a spreadsheet where someone crammed “John Smith” into a single cell and you need to split it into first and last names, you know the frustration. A database with merged names is basically unusable for sorting, filtering, or mail merges. The good news? How to separate first and last name in Excel is one of the most straightforward data-cleaning tasks you can do—and Excel gives you multiple ways to handle it, from simple formulas to built-in text-to-columns features.
Real talk: this skill saves hours on data entry and prevents embarrassing mail-merge disasters. Let’s walk through the methods that actually work, from the easiest approach to the more flexible formula-based solutions.
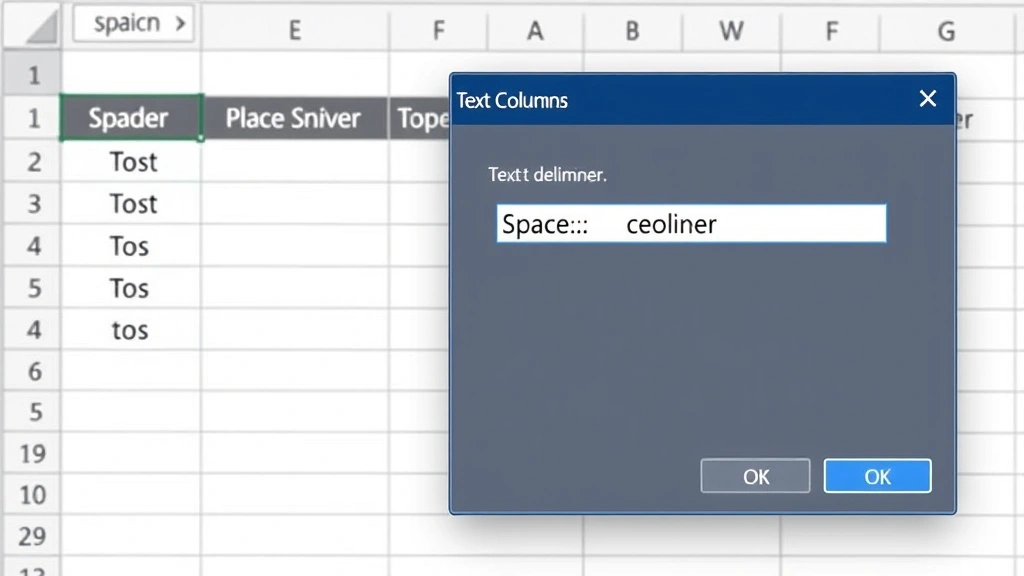
Using Text to Columns (The Fastest Method)
If your names are consistently formatted—like “FirstName LastName” with a space in between—the Text to Columns feature is your fastest route. This built-in Excel tool literally splits data into separate columns based on a delimiter (in this case, a space).
Here’s the step-by-step process:
- Select the column containing the full names. Click the column header to select the entire column, or highlight just the cells you need.
- Go to the Data tab in the ribbon.
- Click Text to Columns (it’s usually on the left side of the Data tab).
- The Text to Columns wizard opens. Choose Delimited (not Fixed Width) and click Next.
- On the next screen, uncheck “Tab” and check Space as your delimiter. You’ll see a preview at the bottom showing how your data will split.
- Click Next again, then Finish.
Excel splits the names into two columns instantly. The first name stays in the original column, and the last name appears in the column to the right. If there’s data already in that column, Excel will warn you—make room first by inserting a blank column.
Pro Tip: Text to Columns overwrites your original data. Always make a backup copy of your spreadsheet before using it, or copy your name column to a new sheet first. This is non-negotiable if you need to keep the original full names.
The beauty of this method? It’s instant and requires zero formulas. For simple, consistently-formatted names, nothing beats it.
Extract First Name with Formulas
If you want to keep your original data intact or need more control over the splitting logic, formulas are your answer. The formula approach is also essential when names don’t follow a standard format (like “Smith, John” or names with suffixes like “John Smith Jr.”).
For standard “FirstName LastName” format, use the LEFT and FIND functions:
=LEFT(A2,FIND(" ",A2)-1)
Here’s what this formula does:
- FIND(” “,A2) locates the position of the space in cell A2.
- LEFT(A2,FIND(” “,A2)-1) extracts everything from the left up to (but not including) that space.
Example: If A2 contains “Sarah Johnson”, FIND returns 6 (the position of the space), and LEFT extracts the first 5 characters: “Sarah”.
Step-by-step:
- Click on cell B2 (or wherever you want the first names to appear).
- Type the formula:
=LEFT(A2,FIND(" ",A2)-1) - Press Enter.
- Click B2 again, then drag the fill handle (small square in the bottom-right corner) down to copy the formula to all rows with data.
The formula fills down instantly, extracting first names from every row. This approach is safer because it doesn’t touch your original data—you can always delete the formula columns later if needed.
Safety Note: If any cells in your name column don’t contain a space, the formula will error out with #VALUE!. We’ll cover how to handle that in the advanced techniques section.
Extract Last Name with Formulas
Extracting the last name is slightly trickier because you need to find the space first, then grab everything after it. The RIGHT, LEN, and FIND functions work together here:
=RIGHT(A2,LEN(A2)-FIND(" ",A2))
Breaking it down:
- FIND(” “,A2) finds the position of the space.
- LEN(A2) counts the total characters in the cell.
- LEN(A2)-FIND(” “,A2) calculates how many characters come after the space.
- RIGHT(…) extracts that many characters from the right side.
Example: “Sarah Johnson” has 13 characters total. The space is at position 6. So 13 – 6 = 7 characters after the space, and RIGHT extracts “Johnson”.
To implement:
- Click on cell C2 (or your chosen column for last names).
- Type:
=RIGHT(A2,LEN(A2)-FIND(" ",A2)) - Press Enter and drag the fill handle down to all rows with data.
Now you have first names in column B and last names in column C, all derived from the full names in column A. Your original data stays untouched.
Advanced Techniques for Complex Names
Real-world data is messy. You might encounter:
- Names with multiple spaces (“Mary Anne Smith”)
- Last names with prefixes (“Van Der Berg”)
- Suffixes (“John Smith Jr.”, “Jane Doe, PhD”)
- Missing spaces or extra spaces
- Reversed formats (“Smith, John”)
Handling errors with IFERROR:
If your data is inconsistent, wrap your formula in IFERROR to prevent errors:
=IFERROR(LEFT(A2,FIND(" ",A2)-1),A2)
This says: “Try to extract the first name. If there’s no space and the formula fails, just return the whole cell value.” It’s a safety net for incomplete data.
For reversed names (“LastName, FirstName”):
Use this to extract the first name (which is after the comma):
=TRIM(RIGHT(A2,LEN(A2)-FIND(",",A2)))
The TRIM function removes leading spaces that often appear after a comma. For the last name, use:
=LEFT(A2,FIND(",",A2)-1)
For names with three or more parts (“Mary Anne Smith”):
This is where it gets complicated. Excel doesn’t have a built-in “second space” function, so you’d need to either:
- Use a more complex nested formula combining FIND and SUBSTITUTE to locate the second space.
- Manually clean the data first (decide: is “Mary Anne” the first name or is “Mary” the first and “Anne Smith” the last?).
- Use Power Query (Excel’s data transformation tool), which handles complex splitting more elegantly.
For most business use cases, the simple LEFT/RIGHT approach handles 90% of your data. The remaining 10% usually needs manual review anyway.
Common Mistakes and How to Avoid Them
Mistake #1: Not backing up before using Text to Columns.
Text to Columns is destructive—it overwrites your original data. Always copy your data to a new sheet or column first. A two-minute backup saves you from re-entering hundreds of names.
Mistake #2: Forgetting about extra spaces.
Sometimes names have double spaces (“John Smith” with two spaces). Your formulas will still work, but you’ll end up with empty strings or leading spaces. Use TRIM liberally:
=TRIM(LEFT(A2,FIND(" ",A2)-1))
Mistake #3: Assuming all names follow the same format.
Before you automate anything, scan through your data. Look for:
– Names without spaces
– Reversed formats
– Titles or suffixes
– Extra punctuation
A quick visual check prevents wasted time fixing formulas that don’t work on 5% of your data.
Mistake #4: Deleting the original full names too early.
Keep your original data column for at least a week after splitting. You’ll inevitably need to reference it or verify that the split worked correctly. Only delete it once you’re confident everything is right.
Workflow Tips for Larger Datasets
If you’re working with thousands of names, efficiency matters. Here’s a professional workflow:
Step 1: Assess your data.
Before touching anything, filter a sample of 50-100 names. Look for patterns and exceptions. This takes 10 minutes and saves you hours of rework.
Step 2: Choose your method.
– Text to Columns: Use if names are consistently “FirstName LastName” format with no exceptions.
– Formulas: Use if you need to preserve original data or have minor inconsistencies.
– Power Query: Use for complex, multi-format data or if you’ll repeat this task regularly.
Step 3: Work on a copy.
Save your original file as “OriginalData.xlsx” and work on “OriginalData_Working.xlsx”. This is non-negotiable for any data manipulation.
Step 4: Validate your results.
After splitting, use sorting and filtering to spot-check:
– Sort by last name and visually scan for odd entries.
– Filter for blank cells (indicates a splitting error).
– Check the longest and shortest names—they often reveal formatting issues.
According to Microsoft’s official Excel support documentation, validation is the most overlooked step, but it catches 90% of errors before they cause problems downstream.
Step 5: Consider freezing header rows.
Once your names are split, freeze the header row so you always know which column is which when scrolling. This is a small quality-of-life improvement that adds polish to your work.
Step 6: Lock down your work.
If others will use this spreadsheet, lock the rows containing your split names so accidental edits don’t corrupt the data.
For datasets with multiple variations in name format, consider using Power Query (available in Excel 2010 and later), which lets you build reusable splitting rules without formulas. It’s overkill for small datasets but invaluable if you’re processing names regularly.
Frequently Asked Questions
What if my names don’t have a space between first and last?
– Your formulas will error out. You’ll need to manually add spaces or use a different delimiter. If names are formatted like “JohnSmith” (no space), you’d need additional logic to identify where the first name ends. This usually requires manual review or a more complex formula. Consider reaching out to whoever provided the data to get it reformatted first.
Can I use Text to Columns on a column with data already in the adjacent column?
– No. Text to Columns will overwrite whatever’s in the column to the right. Insert a blank column first to make room. Right-click on the column header and select “Insert” to add a blank column without losing data.
How do I handle middle names?
– The simple LEFT/RIGHT approach treats “Mary Anne Smith” as first name “Mary” and last name “Anne Smith”. If you need to separate middle names too, you’d need a more complex formula or manual intervention. For most databases, “Mary Anne” is treated as the first name and “Smith” as the last—decide based on your use case.
What’s the difference between FIND and SEARCH?
– FIND is case-sensitive; SEARCH is not. For splitting names, FIND is typically better because you’re looking for a space character, which has no case sensitivity. Use SEARCH if you’re looking for letters and want to ignore uppercase/lowercase differences.
Can I undo Text to Columns if I make a mistake?
– Yes, immediately. Press Ctrl+Z (or Cmd+Z on Mac) right after running Text to Columns to undo it. But if you’ve closed the file or done other work, you can’t undo. This is why backing up first is critical.
How do I handle names with suffixes like “Jr.” or “Sr.”?
– Your basic formula will include the suffix in the last name (“Smith Jr.”). If you need to separate it, you’d need to add additional logic to strip out common suffixes. For most purposes, leaving the suffix with the last name is acceptable. If you need precision, consider using SUBSTITUTE to remove common suffixes: =SUBSTITUTE(LastName," Jr.","").
Is there a limit to how many rows I can split with formulas?
– No practical limit. Excel can handle millions of rows, though performance slows significantly above 100,000 rows. If you’re working with that much data, consider using Power Query or a database tool instead.
Can I automate this for recurring data imports?
– Yes. If you import names regularly, build a Power Query rule that splits names automatically each time you refresh the data. Set it up once, then it works on autopilot. This is worth the 30-minute setup time if you’re doing this weekly or monthly.
What if I need to wrap text after splitting to make the columns fit better?
– After splitting your names, you can apply text wrapping to make narrow columns display the full names. Select your columns, go to the Home tab, and click “Wrap Text”. This is purely cosmetic but makes your spreadsheet easier to read.
Can I use a dropdown to select how to split names?
– You could build a dropdown in Excel that lets users choose between different splitting methods, but it’s overly complex for this task. Stick with formulas or Text to Columns—both are straightforward enough that a dropdown adds unnecessary complication.