
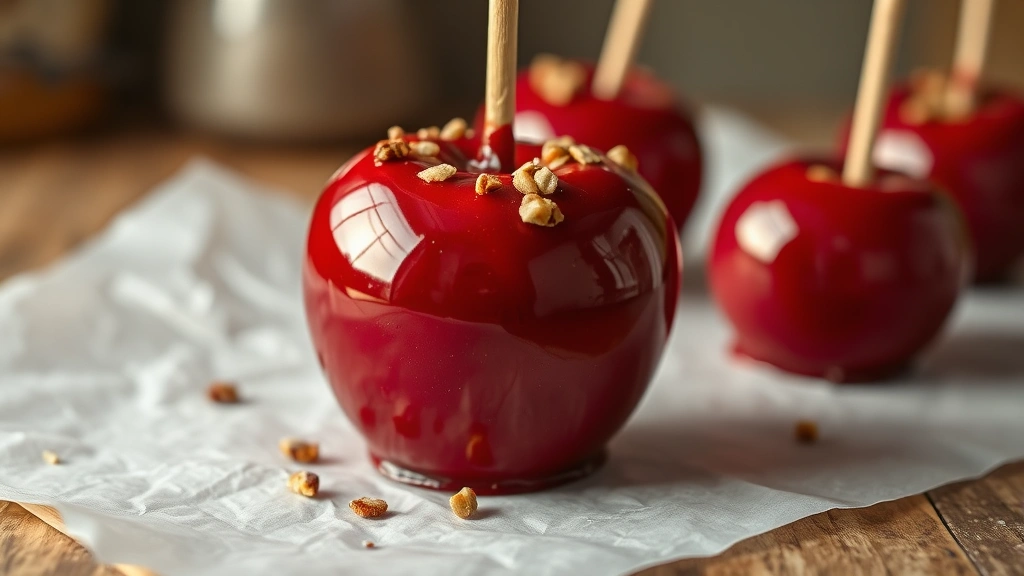
Candy apples look like magic on a stick—that glossy, jewel-toned shell that cracks when you bite into it, revealing crisp apple underneath. But here’s the real talk: making candy apples is one of those kitchen projects that can go sideways fast if you don’t know what you’re doing. Burnt sugar, seized coating, apples that slide off the stick, and burns that’ll make you regret everything—these are the nightmares that happen when people skip the fundamentals.
The good news? Once you understand how to make candy apples properly, it’s actually straightforward. This guide walks you through every step, from picking the right apples to troubleshooting when things go wrong. We’re talking food safety, temperature control, and pro techniques that separate “pretty decent” from “people will actually want to eat this.”
Choosing and Prepping Your Apples
Start with the right apple, and you’re halfway there. You want firm, tart apples—think Granny Smith, Honeycrisp, or Pink Lady. Avoid soft varieties like Red Delicious or Gala; they’ll get mushy and won’t hold up to the hot candy coating. Room-temperature apples are essential because cold apples will shock the hot candy and cause it to set unevenly or crack.
Here’s what most people miss: washing and drying. Use warm water and a vegetable brush to scrub off the waxy coating that manufacturers apply. That coating prevents the candy from sticking properly. After washing, dry thoroughly with paper towels—any moisture will make the candy seize up like concrete. Some folks use a tiny dab of lemon juice on a cloth to polish the apple; that extra acid helps the candy grip better.
Remove the stem if you want, but I’d recommend keeping it on and wrapping it in foil. The stick goes through the core, and a stem gives you a natural handle. If you remove the stem, drill a hole about an inch deep into the apple’s top with a skewer or small drill bit. Make sure your sticks (lollipop sticks, wooden dowels, or sturdy popsicle sticks) are at least 5 inches long and inserted about 2 inches deep. A loose stick means a spinning apple mid-dip.
Pro Tip: Let prepped apples sit at room temperature for 30 minutes before dipping. This ensures even coating and reduces the risk of the candy cracking as it cools.
Essential Equipment and Safety Setup
You’re working with sugar heated to 300°F+. That’s hotter than boiling water and way more dangerous because it sticks to skin. Respect the heat, and you’ll be fine. Ignore it, and you’re looking at serious burns.
Here’s what you need:
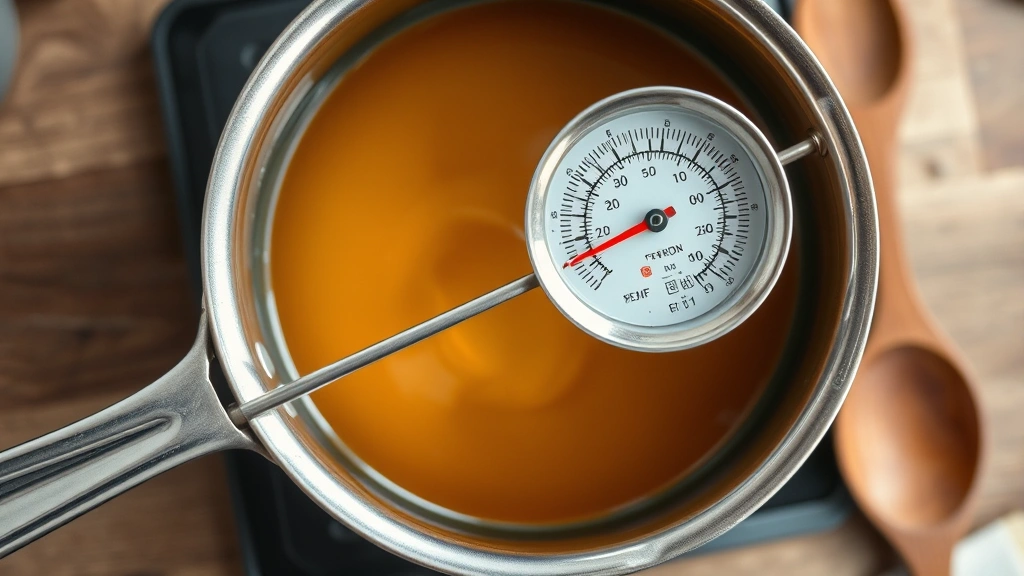
- Candy thermometer (non-negotiable)—clip it to the side of your pot so the bulb doesn’t touch the bottom
- Heavy-bottomed saucepan (2-3 quart capacity)—thin pans create hot spots and burnt sugar
- Wooden spoon for stirring—metal conducts heat and gets too hot to hold
- Shallow dish or small pot for dipping—wider is better than deep so you can coat the apple fully
- Parchment paper or silicone mat on a baking sheet for cooling
- Heat-resistant gloves and long sleeves—non-negotiable
- Kitchen safety gear including an apron that covers your legs
Set up your workspace before you start cooking. Have your apples prepped and on sticks, your cooling sheet ready with parchment, and a glass of ice water nearby (not for drinking—for emergency cooling if you splash hot sugar on yourself). Keep kids and pets out of the kitchen during the cooking process.
When you’re actually dipping, move deliberately. No rushing, no sudden movements. If sugar splatters, don’t panic—just step back. Once it cools, it’s harmless.
The Candy Coating: Temperature and Technique
This is where most homemade candy apples fail. The candy coating needs to reach exactly the right temperature—not too cool (it’ll be gummy), not too hot (it’ll be brittle and taste burnt). You’re aiming for the “hard-crack stage,” which is 300-310°F on a candy thermometer.
The basic formula is simple: 2 cups sugar, ¾ cup light corn syrup, ¾ cup water, and ½ teaspoon cream of tartar. The cream of tartar prevents crystallization—skip it and your coating will be grainy. Some people add ½ teaspoon vanilla or ¼ teaspoon cinnamon here for flavor, but honestly, the toppings are where the real flavor happens.
Combine ingredients in your saucepan and stir over medium heat until the sugar dissolves. Once it starts boiling, stop stirring. Seriously. Stirring introduces air bubbles and can trigger crystallization. Just clip your thermometer and watch. The mixture will go from clear to pale amber to deep amber. That’s your visual cue, but always use the thermometer—color can be deceiving depending on your lighting.
This takes 10-15 minutes. Don’t walk away. When it hits 300-310°F, remove it from heat immediately. If it goes to 320°F, it’ll taste burnt. If it stays below 300°F, the coating won’t set properly.
Safety Warning: Never touch the mixture to test it. A candy thermometer is the only safe way to gauge temperature. Molten sugar will stick to your skin and cause severe burns. If you don’t have a candy thermometer, reliable kitchen resources recommend not attempting candy making.
Once the candy reaches temperature, work fast. You have maybe 2-3 minutes before it starts to set and become too thick to dip. If it does thicken, you can warm it gently over low heat for 10-15 seconds, but this risks re-burning it. That’s why speed matters.
Step-by-Step: How to Make Candy Apples
Now let’s walk through the actual process:
- Prep everything first. Apples on sticks, cooling sheet with parchment ready, toppings in small bowls, heat-resistant gloves on. No improvising mid-dip.
- Combine your sugar mixture in the saucepan: 2 cups sugar, ¾ cup corn syrup, ¾ cup water, ½ teaspoon cream of tartar. Stir gently over medium heat until sugar dissolves—about 2-3 minutes.
- Stop stirring and clip your thermometer. Let the mixture bubble away. This takes 10-15 minutes. Resist the urge to stir.
- Watch the thermometer like a hawk. When it hits 300-310°F, remove from heat immediately. The mixture should be amber-colored and smell sweet, not burnt.
- Let it cool for exactly 30 seconds. This prevents the coating from being so hot that it slides right off the apple. Too long and it’ll be too thick to coat smoothly.
- Dip the apple quickly in one smooth motion—down, twist to coat, and up. The whole thing takes 2-3 seconds. Work fast because the coating is setting as it cools.
- Rotate the apple to let excess candy drip off, then place it stick-up on your parchment-lined sheet. The coating will continue to set for 10-15 minutes.
- Add toppings immediately if you want them to stick. Sprinkles, crushed nuts, or candy bits need to go on before the coating fully hardens.
- Let cool completely before moving or eating. This takes about 30-45 minutes at room temperature.
If you’re making a big batch, work in smaller numbers (3-4 apples at a time) rather than trying to coat a dozen while the candy is still workable. It’s better to reheat the candy between batches than to rush and mess up your coating.
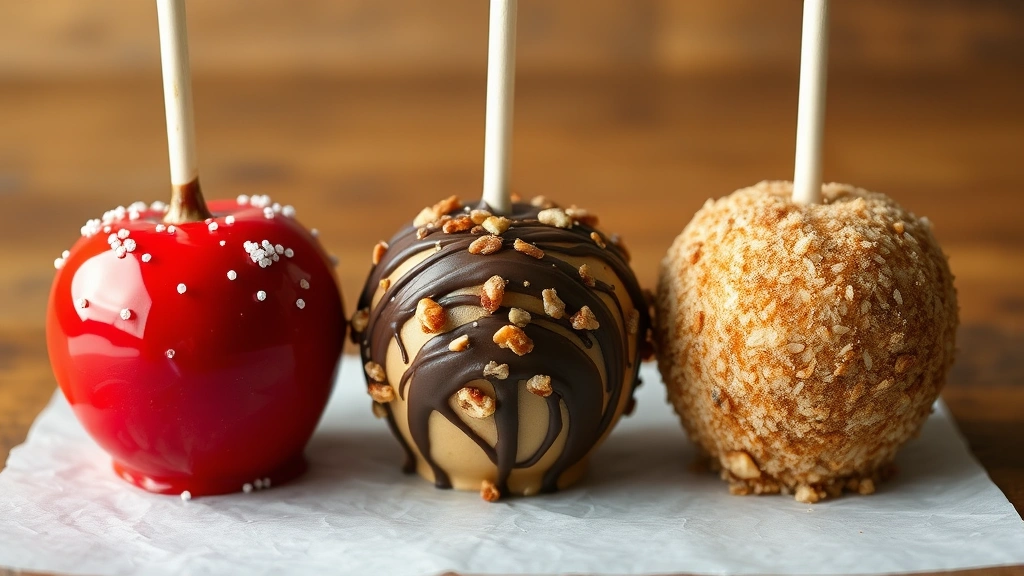
Flavor Variations and Toppings
Plain candy apples are great, but the real fun is in the variations. Here’s where you can get creative without compromising the technique:
- Caramel apples: Make the coating with 1 cup sugar, ½ cup butter, ½ cup heavy cream, and ¼ teaspoon salt. This creates a softer, chewier coating. Temperature is still important—aim for 248°F (soft-crack stage) instead of hard-crack.
- Cinnamon candy apples: Add 1 teaspoon cinnamon to your basic recipe. It won’t affect the cooking temperature or technique.
- Chocolate-dipped: Make your basic candy apple, let it cool, then dip the bottom third in melted dark chocolate. The contrast of textures is incredible.
- Crushed candy toppings: Crush hard candies (lollipops, butterscotch discs, rock candy) into small pieces and sprinkle on immediately after dipping. They’ll partially dissolve into the coating and create pockets of flavor.
- Nut coatings: Finely chop roasted almonds, pecans, or peanuts and sprinkle generously. Toast them first for deeper flavor.
- Sprinkle combinations: Use colored sprinkles, pearl sugar, or edible glitter. Apply while the coating is still tacky (within 10 seconds of dipping).
If you want to infuse flavor into the candy itself, add extracts or oils after removing from heat. A few drops of peppermint extract, almond extract, or even apple flavoring can work. But be careful—too much and the flavor becomes artificial-tasting. Start with ¼ teaspoon and taste a tiny amount on a spoon before dipping.
Pro move: Make a “test apple” first. Dip one, add your toppings, and taste it before committing to a full batch. Flavor adjustments are easy on the first apple, annoying on the tenth.
Storage and Shelf Life
Candy apples are best eaten fresh—ideally within 24 hours. The coating stays crisp, the apple stays firm, and everything tastes optimal. After that, the apple starts to soften and the coating can get sticky if humidity is high.
If you need to store them, wrap each apple individually in parchment paper (not plastic wrap, which traps moisture) and keep them in an airtight container in a cool, dry place. A pantry or cool cupboard works better than the refrigerator. Cold temperatures make the coating sweat and become sticky.
Properly stored, they’ll last 3-5 days, but honestly, they’re not great by day three. The apple inside starts to oxidize and brown, and the coating loses its snap. If you’re making these for an event, make them the day before and store them as described above.
Can you freeze them? Technically yes, but it’s not recommended. The coating can crack when thawed, and the apple texture suffers. If you absolutely must freeze them, wrap tightly in plastic wrap and then foil, and thaw at room temperature (don’t open the wrapping until fully thawed, or condensation will make them soggy).
Common Problems and Fixes
Coating slides off the apple: This happens when the apple is too cold or the candy is too hot. Let your apples warm to room temperature and wait 30 seconds after removing the candy from heat before dipping. Also make sure your apples are clean and dry—any moisture or waxy residue prevents adhesion.
Coating is grainy or crystallized: You either stirred after the mixture started boiling, or you didn’t use cream of tartar. There’s no fix once it’s crystallized. Start over. Next time, add the cream of tartar and don’t stir after boiling.
Coating is too thick to dip: The candy cooled too long before you started dipping. Reheat it gently over low heat for 10-15 seconds, stirring constantly. Be careful not to over-heat it or it’ll burn.
Coating tastes burnt: The temperature went above 320°F, or you left it on heat too long. Use a candy thermometer and remove immediately when it hits 310°F. If it happens, there’s no saving that batch—start fresh.
Apple slides around on the stick: Your stick isn’t inserted deep enough, or the hole was drilled too loosely. Next time, insert the stick at least 2 inches into the apple and make sure it’s snug. If it’s loose, remove the stick, fill the hole with a tiny bit of peanut butter or caramel, and re-insert.
Toppings won’t stick: You waited too long to apply them. Sprinkles and nuts need to go on within 10 seconds of dipping, while the coating is still tacky. If you miss that window, they’ll just fall off.
Coating is too hard and brittle: Temperature was too high (over 315°F). Aim for 300-310°F next time. If it’s already made, there’s no fix—eat it anyway (it’ll still taste good) or start over.
Coating is too soft and gummy: Temperature was too low (under 295°F). You need to hit that hard-crack stage. Use a reliable candy thermometer and wait for 300-310°F.
Pro Tip: Keep a notebook of your batches. Write down the exact temperature, timing, and any adjustments. Over time, you’ll dial in your technique and stop guessing.
According to trusted home and kitchen experts, the most common reason candy apples fail is impatience—either rushing the temperature climb or not waiting long enough for proper cooling. Slow and steady wins this race.
If you’re interested in working with apples in other ways, learning how to make apple cider is a great complementary skill. Both involve understanding fruit prep and timing, though cider is a much longer, slower process.
Frequently Asked Questions
Can I use a regular thermometer instead of a candy thermometer?
– No. Regular kitchen thermometers max out around 212°F, and you need to reach 300-310°F. A candy thermometer is inexpensive (usually under $10) and essential. Safety standards exist around food preparation temperatures for a reason.
What if I don’t have corn syrup?
– Corn syrup prevents crystallization, but you can substitute with honey or glucose syrup in a 1:1 ratio. The coating might be slightly grainier, but it’ll still work. Some people use light brown sugar instead of white sugar for a caramel-like flavor, though this also increases crystallization risk.
Can I make candy apples ahead of time?
– Yes, but not far ahead. Make them the day before and store in an airtight container in a cool, dry place. Beyond 24 hours, the apple starts to deteriorate and the coating gets sticky. For events, make them the morning of if possible.
Why do my apples get sticky after a few hours?
– Humidity. If your kitchen or storage area is humid, moisture gets trapped under the coating and makes it sticky. Store in an airtight container in a dry place, or use a dehumidifier if you live somewhere really humid. Some people add a packet of food-grade silica gel to the storage container to absorb moisture.
Can I use green apples instead of red?
– Absolutely. Granny Smith apples are actually ideal for candy apples because they’re tart, firm, and the green color contrasts beautifully with red or dark candy coatings. Red apples are more traditional-looking, but green works great.
Is the coating safe for people with nut allergies?
– The basic candy coating itself is nut-free, but if you’re adding toppings, be careful. Crushed nuts are a common topping. If you’re making these for someone with allergies, skip the nuts and use sprinkles or crushed hard candies instead. Always declare ingredients if you’re giving these as gifts.
Why does my coating keep cracking?
– Cracking usually means the apples were too cold when you dipped them, or the candy was too hot. Let apples come to room temperature and wait the full 30 seconds after removing candy from heat. Also, avoid moving the apples while the coating is setting—let them sit still for 10-15 minutes.
Can I re-melt leftover candy coating?
– Yes, if you stored it in an airtight container. Reheat gently over low heat, stirring constantly. It might be slightly grainier the second time around (especially if it’s been sitting), but it’ll work. If it’s crystallized, it’s done for—don’t bother trying to salvage it.


