

Let’s be real—dropping $6 on a caramel macchiato every morning adds up fast. If you’re tired of the coffee shop line and want to learn how to make a caramel macchiato that actually tastes like the real deal, you’re in the right place. This isn’t some fancy barista magic. It’s a straightforward technique that takes about 5 minutes once you nail the fundamentals.
A caramel macchiato is espresso “marked” with steamed milk and topped with a caramel drizzle. The name comes from the Italian word “macchiato,” which literally means “marked” or “stained.” What makes it different from a latte or cappuccino is the ratio and the layering—you’re building flavor in a specific order, not just throwing everything together.
Equipment You Actually Need
Here’s the thing about making a caramel macchiato at home: you don’t need a $3,000 espresso machine to start. But you do need the right tools, and there’s a meaningful difference between “good enough” and “actually tastes great.”
Espresso Machine (or Moka Pot): If you’re serious about how to make a caramel macchiato, an espresso machine is the gold standard. Even entry-level machines ($200–$400) produce real espresso with proper crema. If that’s out of budget, a Moka pot ($25–$50) brews strong coffee that approximates espresso, though it won’t have the same pressure or crema. It’s honestly a solid backup.
Milk Frother: This is non-negotiable. You need steam to heat and aerate the milk. Handheld electric frothers ($20–$40) work, but a steam wand on an espresso machine gives you way more control. If you go the handheld route, get one with a whisk design, not just a vibrating rod.
Grinder: Invest here. A burr grinder (not a blade grinder) is the difference between “meh” and “wow.” Blade grinders crush beans unevenly, leading to inconsistent extraction. A decent burr grinder runs $50–$150 and will last years. Family Handyman’s kitchen gadget roundup has some solid recommendations if you’re shopping.
Milk Pitcher: Get a stainless steel pitcher (12–20 oz). The metal conducts heat evenly, and you need one with a spout designed for pouring latte art (even if you’re not doing art, the shape helps control the pour).
Scale (Optional but Smart): If you’re serious about consistency, a small kitchen scale ($15–$30) helps you dial in espresso dose and milk weight. Not essential, but it removes guesswork.
Thermometer (Optional): A milk thermometer ($10–$20) helps you nail the steaming temperature (around 150–155°F is ideal). After a few weeks, you’ll feel the pitcher heat and won’t need it, but it’s helpful early on.
Choosing the Right Coffee Beans
The coffee you choose directly impacts how your caramel macchiato tastes. This isn’t snobbery—it’s just how flavor works.
Roast Level Matters: For a caramel macchiato, you want a medium to medium-dark roast. Light roasts taste too acidic and thin when mixed with milk and caramel. Dark roasts can taste burnt or ashy. Medium roasts hit the sweet spot—they have body and sweetness that plays well with caramel.
Freshness is King: Coffee beans are freshest 5–30 days after roasting. Check the bag for a roast date (not an expiration date). Stale beans taste flat and dull. Buy from local roasters if possible, or order online from reputable sources. Beans that are too fresh (1–3 days old) can be hard to extract evenly, so there’s actually a sweet spot.
Bean Origin: Different origins bring different flavors. Brazilian beans tend to be chocolatey and sweet—perfect for caramel macchiatos. Colombian beans are balanced with slight fruit notes. Ethiopian beans are floral and tea-like. For this drink, stick with Brazilian or Colombian for predictable, caramel-friendly flavors.
Whole Beans vs. Pre-Ground: Always buy whole beans and grind them yourself, right before brewing. Pre-ground coffee loses volatile aromatics within minutes of grinding. It’s like the difference between fresh-squeezed orange juice and juice from concentrate.
A good starting point: buy a 12 oz bag of medium roast from a local roaster, ask them what works well in milk-based drinks, and go from there.
Pulling the Perfect Espresso Shot
This is where precision matters. Espresso is all about pressure, temperature, and timing working together.
Grind Size: Espresso requires a very fine, consistent grind—finer than pour-over but not powder-fine. If your grind is too coarse, water rushes through and you get weak, sour espresso (under-extraction). Too fine, and the water can’t push through; you get bitter, slow shots (over-extraction). Start with your grinder’s espresso setting and adjust from there.
Dosing: Most single shots use 18–20 grams of ground coffee. Double shots use 36–40 grams. For a caramel macchiato, a double shot (2 oz) is standard. If you don’t have a scale, most espresso baskets have marked lines. Fill to the line.
Tamping: After grinding, tamp the grounds into the portafilter with even, firm pressure. Think of it like packing down sand—you want consistent density, not a crater in the middle. Use about 30 pounds of pressure (it’s less than you think). Uneven tamping causes water to channel through weak spots, resulting in sour shots.
Extraction Time: A proper espresso shot pulls in 25–30 seconds from the moment water hits the grounds. If it’s faster, your grind is too coarse or your tamp is too light. If it’s slower, adjust the opposite way. The first few drops should be dark and syrupy; the last drops lighter. This “golden ratio” is what you’re chasing.
Crema: That golden-brown foam on top is crema—it’s emulsified oils and dissolved solids. It’s a sign of good extraction. If you’re getting little to no crema, your beans might be stale, your grind might be off, or your machine’s pressure might be weak.
Pro Tip: Espresso machines need a warm-up period (5–10 minutes) before pulling shots. The group head (where the portafilter attaches) needs to reach the right temperature. Some machines have indicator lights; others you just have to know. Run a blank shot (no grounds) to purge cold water before your first real shot.
Steaming Milk Like a Pro
Steaming milk is a skill that takes practice, but once you get it, it becomes muscle memory. The goal is to heat the milk while creating microfoam—tiny, velvety bubbles that integrate into the milk rather than sitting on top as big, chunky foam.
Milk Choice: Whole milk froths best because of its fat content and protein structure. It creates dense, silky microfoam. 2% milk works fine too. Skim milk froths but can taste thin. Non-dairy milks (oat, almond, soy) have become better in recent years; oat milk actually froths quite well. Whatever you choose, use cold milk straight from the fridge.
Pitcher Technique: Fill your pitcher about one-third full with cold milk. Position the steam wand just below the surface of the milk, angled slightly. Turn on the steam and listen for a gentle hissing sound—that’s the sweet spot. If it’s too loud (screaming), the wand is too high and you’re creating big bubbles. Too quiet, and it’s too deep; you’re just heating without aerating.
The Two Phases: First phase (5–10 seconds): Keep the wand near the surface to aerate and create microfoam. You’ll see the milk level rise and hear that gentle hiss. Second phase: Submerge the wand deeper and angle the pitcher to create a whirlpool. This integrates the foam and heats the milk evenly. Stop when the pitcher is too hot to hold (around 150–155°F).
Common Mistakes: Plunging the wand too deep from the start creates no foam and just heats milk. Holding it too high creates big, wet bubbles that don’t integrate. Steaming too long makes the milk too hot and kills its sweetness. Steaming too short leaves it lukewarm.
Pro move: practice with a thermometer first. Once you feel the pitcher heat at the right temperature, you won’t need it. Most people dial this in after 10–15 attempts.
Milk Pitcher Maintenance: Steam wands get gunked up fast. Purge the wand immediately after steaming by turning on the steam for a second with no pitcher attached. Then wipe it with a damp cloth. At the end of your session, soak the wand in hot water for a minute or two. Clean equipment makes better milk.
Assembly: The Caramel Macchiato Build
Now for the actual drink. This is where you understand why it’s called a “macchiato.”
- Pour the caramel: Add 1–2 tablespoons of caramel sauce to the bottom of your cup (usually 10–12 oz). Some people warm the caramel slightly so it mixes better, but cold caramel works fine. This is your flavor foundation.
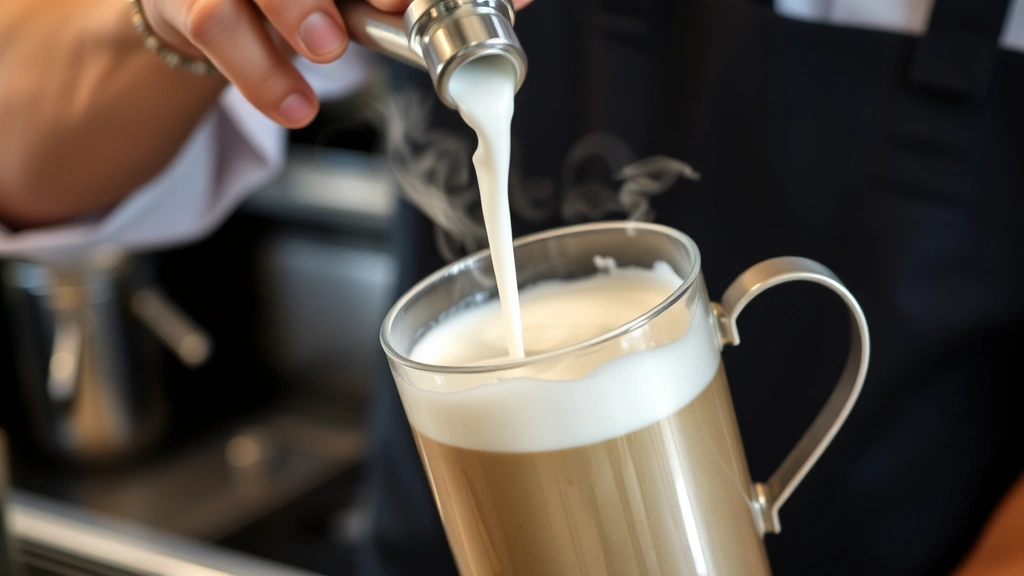
- Add steamed milk: Pour your steamed milk into the cup, filling it about 3/4 of the way. The milk should still have that glossy, integrated microfoam—not a pile of bubbles on top. This is different from a cappuccino, which has more foam.
- Pull your espresso shot: While the milk is still hot, pull a double shot of espresso directly into the cup. The espresso will cut through the milk and caramel, creating that signature “marked” effect. The hot espresso will also slightly heat the milk if it’s cooled a bit.
- Top with foam (optional): If you have a bit of microfoam left in your pitcher, pour a small amount on top. This gives you a nice visual separation and a bit of texture.
- Drizzle caramel on top: Finish with a caramel drizzle across the top. Use a spoon to control the flow, or buy a squeeze bottle for neater application. This is purely visual and adds a bit more caramel flavor in each sip.
The whole assembly takes 30 seconds. The drink should be about 2 oz espresso, 8–10 oz steamed milk, and caramel throughout.
Real Talk: The order matters. Caramel first, then milk, then espresso. If you reverse it, the espresso won’t “mark” the milk the same way, and the drink tastes different. It’s not wrong, just different. Experiment and see what you prefer.
Common Mistakes and How to Fix Them
Espresso Tastes Sour: Your shot is under-extracted. Either your grind is too coarse, your tamp is too light, or you’re not using enough coffee. Try a finer grind or more coffee. Also, make sure your machine is fully heated up.
Espresso Tastes Bitter or Burnt: Over-extraction. Your grind is too fine, your tamp is too hard, or you’re pulling the shot too long (over 30 seconds). Coarsen the grind slightly and try again.
Milk Won’t Froth: Your wand is probably clogged. Soak it in hot water and use a thin needle to clear the small holes. Also, make sure you’re using cold milk and positioning the wand correctly (just below the surface).
Milk is Scorched or Tastes Burnt: You steamed it too long or too hot. Milk starts to scorch around 160°F. Aim for 150–155°F and stop immediately. Also, make sure you’re not holding the pitcher in one spot—create that whirlpool to distribute heat evenly.
Caramel Sinks to the Bottom: This is actually normal. The caramel is denser than milk. Some people stir it in; others let it settle and swirl it as they drink. There’s no “wrong” way, just preference.
Drink Tastes Watery: Your espresso is weak (under-extracted) or you’re using too much milk. Try adjusting your espresso first—finer grind, more coffee, or firmer tamp. If the espresso is solid, use slightly less milk.
Drink is Too Sweet: Use less caramel sauce, or skip the top drizzle and just keep the caramel at the bottom. You can also try a darker roast coffee, which has more natural bitterness to balance sweetness.
Flavor Variations Worth Trying
Once you nail the basic caramel macchiato, here are some fun tweaks:
Salted Caramel: Use salted caramel sauce instead of regular. The salt cuts through the sweetness and adds complexity. It’s genuinely better than plain caramel.
Vanilla Caramel: Add 1/2 teaspoon of vanilla extract to your caramel sauce, or use vanilla syrup. It adds warmth without being over the top.
Iced Version: Pull your espresso shot over ice, add cold milk and caramel, and skip the steaming. It’s refreshing in warm months and honestly easier to make.
Extra Shot: If you like your coffee stronger, pull three shots instead of two. You’ll get more espresso flavor and less sweetness from the caramel ratio.
Cinnamon Caramel: Add a pinch of cinnamon to your caramel sauce or sprinkle it on top. Pairs surprisingly well with caramel and espresso.
Affogato Style: Pour the espresso over vanilla ice cream, then add steamed milk and caramel. It’s dessert and coffee in one.
The beauty of making your own caramel macchiato is that you can adjust sweetness, coffee strength, and milk texture to your exact preference. Coffee shops make one version; you make yours.
Keeping Your Equipment in Shape
Your espresso machine and grinder are investments. Take care of them, and they’ll last years.
Espresso Machine: Run water through the group head daily to clear out old grounds and oils. Use a blind basket (no holes) and run the pump for a few seconds, then turn it off and repeat. This backflushes the group head. Once a week, soak the shower screen and basket in hot water with a cleaning tablet designed for espresso machines (like Cafiza). Follow your machine’s manual for specific cleaning steps.
Grinder: Don’t wash the burrs or internals. Instead, run a grinder cleaning tablet (like Grindz) through it monthly to clear out old coffee oils and particles. This keeps the grind consistent and prevents rancid flavors.
Milk Pitcher: Wash immediately after use. Milk proteins dry fast and are hard to remove later. Use hot soapy water and a cloth.
Descaling: Every month or two (depending on your water hardness), run a descaling solution through your machine. Hard water leaves mineral deposits that clog the heating element and affect temperature stability. This Old House’s water filter guide can help you choose filtered water, which reduces descaling frequency.
Regular maintenance takes 5 minutes a day and prevents expensive repairs.
Now, you might be wondering about the other internal links we mentioned earlier. While how long to steam broccoli and how to clean stainless steel appliances aren’t directly related to espresso, keeping your kitchen clean and organized (including your espresso machine’s stainless steel exterior) is part of the home coffee experience. Similarly, if you’re upgrading your kitchen setup, you might explore how to install a ring doorbell for home security, or even how to become a model if you’re thinking about monetizing your coffee skills on social media.
Frequently Asked Questions
Can I make a caramel macchiato without an espresso machine?
– Yes, but it won’t be exactly the same. A Moka pot brews strong coffee that approximates espresso. Use 2–3 oz of Moka pot coffee, 8–10 oz steamed milk, and caramel. It’ll taste good, just slightly different in texture and crema. Alternatively, use very strong brewed coffee (like a French press) as a substitute, though the flavor profile shifts without true espresso.
How much caramel should I use?
– Start with 1–2 tablespoons at the bottom and a small drizzle on top. Adjust based on taste. If you find yourself wanting less sweetness, reduce the amount or skip the top drizzle. Some people use caramel syrup instead of sauce, which is thinner and easier to control.
What’s the difference between a caramel macchiato and a caramel latte?
– A macchiato has less milk (more espresso-forward) and the espresso is added after the milk, creating visible separation. A latte has more milk and is more uniform in flavor. A macchiato is roughly 1 part espresso to 3 parts milk; a latte is 1 part espresso to 4+ parts milk. Taste both and see which you prefer.
Can I use instant espresso powder instead of pulling shots?
– You can, but it won’t taste as good. Instant espresso powder is convenient but lacks the complexity and crema of real espresso. If you’re in a pinch, dissolve 1–2 teaspoons in a little hot water and add it to your steamed milk. It’s not ideal, but it works.
How long does an espresso machine last?
– A decent entry-level machine (with proper maintenance) lasts 5–10 years. Higher-end machines last 10–15+ years. Regular cleaning and descaling are key. If you’re not willing to maintain it, don’t buy one.
Is oat milk good for caramel macchiatos?
– Yes, modern oat milk froths well and has a natural sweetness that pairs nicely with caramel. Barista-blend oat milks are specifically designed to steam and froth. Regular oat milk can be watery, so check the label.
Why does my homemade caramel macchiato taste different from the coffee shop version?
– Several reasons: different beans, different water (mineral content affects extraction), different machine temperature, or different caramel sauce brand. Coffee shops also use commercial-grade equipment and have dialed-in recipes over years. Your version will taste different—sometimes better, sometimes just different. Keep tweaking until it’s exactly how you like it.
Can I make a caramel macchiato in advance?
– Not really. Espresso is best within 30 seconds of pulling. Milk foam breaks down after a few minutes. The drink is meant to be consumed fresh. You can prep the caramel in your cup ahead of time, but pull the espresso and steam the milk right before drinking.

What’s the best water to use for espresso?
– Filtered water is ideal. Tap water works, but if your water is very hard or has chlorine, it’ll affect flavor and cause mineral buildup in your machine. A simple pitcher filter or reverse osmosis system is worth the investment. Avoid distilled water—it can actually damage some machines.
How do I know when my espresso machine is fully heated up?
– Most machines have a light that turns off when ready. If yours doesn’t, run a blank shot (no grounds) and feel the water temperature with your hand (carefully). It should be hot but not boiling. Typically 5–10 minutes after turning on the machine is safe.


