
Water damage is one of those silent killers in home maintenance. You don’t notice it until the rot starts, and by then you’re looking at thousands in repairs. The truth? Learning how to install gutters is one of the best investments you can make in your home’s longevity. Whether you’re replacing old, sagging gutters or installing them for the first time, this guide walks you through the entire process—no contractor markup required.
Why Gutters Matter (More Than You Think)
Most homeowners don’t think about gutters until they’re overflowing or pulling away from the house. But here’s the real talk: gutters are your home’s first line of defense against water damage. Without them, rainwater runs straight down your siding, pools around your foundation, and eventually finds its way into your basement or crawl space.
The cost of how to install gutters yourself—maybe $300–$800 depending on your home’s size—is a fraction of what you’d pay for foundation repair or mold remediation. Plus, properly installed gutters protect your landscaping, prevent erosion around your home, and keep your fascia and soffit from rotting.
According to Family Handyman’s gutter installation guide, most homeowners can tackle this project in a weekend with the right approach. The key is understanding the fundamentals: slope, support, and sealant.
Pro Tip: A properly installed gutter system should slope toward the downspout at a rate of about 1/2 inch per 10 feet. Too much slope looks bad; too little and water pools and becomes a mosquito breeding ground.
Tools & Materials You’ll Need
Before you climb that ladder, gather your gear. You don’t need fancy equipment—just the essentials.
Tools:
- Extension ladder (16–20 feet, depending on roof height)
- Tape measure and chalk line
- Hacksaw or power miter saw (for cutting gutter sections)
- Drill with bits
- Caulking gun
- Screwdriver (cordless is faster)
- Torpedo level
- Work gloves and safety glasses
- Bucket for carrying materials up the ladder
Materials:
- Aluminum or steel gutter sections (K-style is most common)
- Gutter hangers or brackets (spacing depends on gutter type, typically 24 inches apart)
- Downspout sections and elbows
- End caps and inside/outside corners
- Gutter sealant or silicone caulk (aluminum-compatible)
- Fasteners (galvanized screws or nails, depending on your hanger type)
- Gutter strainers or screens (optional but highly recommended)
Measuring & Planning Your System
This is where most DIYers stumble. You can’t just eyeball it. Measure twice, buy once.
Step 1: Determine Total Gutter Length
Walk around your home with a tape measure and note the length of each roof edge where gutters will run. Don’t forget corners and any sections where the roofline changes. Add up the total.
Step 2: Identify Downspout Locations
Downspouts should be placed at the lowest points of your gutter run. As a rule, one downspout per 30–40 feet of gutter is standard. For a typical single-story home, you might have 4–6 downspouts.
Step 3: Check for Obstacles
Look for roof penetrations (vents, chimneys), overhanging branches, and electrical lines. You’ll need to work around these, and they might affect hanger placement.
Step 4: Plan Your Slope
Using a level and chalk line, mark where your gutter will sit. Remember: 1/2 inch drop per 10 feet of run. If you have a 40-foot run, your downspout end should be 2 inches lower than your starting point. This isn’t a visual thing—you need to measure it.
Safety Warning: Never work on a ladder alone. Have someone spot you, and always maintain three points of contact on the ladder (two hands, one foot, or vice versa). Falling from a ladder is one of the most common home injuries.
Prep Work: Getting Your Roof Ready
Before you hang a single bracket, prep your fascia board. This is the horizontal board that runs along the edge of your roof—the surface your gutters will attach to.
Clean the Fascia
Remove any old gutter debris, moss, or loose paint. If your fascia is painted, you’re good. If it’s bare wood, consider a coat of exterior primer and paint. This protects the wood and gives your new gutters a clean backdrop.
Inspect for Rot
Press your screwdriver into the fascia. If it sinks in easily, you’ve got rot. Small areas can be patched with wood filler, but extensive rot means you’ll need to replace that section of fascia before installing gutters. Don’t skip this—your gutters are only as strong as what they’re attached to.
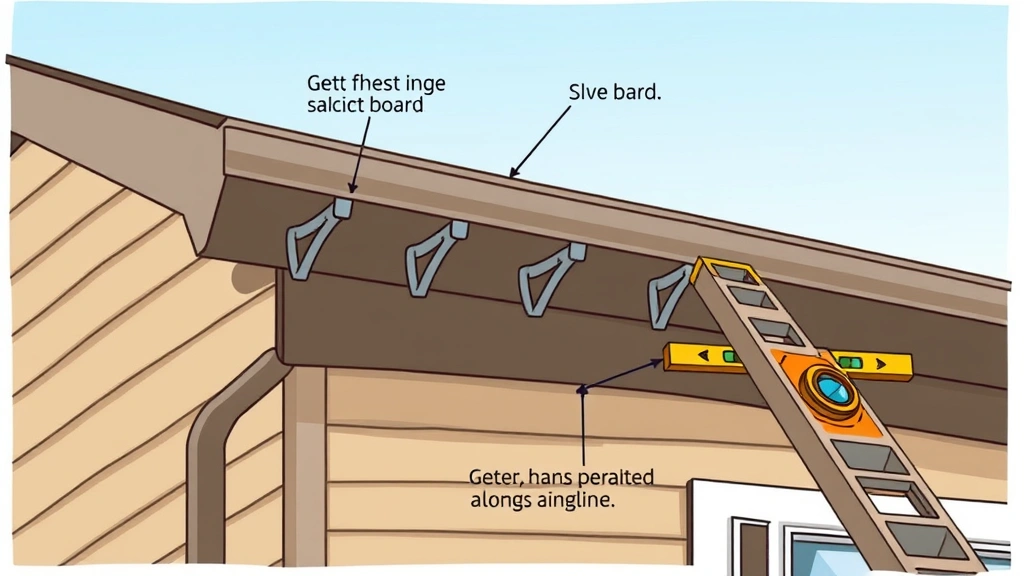
Mark Your Hanger Locations
Using your chalk line and level, snap a line where the top of your gutter will sit. This is your reference point. Then mark where each hanger will go—typically 24 inches apart for standard aluminum gutters, though some manufacturers recommend 16 inches for heavier steel gutters. Check your specific product specs.
Installing Hangers & Brackets
The hangers do the heavy lifting—literally. They support the weight of water, debris, and ice. Don’t cheap out here.
Step 1: Choose Your Hanger Type
There are two main styles: hidden hangers (screwed into the fascia from underneath, cleaner look) and bracket-style hangers (visible, more robust). For DIY work, bracket-style is easier because you can see what you’re doing.
Step 2: Pre-Drill Holes
Using a drill bit slightly smaller than your fastener, pre-drill each hanger location. This prevents the fascia from splitting and makes driving screws easier.
Step 3: Install Hangers
Screw or nail each hanger into the pre-drilled holes. Make sure they’re level and aligned with your chalk line. A crooked hanger now means a crooked gutter later.
According to This Old House’s gutter installation article, spacing and level are critical—even small variations compound over long runs.
Step 4: Check Your Slope
Once all hangers are installed, lay your level across them. You should see a gradual drop toward your downspout location. If you don’t, adjust the hangers before moving forward.
Hanging the Gutter Sections
Now comes the satisfying part—actually hanging the gutters. This is where your planning pays off.
Step 1: Cut Gutter Sections
Measure and cut your gutter sections to length using a hacksaw or power miter saw. Cut slowly with aluminum—it can burr and create sharp edges. Wear gloves and safety glasses.
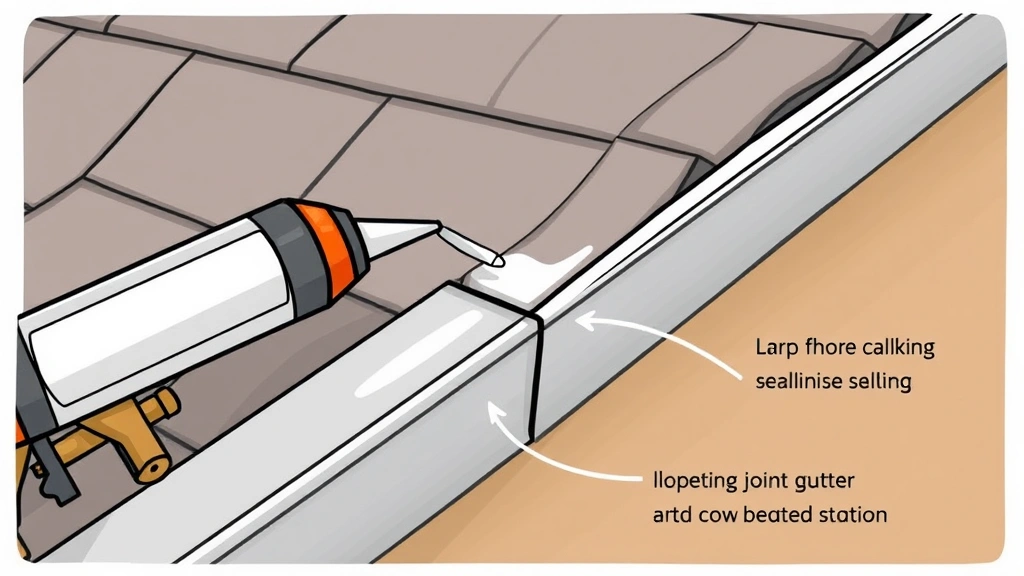
Step 2: Attach End Caps
If your gutter run ends (doesn’t wrap around a corner), attach an end cap using gutter sealant and fasteners. This prevents water from running off the side.
Step 3: Install Corner Pieces
For outside corners, use an outside corner piece. For inside corners (where the roof changes direction), use an inside corner. Seal all joints with gutter sealant before fastening.
Step 4: Hang the Gutter
Starting at the high end of your run, set the gutter into the hangers. You might need a helper for long sections—gutters are awkward but not heavy. Screw or snap the gutter into place, depending on your hanger type.
Step 5: Join Sections
If your run is longer than a single gutter section (typically 10 feet), you’ll need to join sections end-to-end. Overlap them by 1–2 inches, apply sealant to the joint, and screw or rivet them together. Most pros use screws because they’re easier to adjust if needed.
Pro Tip: Think of gutter joints like roof shingles—overlap them so water flows over the joint, not into it. The upstream section should sit slightly higher than the downstream section.
Sealing Joints & Connections
Here’s where many DIY gutter installations fail: poor sealing. Water finds every gap, and once it does, you’ve got problems.
Types of Sealant
Use a silicone-based or polyurethane gutter sealant—not regular caulk. Regular caulk breaks down in UV light and cold weather. Gutter sealant is formulated to stay flexible and last 10+ years. Bob Vila’s gutter guide recommends aluminum-compatible sealants for best results.
Where to Seal
- All joints between gutter sections
- Inside and outside corners
- Where end caps meet the gutter
- Around downspout connections
How to Apply
- Load your caulking gun with gutter sealant.
- Run a bead along the joint, about 1/4 inch thick.
- Use a wet finger or caulk tool to smooth it out.
- Let it cure per the manufacturer’s instructions (usually 24 hours) before running water through the system.
Don’t skimp on sealant. A little extra is better than a leak later.
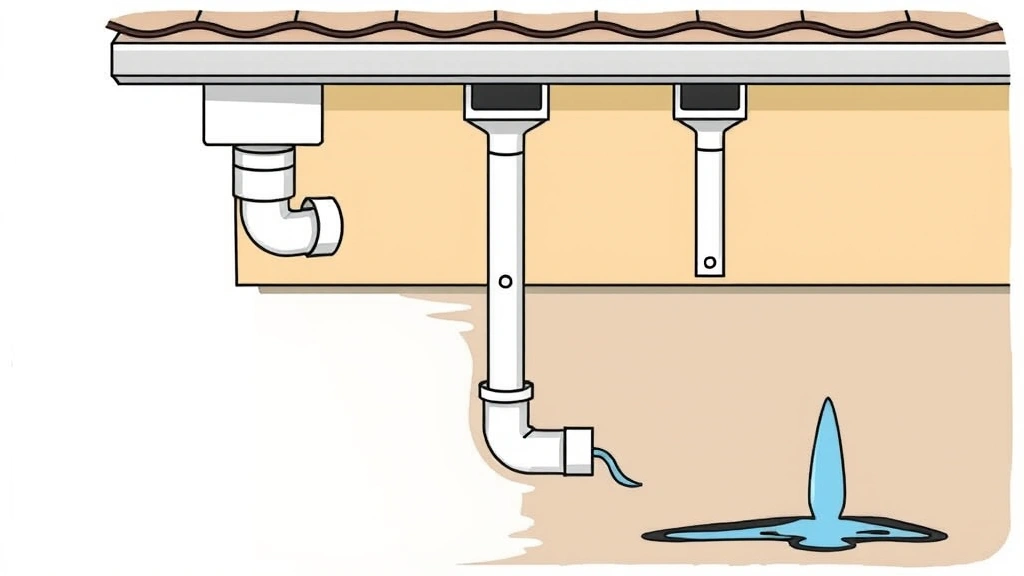
Adding Downspouts & Extensions
Downspouts are just as important as gutters. They direct water away from your foundation. Improper downspout installation is a common cause of basement flooding.
Step 1: Attach Downspout Elbows
At your downspout location, attach an elbow (typically a 90-degree angle) to the outlet of your gutter. Seal this connection with gutter sealant and screw or rivet it in place.
Step 2: Install Downspout Sections
Downspouts come in 10-foot sections. Measure from the elbow to the ground, accounting for a slight angle (not perfectly vertical). Connect sections by overlapping them 1–2 inches and securing with screws or rivets. Seal the joints.
Step 3: Add Elbows at the Base
At the bottom of your downspout, add another elbow to direct water away from the foundation. The downspout should discharge at least 4–6 feet away from your home. Many building codes require even more distance.
Step 4: Secure to the House
Use downspout brackets to attach the downspout to your siding, spacing them every 4 feet. This prevents the downspout from swinging in the wind and pulling away from the house.
Step 5: Consider Extensions or Splash Blocks
For heavy rain areas or if your foundation is close, consider a downspout extension (a flexible or rigid pipe that extends the discharge point further) or a splash block (a plastic or concrete pad that directs water away from the foundation). These are cheap insurance against water damage.
According to OSHA guidelines on fall prevention, proper ladder use and fall protection are essential when working at heights. Always prioritize safety over speed.
Frequently Asked Questions
How long does it take to install gutters on a typical home?
– For a single-story home with 4–5 downspouts, plan on 8–12 hours spread over a weekend. This includes measuring, prep work, and installation. Larger homes or two-story houses can take 16–20 hours. If you’re doing this solo, add 25% more time because climbing up and down a ladder eats into productivity.
Can I install gutters myself, or do I need a contractor?
– Absolutely, you can install gutters yourself. The skills required are basic: measuring, drilling, and fastening. The main challenge is working at height safely. If you’re comfortable on a ladder and have a helper, you’re good. If heights make you nervous, hire a pro—it’s not worth the anxiety or risk.
What’s the best material for gutters: aluminum, steel, or copper?
– Aluminum: Most affordable, lightweight, and easy to work with. Lasts 20–30 years. Best for DIY. Steel: More durable (30–50 years) but heavier and prone to rust if not properly maintained. Copper: Lasts 50+ years and looks beautiful, but costs 3–4x more than aluminum. For DIY, aluminum is the sweet spot between cost and durability.
Do I need gutter guards or screens?
– Gutter guards reduce maintenance significantly by keeping leaves and debris out. They cost $5–$15 per linear foot but save you hours of cleaning. If you have trees near your home, they’re worth the investment. If you’re in a relatively clear area, standard gutters with occasional cleaning are fine.
What slope should my gutters have?
– The standard is 1/2 inch of drop per 10 feet of horizontal run. This is enough to keep water moving without being visually obvious. Too much slope (more than 1 inch per 10 feet) looks bad; too little (less than 1/4 inch per 10 feet) causes pooling. Use a level and measure carefully.
How often should gutters be cleaned?
– At least twice a year: once in late spring (after trees finish shedding) and once in fall (after leaves drop). If you have lots of trees, clean them more often. Clogged gutters defeat the entire purpose and can cause the same water damage problems you’re trying to prevent.
Can I install gutters over existing gutters?
– Not recommended. Old gutters should be removed before installing new ones. You need to inspect the fascia for rot, and you can’t properly slope new gutters if they’re sitting on top of old, potentially uneven ones. Plus, the extra weight stresses the hangers. Do it right the first time.
What’s the difference between K-style and half-round gutters?
– K-style: Flat back, decorative front. Most common in modern homes. Easier to install and more affordable. Half-round: Curved, classic look. More traditional, often used on older homes. Slightly easier to clean but less common, so parts are harder to find. For a new installation, K-style is the practical choice.
Do I need a permit to install gutters?
– Most jurisdictions don’t require a permit for gutter installation. However, check your local building department’s website or call to confirm. If you’re replacing gutters on a historic home, there might be restrictions. When in doubt, ask—it takes five minutes and saves potential headaches.
What if my fascia is damaged or rotten?
– Small rot (less than 2 square feet) can be cut out and patched with exterior wood filler or a new piece of fascia. For extensive rot, you’ll need to replace that section of fascia before installing gutters. This adds cost and time but is essential. Gutters mounted on rotten wood will eventually fail.


