

A garbage disposal is one of those home upgrades that feels intimidating until you actually do it. The truth? How to install a garbage disposal is totally doable for a DIYer with basic plumbing confidence and the right tools. Most people spend $200–$400 on a plumber when you can knock this out in an afternoon for the cost of the unit itself.
The real challenge isn’t the installation—it’s understanding why you’re doing each step and knowing when to call in a pro. This guide walks you through the entire process, from choosing the right disposal to flipping the switch for the first time.
What You Need to Know Before Starting
Before you touch a wrench, let’s be honest about what you’re dealing with. A garbage disposal is an electric motor with spinning blades that grinds food waste into slurry. It sits under your sink, connects to your drain, and requires both plumbing and electrical work.
The good news: plumbing connections here are straightforward. The tricky part is the electrical—and if you’re not comfortable working with 120-volt circuits, this is the moment to call an electrician. No shame in that.
Choose the right disposal first. Disposals come in two horsepower ranges: 1/3 to 1/2 HP for light home use, and 3/4 to 1 HP for heavier loads. If you have a family of four or more, or you cook a lot, go 3/4 HP minimum. Underpowered disposals jam constantly, and that’s a headache you don’t want.
Check your sink configuration too. Single-bowl sinks are easiest. Double-bowl sinks work, but you’ll need to plug one drain opening. If your sink is granite or composite, you’ll need a special mounting kit—don’t skip this.
Pro Tip: Buy a disposal with a continuous feed (the normal kind) rather than batch feed. Batch feed requires you to load food and insert a stopper, which is slower and less convenient. Continuous feed lets you run water and feed scraps while it’s running.
Tools and Materials Checklist
Gather these before you start. Running back and forth kills momentum.
- Adjustable wrench (8–10 inch)
- Screwdrivers (Phillips and flathead)
- Plumber’s putty or silicone caulk
- Slip-nut wrench or large adjustable wrench
- Flashlight or headlamp
- Bucket (for water and debris)
- Plumber’s tape (for threaded connections)
- New drain pipes and fittings (if replacing old ones)
- Electrical outlet or junction box (if hardwiring)
- Wire nuts and electrical tape (if hardwiring)
- Screwdriver or hex key (for mounting bolts)
You’ll also need the garbage disposal unit itself, obviously. Check the manual—every brand is slightly different, and the manual is your friend here.
Removing Your Old Disposal (If You Have One)
If you’re upgrading an existing disposal, you need to remove it first. This is the messy part.
- Turn off the power. Flip the breaker or unplug the unit. Test it by pressing the switch—nothing should happen. This isn’t optional.
- Place a bucket under the disposal. Old water, food particles, and gunk will drip out. Lots of it.
- Disconnect the drain pipes. Use your slip-nut wrench to loosen the connections where the disposal connects to the main drain and the dishwasher line (if you have one). Loosen slowly—water will pour out.
- Remove the mounting bolts. Most disposals use three bolts around the sink opening. Turn them counterclockwise until the entire unit drops into your hand. It’s heavier than it looks.
- Disconnect the electrical. If it’s hardwired, you’ll see a junction box. Unscrew the wire nuts carefully and separate the wires. If it’s plugged in, just unplug it.
Once the old unit is out, clean the sink opening thoroughly. You’ll see the mounting ring—this stays in place unless you’re replacing it (which you usually don’t need to do).
Installing the Mounting Assembly
This is where the new disposal gets locked into place. Think of it like anchoring a boat—you need a solid, stable base.
- Check the mounting ring. If it’s old or damaged, replace it. If it’s solid, keep it. Apply a thin bead of plumber’s putty around the underside where it contacts the sink. This creates a water seal.
- Position the disposal under the sink. Align the three mounting bolts with the holes in the disposal’s mounting bracket. This takes patience—the bolts are stiff and the space under the sink is cramped.
- Tighten the bolts evenly. Don’t crank one bolt tight and then move to the next. Tighten all three in a star pattern (bolt 1, then 3, then 2) a quarter turn at a time. This keeps the mounting ring level and prevents leaks.
- Check for wobble. Grab the disposal and try to move it side to side. It should be rock solid. If it moves, tighten the bolts more.
This step determines whether you get leaks later. Don’t rush it. A loose mounting is the #1 reason for water pooling under the sink.
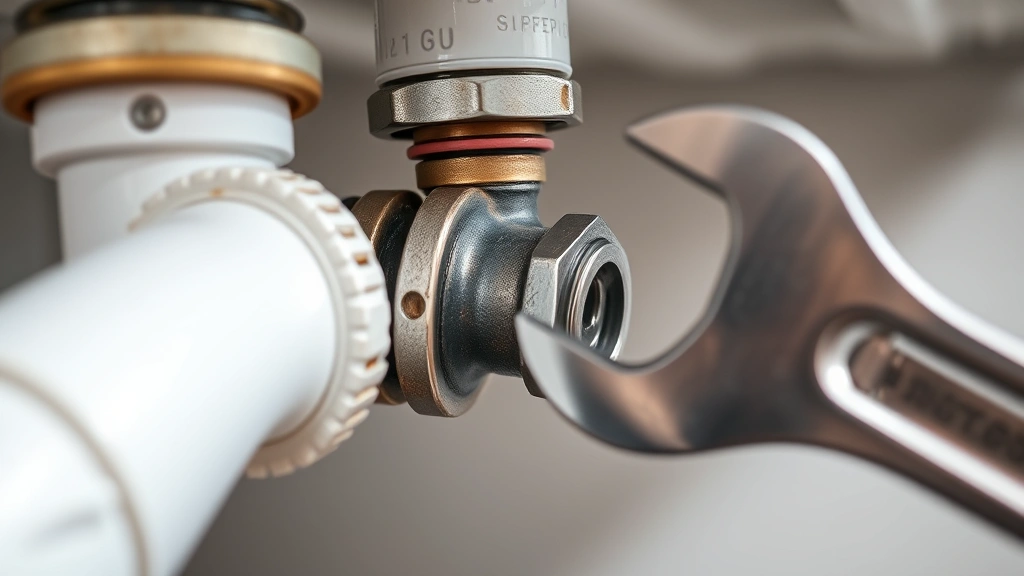
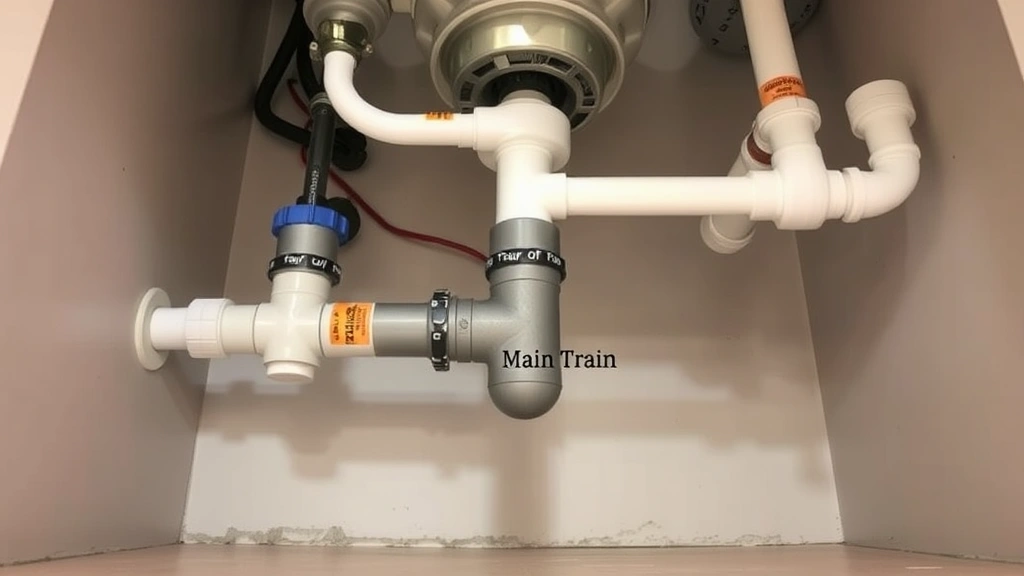
Connecting the Drain Pipes
Now you’re connecting the disposal to your drain system. This is pure plumbing, and it’s actually the most straightforward part if you take your time.
- Install the discharge tube. This is the outlet where ground food slurry exits the disposal. It usually comes attached, but if not, screw it on hand-tight, then snug it with a wrench. Don’t overtighten—you’ll crack the plastic.
- Connect to the main drain. Your main drain line (the one that goes to the wall or floor) will have a trap—that U-shaped pipe that holds water to block sewer gases. Disconnect the old trap if you haven’t already. Attach the disposal’s discharge tube to the trap using slip nuts and washers. Hand-tighten first, then use a wrench to snug it. You want it tight enough that it doesn’t drip, but not so tight you crush the fitting.
- Seal the connection. Wrap plumber’s tape around the threaded connections (the parts you just tightened). This prevents small leaks. Wrap clockwise, three to four times, then reconnect.
- Connect the dishwasher line (if applicable). If you have a dishwasher, its drain hose connects to a nipple on the side of the disposal. Loosen the hose clamp, push the hose onto the nipple, and tighten the clamp. Use a screwdriver, not your hands—it needs to be snug.
- Test for leaks. Fill the sink with water and let it drain. Watch underneath. Any drips? Tighten that connection a quarter turn and retest. Repeat until it’s dry.
Safety Warning: Never run the disposal without water. Water lubricates the grinding chamber and prevents overheating. Always run water before, during, and for 30 seconds after grinding.
Wiring and Safety
This is where many DIYers get nervous, and honestly, it’s the right place to be cautious. Electricity under the sink is serious.
Three options:
- Plug it in. Easiest. You need a GFCI outlet (ground fault circuit interrupter) under the sink. If you don’t have one, install one now. This outlet cuts power if it detects a fault, protecting you from electrocution. Most modern kitchens have one. If yours doesn’t, hire an electrician to install it.
- Hardwire it. More permanent. Requires running a dedicated 15-amp circuit from your breaker box. This is a job for a licensed electrician unless you’re experienced with electrical work.
- Use an air switch. A wireless option. You install a button on the counter that triggers the disposal remotely. Cleaner look, no cord under the sink. Pricier, but worth it if you want a pro installation feel.
If you’re plugging it in, check that your outlet is GFCI-protected. Press the test button on the outlet—it should cut power. Press reset to restore it. If nothing happens, you don’t have GFCI protection and you need to install one.
If you’re hardwiring, here’s the basic process (but seriously, hire an electrician for this):
- Turn off the breaker.
- Run 14-gauge wire from the breaker box to a junction box under the sink.
- Connect the disposal’s wires to the junction box wires using wire nuts: black to black (hot), white to white (neutral), and green/bare to green/bare (ground).
- Screw the junction box cover back on.
- Turn the breaker back on and test.
For detailed electrical guidance, the Family Handyman garbage disposal guide has excellent step-by-step photos of the wiring process. Also check This Old House’s disposal installation article for additional safety tips.
Pro Tip: Label your breaker. Write “Garbage Disposal” on the breaker panel so you (or a future homeowner) know which breaker controls it. This matters if you ever need to service it.
Testing and Troubleshooting
You’re almost done. Now comes the moment of truth.
- Turn on the water. Let it run for 10 seconds.
- Flip the switch. The disposal should start with a low hum or gentle grinding sound. It should NOT sound like a chainsaw or make loud rattling noises.
- Feed a small amount of food waste. A few vegetable scraps, nothing hard or fibrous. Let it grind for 5 seconds, then turn it off and run water for 30 more seconds.
- Check under the sink again. Any new leaks? If yes, tighten that connection.
- Run the dishwasher (if connected). Make sure water drains normally through the disposal.
Common issues:
- Disposal won’t turn on. Check the breaker. Check that the outlet has power (plug in a lamp to test). If hardwired, make sure all wire connections are tight.
- Disposal hums but doesn’t grind. Something is jammed. Turn it off immediately. Never stick your hand in. Use tongs or pliers to fish out the object. Most common culprits: utensils, glass, bones.
- Water drips from under the sink. Tighten the connection where the discharge tube meets the trap. If it still drips, you may need a new washer or O-ring.
- Loud grinding or rattling. Again, something is loose or jammed. Turn it off and investigate. If the disposal itself is rattling, the mounting bolts may be loose—tighten them.
- Slow drain. Run hot water and a bit of dish soap through it. If that doesn’t work, you may have a clog further down the drain line (not the disposal’s fault).
For more troubleshooting, Bob Vila’s disposal guide covers common problems and fixes in detail.
Maintenance going forward: Run water before and after every use. Once a month, grind ice cubes and citrus peels to clean the chamber. Never pour grease down the disposal—it solidifies in the pipes and causes clogs downstream. Avoid fibrous foods like celery, corn husks, and onion skins.
Frequently Asked Questions
Can I install a garbage disposal myself, or do I need a plumber?
– You can absolutely do this yourself if you’re comfortable with basic plumbing and electrical work. The plumbing part is straightforward—it’s just connecting pipes with slip nuts. The electrical part is where you might want professional help. If you’re unsure about wiring, hire an electrician for that portion. Many people do the plumbing themselves and call an electrician for the hardwiring, which is a smart middle ground.
How long does it take to install a garbage disposal?
– Plan for 2–4 hours if you’re removing an old unit and installing a new one. If you’re starting from scratch (no existing disposal), add another hour. Most of that time is spent wrestling with connections under the sink and waiting for water to drain during leak tests. It’s not complicated, just methodical.
Do I need a GFCI outlet for a garbage disposal?
– Yes. A GFCI outlet detects electrical faults and cuts power instantly, protecting you from shock. Building codes require it for any outlet within 6 feet of a sink. If your kitchen doesn’t have one, install one before plugging in the disposal. It’s a $15 part and takes 15 minutes to swap out an existing outlet.
What’s the difference between 1/2 HP and 3/4 HP disposals?
– Power and grinding speed. A 1/2 HP disposal works fine for one or two people, but it jams easily with heavier loads. A 3/4 HP or 1 HP disposal grinds faster, handles tougher food waste, and lasts longer because it’s not straining. The price difference is $50–$100, and it’s worth it for a family home.
Can I install a garbage disposal in a double-bowl sink?
– Yes, but you’ll need to plug one of the drain openings. Install the disposal under the sink bowl you use most, then cap off the other drain with a drain plug (available at any hardware store). You can still use that bowl for washing dishes—water just drains into the first bowl and then through the disposal.
What should I never put down a garbage disposal?
– Avoid: bones, shells (crab, shrimp), fibrous vegetables (celery, corn husks), grease, oils, pasta, rice, and non-food items. These either jam the blades, create clogs downstream, or expand and clog the pipes. Stick to soft food scraps: vegetable trimmings, fruit peels, cooked foods, and small bones (chicken bones are usually okay, but beef bones are not).
Why is my garbage disposal leaking?
– 90% of leaks come from loose connections. Check the slip nuts where the disposal connects to the drain trap and where the dishwasher line connects. Tighten them with a wrench. If tightening doesn’t fix it, you may need a new washer or O-ring. If the leak is coming from the disposal itself (not the connections), the unit may be cracked and need replacement.
Can I hardwire a garbage disposal myself?
– Only if you’re experienced with electrical work and familiar with your local building codes. If you’re not, hire a licensed electrician. Electrical mistakes can be dangerous and may void your home’s insurance. It’s one of those situations where the $100–$200 electrician fee is money well spent.
How do I know if my garbage disposal is jammed?
– It hums but doesn’t grind. The motor is trying to turn the blades, but something is blocking them. Turn it off immediately. Never stick your hand in. Use tongs or pliers to remove the object. Common culprits: utensils, glass, plastic, bones, or shells. Once you remove the object, run water and try again.
Do I need a new sink or sink opening to install a garbage disposal?
– No. If your sink already has a drain opening (which it does), you can install a disposal. The mounting ring screws into the existing opening. The only exception: if your sink is granite or composite, you need a special mounting kit designed for those materials. Check with the disposal manufacturer or your sink maker.


