
Checkboxes in Excel are one of those features that sits right under your nose but most people never touch. If you’re building a task list, tracking inventory, or creating any kind of form, knowing how to insert checkbox in Excel will save you hours of manual work. This isn’t complicated stuff—it’s actually dead simple once you know where to look. Let me walk you through it.
Think of checkboxes like the physical boxes on a paper form. Except these ones are interactive, linked to cells, and can trigger formulas. They’re perfect for to-do lists, project trackers, quality assurance checklists, or anything where you need a clear yes/no visual indicator. The best part? You can automate what happens when someone clicks the box.
Accessing the Developer Tab
Here’s the thing: Excel hides the Developer tab by default. It’s like they don’t want you messing with the advanced stuff right away. But we need it to insert checkboxes. The good news? Turning it on takes 30 seconds.
For Windows:
- Open Excel and click the File menu (top left)
- Select Options at the bottom of the menu
- Click Customize Ribbon on the left sidebar
- In the right column under “Main Tabs,” find and check the box next to Developer
- Click OK
For Mac:
- Click Excel in the top menu bar
- Select Preferences
- Click Ribbon & Toolbar
- Check the Developer checkbox
- Click Save
Now look at your ribbon at the top. You should see a new Developer tab sitting between “Data” and “Review” (or somewhere in that neighborhood depending on your version). That’s your gateway to checkboxes.
Inserting a Checkbox Control
Once the Developer tab is visible, inserting a checkbox is straightforward. But here’s where people get confused: there are actually two types of checkboxes in Excel. We’re going to focus on the Form Control checkbox because it’s more reliable and works better for most people.
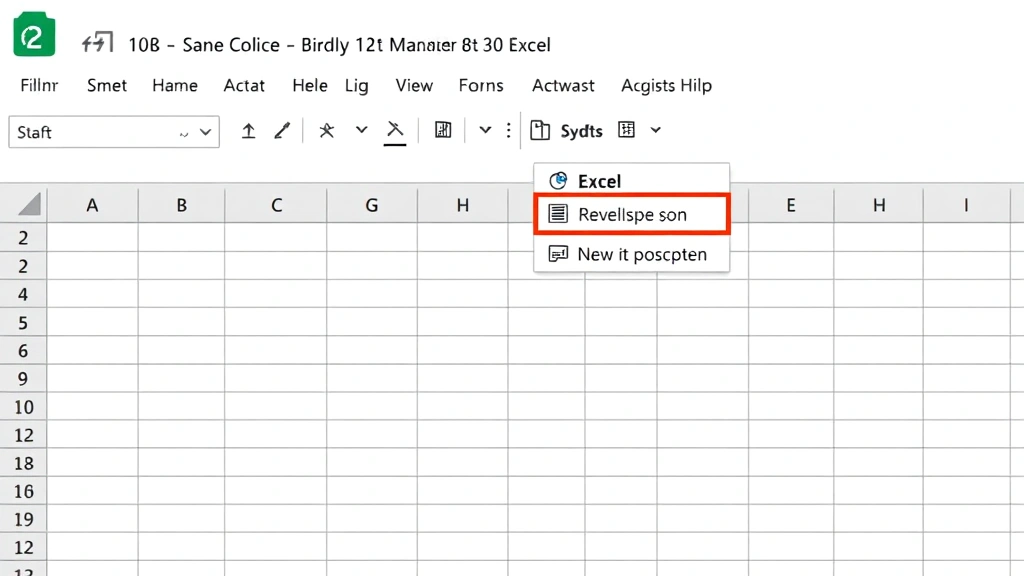
- Click the Developer tab
- Look for the Insert button in the ribbon (it’s usually on the left side)
- Click the dropdown arrow next to it
- You’ll see a section called “Form Controls” with a checkbox icon (it looks like a small square with a check mark)
- Click on the checkbox icon
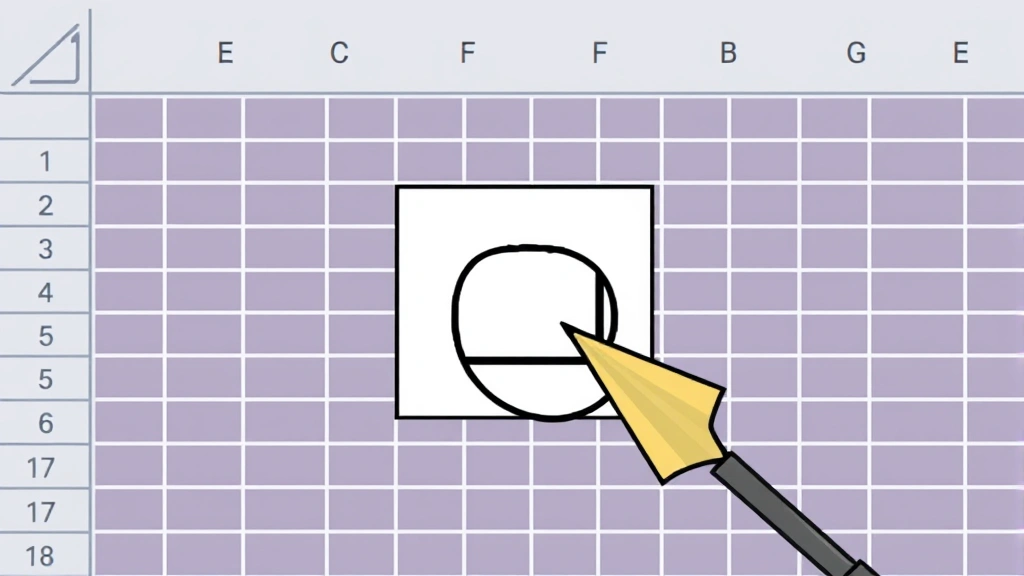
- Your cursor will change to a crosshair
- Click and drag on your spreadsheet to draw the checkbox where you want it
Don’t worry about the size being perfect—you can resize it later. Just get it roughly where you want it. When you release the mouse, Excel will create a checkbox with a default label like “Check Box 1.”
The checkbox appears as an object floating on top of your cells, not inside a cell itself. This is important to understand because it means you can move it around independently of the cell grid.
Pro Tip: If you need multiple checkboxes in a hurry, insert one, format it how you like it, then copy and paste it repeatedly. This saves time versus creating each one from scratch.
Linking Your Checkbox to a Cell
Here’s where the real magic happens. Right now your checkbox just sits there looking pretty. To make it actually do something, you need to link it to a cell. This is what turns it from decoration into a functional tool.
- Right-click on the checkbox you just created
- Select Format Control (or sometimes it says “Properties”)
- A dialog box opens—click the Control tab
- Find the field labeled Cell link (or sometimes “Linked cell”)
- Type in the cell reference you want to link to (like A1, B5, etc.)
- Click OK
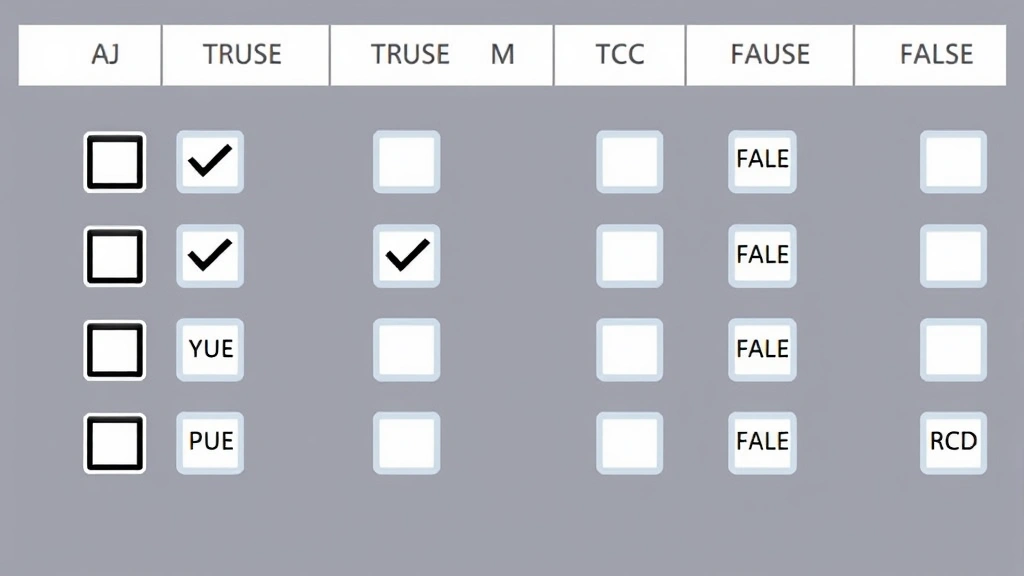
Now when you click the checkbox, it will put a TRUE value in that linked cell when checked, and FALSE when unchecked. This is the foundation for everything else you’ll do with checkboxes.
Think of the linked cell as the “memory” of your checkbox. The checkbox is just the visual control—the cell stores the actual data. This is crucial because it means you can reference that cell in formulas, use it in conditional formatting, or export it to another system.
For example, if you link your checkbox to cell A1, and someone checks the box, A1 will show TRUE. If they uncheck it, A1 shows FALSE. Simple as that.
Formatting and Styling Checkboxes
By default, Excel checkboxes are pretty boring. White box, black outline, generic label. You can customize them to match your spreadsheet’s look and feel.
Changing the Label:
- Right-click the checkbox
- Select Edit Text (or just double-click it)
- Delete the default text and type your own label (like “Completed,” “Approved,” “Shipped,” etc.)
- Click outside the checkbox when done
Resizing and Moving:
Click once on the checkbox to select it. You’ll see resize handles (small squares) around it. Drag these to make it bigger or smaller. Drag the checkbox itself to move it to a new location. This is all standard object manipulation—nothing fancy.
Formatting Colors and Appearance:
- Right-click the checkbox
- Select Format Control
- Click the Colors and Lines tab
- Adjust the fill color, line color, and line style to your preference
- Click OK
You can make checkboxes blend seamlessly into your spreadsheet or make them stand out. It depends on what you’re trying to accomplish. For a professional task tracker, subtle formatting usually works best. For a visual dashboard, you might want more contrast.
Real Talk: Checkbox formatting can get finicky. If something doesn’t look right, try right-clicking and selecting “Reset” or just delete it and start over. It’s faster than troubleshooting weird formatting issues.
Using Checkboxes with Formulas
This is where checkboxes become genuinely useful. You can use the TRUE/FALSE values they generate in formulas to automate calculations, trigger actions, or build dynamic spreadsheets.
Basic IF Formula:
Let’s say you have a checkbox in cell A1 linked to a checkbox. You want another cell to show “Done” when checked and “Pending” when unchecked:
=IF(A1,"Done","Pending")
Put this formula in another cell, and it will automatically update based on the checkbox status.
Counting Checked Boxes:
If you have multiple checkboxes linked to cells A1 through A10, you can count how many are checked:
=COUNTIF(A1:A10,TRUE)
This is perfect for progress tracking. You can instantly see how many items in a list are completed.
Conditional Formatting with Checkboxes:
You can use conditional formatting to highlight rows based on checkbox status. For example, highlight a row green when the checkbox is checked. This creates a visual dashboard effect that’s really powerful for project management.
- Select the range of cells you want to format
- Go to Home tab → Conditional Formatting → New Rule
- Choose “Format only cells that contain”
- Set it to look for cells equal to TRUE (or FALSE, depending on what you want)
- Choose your formatting (background color, text color, etc.)
- Click OK
Now whenever a checkbox is checked, the entire row (or whatever range you selected) will automatically highlight. This is incredibly useful for tracking status at a glance.
Working with Multiple Checkboxes
Most real-world uses involve multiple checkboxes. Building a task list with 50 items? You need 50 checkboxes. Here’s the efficient way to do it.
The Copy-Paste Method:
- Create one checkbox and format it exactly how you want it
- Link it to a cell (like A1)
- Right-click it and select Copy
- Select the range where you want checkboxes to appear (B1:B50 for example)
- Right-click and select Paste
- Excel will automatically adjust the cell links for each checkbox
This is way faster than creating 50 checkboxes individually. Excel is smart enough to increment the cell references automatically.
Organizing Your Data:
When you have multiple checkboxes, keep your data organized. Put the checkbox in one column, the task description in another column, and maybe a due date in a third column. This makes your spreadsheet readable and functional.
For example:
- Column A: Checkbox (linked to A)
- Column B: Task name
- Column C: Due date
- Column D: Assigned to
- Column E: Status formula (based on checkbox)
This structure is clean, easy to use, and scales well as you add more items.
Sorting and Filtering:
Here’s a heads-up: checkboxes can be finicky with sorting. If you sort your data and the checkboxes don’t move with it, you’ll have misaligned checkboxes—which is a nightmare. To avoid this, keep your checkboxes in a column that you never sort, or use a helper column with TRUE/FALSE values instead of actual checkbox controls. Reference the helper column for your formulas and formatting.
Troubleshooting Common Issues
Checkbox Won’t Check/Uncheck:
If clicking the checkbox does nothing, it’s probably locked. Right-click it, select Format Control, go to the Properties tab, and make sure Locked is unchecked. If your sheet is protected, you need to unprotect it first.
Checkbox Linked Cell Shows “#NAME?” Error:
This usually means the link got broken somehow. Right-click the checkbox, select Format Control, check the cell link field. If it’s empty or shows an invalid reference, re-enter the correct cell address.
Checkboxes Disappear When Printing:
By default, Excel might not print checkboxes. Go to File → Print, click Print Options, and make sure “Print Objects” is selected. Alternatively, use a formula-based approach with TRUE/FALSE values and conditional formatting instead of actual checkboxes.
Can’t Find the Developer Tab:
Make sure you followed the steps in the first section correctly. If you’re using Excel Online (web version), the Developer tab isn’t available—you’ll need to use the desktop version. Also, if you’re using Excel in a corporate environment with restricted access, your IT department might have disabled the Developer tab.
Checkbox Moves Around When Scrolling:
Checkboxes are floating objects, so they stay in place visually even when you scroll. This can be annoying. To anchor a checkbox to specific cells, right-click it, select Format Control, go to Properties, and check Move and size with cells. This makes the checkbox move when you insert or delete rows/columns.
Safety Warning: If you’re sharing a file with checkboxes, make sure recipients have the Developer tab enabled or they won’t be able to use them. Consider using a simpler alternative like drop-down lists if compatibility is a concern.
According to Family Handyman’s approach to problem-solving, breaking complex tasks into steps is key. The same applies to Excel—when something goes wrong, check one thing at a time rather than panicking.
Advanced Tips for Power Users
Once you’ve mastered the basics, here are some tricks that’ll make you look like an Excel wizard.
Using VBA with Checkboxes:
If you know a little VBA (Visual Basic for Applications), you can make checkboxes trigger macros. This lets you do complex actions automatically when someone checks a box. For example, send an email notification, update another sheet, or create a log entry. This is advanced territory, but it’s possible if you’re willing to learn a bit of coding.
Creating a Dashboard:
Combine checkboxes with frozen panes, conditional formatting, and formulas to build an interactive dashboard. Use checkboxes to filter data, trigger calculations, or toggle between views. This creates a professional-looking tool that doesn’t require any coding knowledge.
Checkbox with Data Validation:
You can combine checkboxes with drop-down lists for more complex workflows. For example, checkbox to mark complete, drop-down to select priority level, and another column for notes. This creates a mini-database within your spreadsheet.
Exporting Checkbox Data:
When you export your spreadsheet to CSV or another format, checkboxes might not transfer properly. The linked cells (TRUE/FALSE values) will export fine, but the visual checkboxes won’t. If you need to preserve the checkbox appearance, export as PDF instead.
When to Use Alternatives to Checkboxes
Checkboxes are great, but they’re not always the best solution. Sometimes other tools work better.
Use Drop-Down Lists Instead If:
You need more than two options (not just yes/no). Drop-down lists let you select from multiple values. Check out our guide on how to add a drop-down list in Excel for details.
Use Conditional Formatting Instead If:
You want to track status but don’t need interactive controls. Just use formulas and conditional formatting to color-code cells based on their values. This is simpler and more compatible across different Excel versions.
Use a Form Instead If:
You’re collecting data from multiple people. Excel’s built-in forms or Microsoft Forms are better for this than checkboxes in a shared spreadsheet.
Use Comments Instead If:
You need to track whether something has been reviewed or approved. Comments are simpler and less prone to breaking than checkboxes.
According to OSHA guidelines on workplace safety documentation, clear and reliable tracking systems are essential. Checkboxes are one way to achieve this, but you need to choose the right tool for your specific use case.
Real-World Examples
Example 1: Project Task List
Create a spreadsheet with project tasks in column B, due dates in column C, assigned person in column D, and checkboxes in column A. Link each checkbox to cells in column E. Use conditional formatting to highlight completed tasks in green. Add a formula at the top to count how many tasks are done. Now you have a functional project tracker.
Example 2: Quality Assurance Checklist
Build a checklist for product inspection. Each row is a quality check (“Paint is even,” “No scratches,” “Packaging intact,” etc.). Checkboxes in column A. When all boxes are checked, the cell in column B automatically shows “PASS.” If any are unchecked, it shows “FAIL.” This creates an automated QA system.
Example 3: Inventory Tracking
Track which items are in stock. Item name in column A, quantity in column B, checkbox in column C (“In Stock?”). Use the checkbox status to filter which items show in a separate “Available” list using formulas. This keeps your inventory management organized.
Frequently Asked Questions
Can I use checkboxes in Excel Online?
– No, the Developer tab (which you need to insert checkboxes) isn’t available in Excel Online. You need the desktop version of Excel. However, you can view and interact with checkboxes that were created in the desktop version when you open the file in Excel Online—you just can’t create new ones.
Why are my checkboxes not printing?
– Go to File → Print → Print Options and make sure “Print Objects” is checked. If it’s already checked and checkboxes still aren’t printing, try converting your checkboxes to static images by copying them and pasting as a picture, or use TRUE/FALSE values with conditional formatting instead.
Can I make a checkbox that affects multiple cells?
– A single checkbox can only link to one cell directly. However, you can create formulas in other cells that reference the linked cell. For example, if your checkbox links to A1, you can have formulas in B1, C1, and D1 that all reference A1. This way, checking one box triggers changes across multiple cells.
How do I copy a checkbox to another workbook?
– Copy the checkbox from the original workbook, then paste it into the new workbook. The cell link will be preserved, but you might need to update it if the cell structure is different in the new workbook. Right-click the pasted checkbox and update the cell link to match your new sheet layout.
What’s the difference between Form Control and ActiveX checkboxes?
– Form Control checkboxes are simpler, more stable, and work reliably across different Excel versions. ActiveX checkboxes are more advanced and allow more customization but can be buggy and aren’t compatible with all versions of Excel. For most users, Form Control is the better choice. We focused on Form Control in this guide because it’s more practical.
Can I use checkboxes in Excel for Mac?
– Yes, the process is slightly different (see the “Accessing the Developer Tab” section for Mac-specific steps), but checkboxes work the same way. The functionality is identical whether you’re on Windows or Mac.
How do I delete a checkbox?
– Click the checkbox once to select it (you’ll see resize handles around it), then press Delete. Don’t double-click it first, or you’ll enter edit mode. A single click, then Delete is the way to go.
Can I resize multiple checkboxes at once?
– Yes. Hold Shift and click each checkbox to select multiple ones, then drag any of them to resize all of them proportionally. This is much faster than resizing them individually.
What if my checkbox linked cell shows “#REF!” error?
– This means the cell you linked to has been deleted or the reference is broken. Right-click the checkbox, select Format Control, and re-enter a valid cell reference in the cell link field.
Can I make checkboxes mandatory in Excel?
– Excel doesn’t have a built-in way to force someone to check a box before saving. However, you can use data validation or conditional formatting to highlight unchecked boxes, or add a formula that prevents the file from being saved until all boxes are checked (requires VBA). For most purposes, clear visual indicators and instructions are enough.
How do I protect my checkboxes so users can only check/uncheck them?
– Right-click the checkbox, select Format Control, go to Properties, and check “Locked.” Then protect your sheet (Review → Protect Sheet). Users will be able to check and uncheck the boxes but won’t be able to move, resize, or delete them. This keeps your spreadsheet structure intact.
Can I link a checkbox to a cell in a different sheet?
– Yes. When setting the cell link, use the format: SheetName!CellReference (for example: “Dashboard!A1”). This links the checkbox in one sheet to a cell in another sheet. Make sure the sheet name is spelled correctly.


