

Let’s be honest—Mickey Mouse is intimidating at first glance. Those perfect circles, the iconic ears, that signature smile. You look at reference images and think, “I could never.” But here’s the real talk: how to draw Mickey Mouse is actually way easier than you’d think, especially if you break it down into basic shapes. Thousands of people pick up a pencil every day convinced they can’t draw, and then they nail a Mickey sketch on their first try. You’re about to be one of them.
The secret isn’t talent. It’s understanding that Mickey is built from simple geometry—circles, ovals, and curves. No complicated anatomy. No perspective tricks. Just shapes stacked on top of each other like a visual recipe. Whether you’re 8 or 80, whether you’ve never drawn anything beyond a stick figure, this guide will walk you through exactly how to draw Mickey Mouse step by step.
Materials You’ll Actually Need
Here’s where people overthink it. You don’t need a $200 art tablet or professional-grade pencils. Honestly, a regular #2 pencil and printer paper work fine. That said, having the right tools makes the process smoother and more enjoyable.
- Pencil: Start with HB or 2B. Softer pencils (like 4B or 6B) are great for shading later, but they’re not essential for learning how to draw Mickey Mouse.
- Paper: Sketch paper or even regular copy paper. Avoid super thin napkin-weight paper—it tears when you erase.
- Eraser: A kneaded eraser is your friend. It doesn’t leave rubber shavings everywhere and won’t damage paper like a hard pink eraser will.
- Ruler (optional): Helpful for keeping proportions consistent, but not mandatory.
- Compass or circular template (optional): Makes perfect circles easier, but you can freehand them too.
- Colored pencils or markers: For the final step, though your Mickey will look great in pencil alone.
Pro Tip: If you’re serious about drawing, invest in decent sketch paper (like Strathmore or Canson). It handles erasing and layering way better than copy paper, and it won’t yellow over time. Your future self will thank you.
Start With Basic Shapes (The Foundation)
This is the step that separates people who “can’t draw” from people who can. Everyone can draw a circle. Everyone can draw an oval. Therefore, everyone can draw Mickey Mouse. It’s that simple.
Think of how to draw Mickey Mouse like building with blocks. You start with the biggest, most obvious shapes first. You’re not trying to make it look perfect yet—you’re just laying out a blueprint.
- Lightly sketch a large circle in the center of your paper. This is Mickey’s head. Use a compass if you have one, or just draw freehand. Don’t press hard—you want light guidelines you can erase later.
- Below the head, draw a larger oval or egg shape. This is the body. It should be roughly 1.5 times the size of the head.
- On either side of the head, sketch two smaller circles positioned at the top. These are the ears. They should be roughly half the diameter of the head.
- From the sides of the body, sketch four thin ovals for the limbs. Two on top (arms) and two on bottom (legs). Make them slightly curved, not perfectly straight.
At this stage, your drawing should look like a stick figure’s sophisticated cousin—all geometry, no details. This is exactly what you want. You’ve just completed the hardest part of learning how to draw Mickey Mouse: the spatial planning.
Drawing the Head and Ears
Now we’re going to refine those basic shapes into something that actually looks like Mickey. The head is straightforward, but the ears need attention because they’re what makes him instantly recognizable.
- Refine the head circle: Look at your basic circle. You’re not going to erase it completely. Instead, you’ll use it as a guide. The head should stay roughly circular, but you can make the bottom slightly flatter—Mickey’s head isn’t a perfect sphere; it’s more like a circle with a subtle chin.
- Position the ears: Those two smaller circles you drew? They’re going to become the iconic Mickey ears. Here’s the key: the ears should overlap slightly with the head circle, not sit completely on top. This creates depth and makes them look 3D. The ears should be positioned so they’re roughly symmetrical, sitting at about the 10 o’clock and 2 o’clock positions on the head.
- Refine the ear shape: Ears aren’t perfect circles. Make them slightly more oval, with the top slightly narrower than the bottom. Think of them like upside-down teardrop shapes.
- Add ear definition: Inside each ear, draw a smaller circle or oval. This is the inner ear. It gives dimension and makes the ears look less flat. Leave a thin border of the outer ear visible around it.
At this point, if someone showed your drawing to a stranger and asked “Who’s this?” they’d probably say “Mickey Mouse.” The ears are that important. You’ve already nailed how to draw Mickey Mouse’s most recognizable feature.
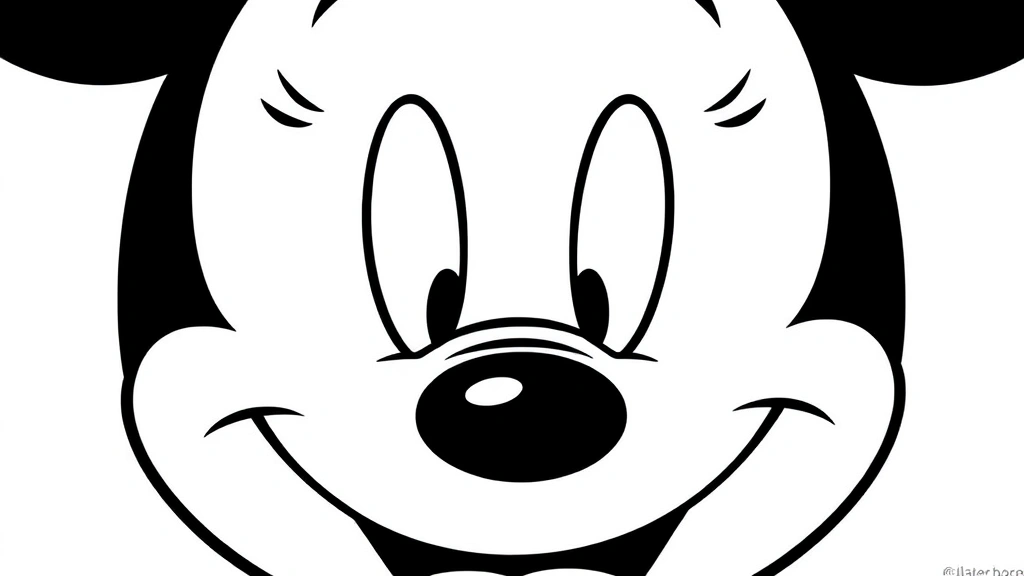
Adding Mickey’s Iconic Facial Features
The face is where Mickey comes to life. This is also where a lot of people get nervous because eyes and expressions feel personal. But Mickey’s face is actually formulaic—in a good way. Once you know the rules, it’s almost impossible to mess up.
The Eyes: Mickey’s eyes are the most distinctive part of his face. They’re not just dots; they’re large, oval shapes that dominate his face.
- Draw two large ovals side by side, positioned in the upper-middle area of the head circle. They should be roughly the same size, with a small gap between them (about the width of one eye).
- Inside each oval, draw a smaller oval or circle for the pupil. Position the pupil slightly toward the center-top of the eye, giving Mickey that characteristic “looking down” expression.
- Inside the pupil, add a tiny white circle (leave it white, don’t fill it in). This is the highlight that makes his eyes sparkle and look alive.
- Above each eye, draw a curved line for the eyebrow. Mickey’s eyebrows are simple arcs, not thick or detailed.
The Nose: Mickey’s nose is simple but important.
- Below and between the eyes, draw a small oval or teardrop shape pointing downward. It should be roughly 1/3 the size of an eye.
- Add a small curved line or two inside the nose to suggest nostrils. Keep it minimal.
The Mouth: This is where Mickey’s personality shows. His smile is wide, friendly, and exaggerated.
- Below the nose, draw a large curved line that arcs upward. This is the smile. It should be wide—roughly the width of both eyes combined.
- At the center of the smile, add a small vertical line to suggest the division between his upper and lower lip.
- For a classic Mickey, you can add a small curved line above the main smile line to show the upper lip. Think of it like a smile with a little extra dimension.
- Optional: Add a small curved line below the smile for the lower lip or chin definition.
Safety Note on Proportions: Mickey’s eyes take up a lot of his face—this is intentional and iconic. Don’t make them smaller or more realistic. The “cartoon” proportions are what make him Mickey. If you’re unsure about spacing, check out reference images from Family Handyman’s creative resources or official Disney art guides.
The facial features are where you’ll see your Mickey really come together. Step back and look at your work. Does it feel like him? If not, don’t panic. Small tweaks to eye position or smile width can completely change the expression. This is the beauty of learning how to draw Mickey Mouse—he’s forgiving.
Sketching the Body and Limbs
The body is the easiest part because Mickey’s torso is essentially a simple shape. It’s not anatomically complex—it’s a cartoon body, which means it’s all about proportions and flow.
The Torso:
- Remember that large oval or egg shape you sketched earlier? That’s still your guide. Refine it slightly so it’s smooth and symmetrical. The bottom should be slightly narrower than the top.
- Add a simple curved line down the center for the torso centerline. This helps with symmetry and is optional but useful.
- At the top of the torso (where it connects to the head), add a small circle or oval for the neck. It should be thin—Mickey’s neck is more of a connector than a prominent feature.
The Arms: Mickey’s arms are long and thin, with a bend at the elbow.
- From the upper sides of the torso, extend two curved lines downward. These should be slightly thicker than you’d draw a stick figure’s arms, but still thin. The curves should be gentle, not sharp.
- At roughly the midpoint of each arm, add a slight bend or angle. This is the elbow. It doesn’t need to be sharp—a subtle curve works great.
- The arms should extend down to roughly the middle of the torso or slightly below.
The Legs: Legs follow a similar logic to arms.
- From the lower sides of the torso, draw two curved lines extending downward. Legs are slightly thicker than arms and should be roughly the same length as the torso.
- Add a subtle bend at the knee, roughly in the middle of each leg.
- At the bottom of each leg, add a large circle or oval for the foot. Mickey’s feet are comically large—this is intentional and part of his charm.
Your Mickey now has a complete body structure. He’s starting to look like an actual character, not just a collection of shapes. The proportions might not be perfect yet, but that’s what the next steps are for.
The Tricky Part: Hands and Gloves
Hands are where a lot of people get stuck when learning how to draw Mickey Mouse. The good news? Mickey wears gloves, which means you don’t have to draw detailed fingers. The gloves simplify everything.
Drawing Mickey’s Gloves:
- At the end of each arm, draw a large circle or oval. This is the glove. It should be roughly the size of the head or slightly smaller.
- From the bottom of each glove, extend four small ovals or cylinders downward. These are the fingers. They don’t need to be individually detailed—just simple shapes.
- Add a small curved line or circle on the outer side of each glove for the thumb. It should be positioned at roughly a 45-degree angle from the hand.
- Optional: Add a few curved lines across the glove to suggest wrinkles or seams. This adds depth without being complicated.
Hand Positioning: This is where gesture and personality come in. You can:
- Point both hands forward (friendly, welcoming)
- Place one hand on the torso and one extended (casual, confident)
- Have both hands at the sides (neutral, at-rest pose)
- Raise both hands up (excited, celebratory)
The hand position doesn’t affect how to draw Mickey Mouse technically—it just changes his pose and attitude. Pick whichever feels right for your drawing.
Refinement and Final Details
You’re almost done. Your Mickey is recognizable, proportioned, and ready for the final polish. This step is about cleaning up your sketch and adding personality.
- Erase your guidelines: Go back through your drawing and gently erase all those light construction lines. Use a kneaded eraser so you don’t damage the paper. Don’t erase everything—keep the lines that form the actual drawing.
- Darken the final lines: With a pencil or pen, go over the lines you want to keep. This is your chance to make deliberate decisions about line weight. You can make some lines darker or thicker than others to create emphasis. For example, the outline of the head and ears might be darker than the inner details.
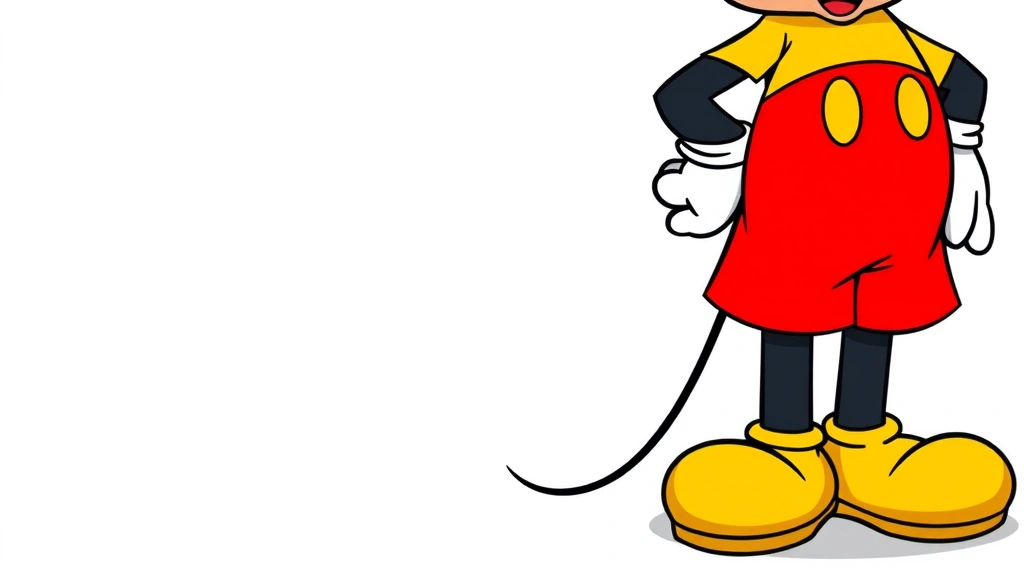
- Add shoe details: Mickey wears shoes. At the bottom of each leg, draw a simple shoe shape. It should look like a large oval with a slightly pointed toe. Add a curved line across the middle for the sole.
- Add clothing (optional): Classic Mickey wears shorts and a shirt. If you want to add these, draw a simple line across the middle of the torso for the waistline. Add two small curved lines on the sides for the shorts’ edges. You can add buttons or other details, but keep it simple.
- Fine-tune proportions: Step back and look at the whole drawing. Do the ears look right? Are the eyes positioned well? Is the smile symmetrical? Make small adjustments now. This is the time to fix anything that feels off.
- Add shadows (optional): If you want depth, add light shading. Use a softer pencil (like 4B) and lightly shade under the chin, under the ears, and in the creases of the limbs. Keep it subtle—cartoon characters don’t need realistic shading.
Pro Tip: The most common mistake when learning how to draw Mickey Mouse is making the ears too small or positioned too high. If something feels off, check the ears first. They’re the anchor of the whole character.
Coloring Your Mickey Drawing
Your pencil sketch is complete, but now comes the fun part: color. This is where your Mickey really pops off the page.
Traditional Color Scheme:
- Head and body: Black outline with a light gray or tan fill (or leave it white)
- Ears: Black
- Eyes: Black pupils with white highlights, black eyebrows
- Nose: Black
- Mouth: Red or pink
- Gloves: White
- Shorts: Red
- Shoes: Black with yellow or tan sole
- Shirt: Yellow or tan
Coloring Tips:
- Colored pencils: Layer light colors first, then add darker colors on top. This gives you more control than markers.
- Markers: Work fast and confident. Markers don’t layer well, so plan your colors before you start.
- Paint: If using watercolor or acrylic, apply light washes first, then add details. Let each layer dry before adding the next.
- Digital: If you’re coloring digitally (using Photoshop, Procreate, or free software like Krita), scan your pencil drawing first, then use the bucket fill tool or brush to add color. You can always undo mistakes.
For a detailed guide on organizing your creative work, you might want to check out how to add a table of contents in Word if you’re documenting your art progress. Similarly, if you’re sharing your Mickey drawing online, learning how to make a Facebook post shareable can help you get more eyes on your work.
One last thing: don’t feel like you have to use the traditional colors. Mickey’s been reimagined in thousands of ways. Try different color schemes. Make him neon. Make him pastel. Make him grayscale. The point is that you’ve learned how to draw Mickey Mouse—the colors are just your personal style showing through.
Frequently Asked Questions
Is it possible to learn how to draw Mickey Mouse if I have no drawing experience?
– Absolutely. Mickey is literally designed to be simple. His proportions are exaggerated and forgiving. If you can draw a circle and a line, you can draw Mickey. The fact that you’re reading this means you’re already past the hardest part—deciding to try.
What if my Mickey doesn’t look like Mickey on the first try?
– That’s normal. The first attempt is always a learning experience. The good news? You can draw another one immediately. Unlike woodworking or other crafts, pencil and paper are forgiving. Draw 10 Mickeys. By the fifth one, you’ll be nailing it. Each attempt teaches you something about proportions, line quality, or expression.
How long does it take to learn how to draw Mickey Mouse?
– Your first recognizable Mickey? Maybe 15-30 minutes. A polished, colored Mickey? Maybe an hour. A Mickey you’re genuinely proud of? Probably 2-3 hours if you’re being careful and deliberate. But honestly, you’ll be amazed at how fast it goes once you understand the basic shapes.
Should I use a ruler or compass?
– Not necessary, but helpful if you like precision. A compass makes perfect circles, which helps with the head and ears. A ruler helps with straight lines if you’re adding clothing details. But plenty of amazing artists draw Mickey completely freehand. Use tools if they help you feel more confident; skip them if you prefer the organic feel of drawing by hand.
Can I draw Mickey in different poses?
– Absolutely. Once you understand the basic structure, you can rotate limbs, change hand positions, tilt the head, or adjust the expression. The core principles of how to draw Mickey Mouse stay the same—it’s just about moving the pieces around. Try drawing him sitting, jumping, or waving. Each pose teaches you something new about character drawing.
What’s the difference between drawing Mickey and other cartoon characters?
– Mickey is one of the simplest cartoon characters because he’s built from basic shapes. Other characters might have more complex proportions or details. But once you understand how to draw Mickey Mouse, you’ve learned the fundamental skills: breaking down complex images into simple shapes, understanding proportions, and adding personality through expression. Those skills transfer to any character.
Is there a “wrong” way to draw Mickey?
– Not really. Disney has an official character model, but your interpretation is valid. Your Mickey might have slightly different proportions or expressions, and that’s what makes it yours. The point of learning how to draw Mickey Mouse isn’t to become a Disney animator—it’s to understand the character well enough that you can draw him confidently and consistently. Your version is the right version.
Can I use references while drawing?
– Yes, absolutely. In fact, you should. References are how you learn. Look at official Mickey images, fan art, or animation frames. See how different artists interpret the character. This is how you develop your own style. For more on organizing reference materials, you might explore how to add checkboxes in Word to create a reference checklist for your drawing sessions.
What if I want to draw Mickey more realistically?
– You can, but you’ll lose some of the charm. The exaggerated proportions are what make Mickey Mickey. That said, if you want to practice realistic anatomy while keeping the character recognizable, focus on the head first. Make the features more proportional while keeping the iconic ears and expression. It’s a fun challenge once you’ve mastered the basic version.
Can I turn my Mickey drawing into something else?
– Sure. Once you have a solid Mickey drawing, you can use it as a base for other projects. Scan it and use it as a reference for digital art. Use it as a template for a painting. Trace it onto fabric for embroidery. The drawing is just the beginning. Some people even use their Mickey drawings to add a signature in Word documents as personalized graphics for digital projects.
How do I improve my Mickey drawing skills?
– Draw Mickey over and over. Seriously. Each time, you’ll get faster and more confident. Try different poses. Experiment with expressions. Change the style slightly each time. After 20 Mickeys, you’ll barely have to think about the process. Your hand will just know what to do. That’s when the real fun starts—when the technical part is automatic and you can focus on personality and style.
What materials do professional artists use to draw Mickey?
– Disney animators use specialized tools like light tables and animation paper, but that’s for production. Most professional fan artists use the same basic tools you have access to: pencils, paper, erasers, and coloring supplies. Some work digitally using tablets and software like Adobe Creative Suite or free alternatives like Clip Studio Paint. But the fundamentals of how to draw Mickey Mouse are the same regardless of tools.
Can kids learn how to draw Mickey Mouse?
– Absolutely. In fact, Mickey is often one of the first characters kids learn to draw. The simple shapes make it accessible for young artists. If you’re teaching a child, break it down into even simpler steps: circles, then ears, then eyes, then smile. Let them color it however they want. It builds confidence and creativity.
Learning how to draw Mickey Mouse is more than just creating a cute image—it’s about understanding the fundamentals of character design, proportion, and expression. These skills will serve you whether you want to draw more cartoon characters, develop your own original characters, or simply enjoy the meditative process of creating art. The best part? You’re already on your way. Pick up a pencil and start with that first circle. Your Mickey is waiting.


