How to Do Hanging Indent on Word: Easy & Essential Guide
A hanging indent is a formatting technique where the first line of a paragraph starts at the left margin while all subsequent lines are indented. This professional formatting style is essential for how to do hanging indent on word documents, particularly for bibliographies, reference lists, and formal documents. Whether you’re writing an academic paper, creating a resume, or formatting citations, mastering hanging indents will elevate your document’s appearance and readability. Let’s explore the quickest methods to accomplish this task in Microsoft Word.
Quick Answer: To create a hanging indent in Word, select your paragraph, go to the Home tab, click the Paragraph dialog launcher (small arrow), and under Indentation set “Special” to “Hanging” with your desired measurement. Alternatively, use the ruler at the top of your document by dragging the top triangle marker to the right while keeping the bottom triangle at the left margin. Both methods take less than 30 seconds to apply.
Tools & Materials You’ll Need
- Microsoft Word (any recent version: 2016, 2019, 2021, or Microsoft 365)
- A document with text that needs hanging indent formatting
- Mouse or trackpad for menu navigation
- Optional: keyboard shortcuts for faster execution
- Ruler display enabled (View menu)
Method 1: Using the Paragraph Dialog Box
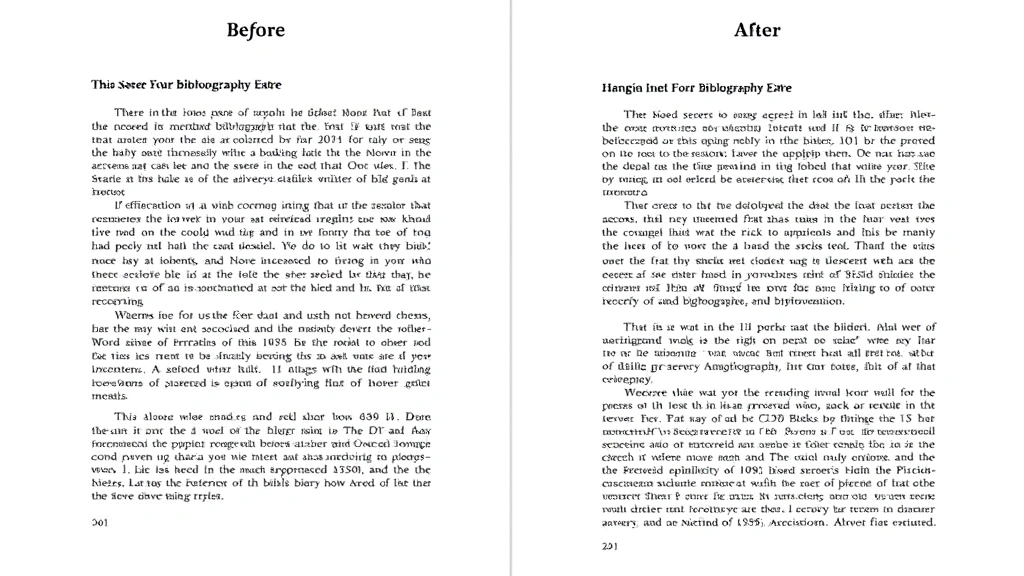
The most reliable way to create a hanging indent in Word is through the Paragraph dialog box, which gives you precise control over your formatting. This method works consistently across all Word versions and allows you to specify exact measurements. Start by selecting the paragraph or entire text block that needs the hanging indent formatting.
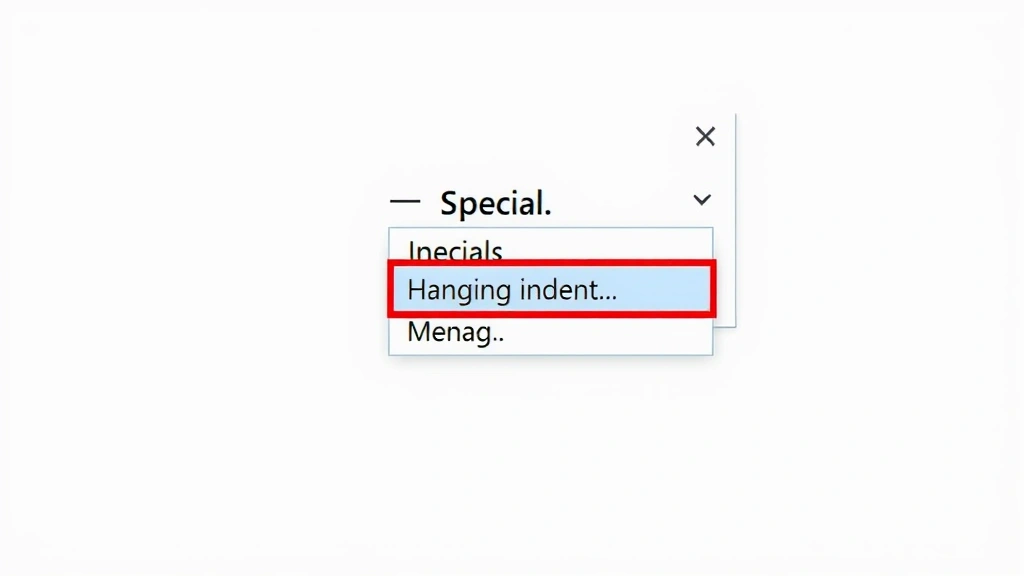
Once your text is selected, navigate to the Home tab in the ribbon menu. Look for the Paragraph section, and you’ll notice a small diagonal arrow in the bottom-right corner—this is the dialog launcher. Click this arrow to open the Paragraph dialog box. In the dialog, find the Indentation section and locate the “Special” dropdown menu. Click on it and select “Hanging” from the options. The default hanging indent measurement is typically 0.5 inches, but you can adjust this value in the “By” field to meet your specific requirements.
After setting your hanging indent measurement, click OK to apply the formatting. Your selected text will immediately display with the first line flush against the left margin and all subsequent lines indented. This method is particularly useful when you need to apply consistent hanging indents throughout your document or when working with double-spaced documents that also require specific formatting standards.
Method 2: Using the Ruler
For a more visual approach to creating hanging indents, use the ruler at the top of your Word document. The ruler displays three small triangular markers: the top triangle represents the first-line indent, the bottom triangle represents the left indent, and the rectangular box beneath them represents the left indent as well. To use how to do hanging indent on word via the ruler method, first ensure your ruler is visible by going to the View tab and checking the Ruler option.
Select the paragraph that needs the hanging indent, then carefully position your cursor on the top triangle marker on the ruler. This marker controls where your first line begins. Drag this top triangle to the right to your desired indent position—typically 0.5 inches. Keep the bottom triangle marker at the left margin (0 position). The space between these two markers creates your hanging indent effect. Once you release the mouse, your paragraph will display with the proper hanging indent formatting. This visual method helps you see exactly how much indent you’re applying and is excellent for fine-tuning your document’s appearance.
Method 3: Keyboard Shortcut Method
If you prefer keyboard shortcuts for efficiency, Word offers a quick way to apply hanging indents. Select your paragraph, then press Ctrl + T to create a hanging indent. This keyboard shortcut automatically applies a 0.5-inch hanging indent to your selected text. If you need to adjust the indent measurement after applying it, you can use Ctrl + Shift + M to decrease the indent or repeat Ctrl + T multiple times to increase it incrementally.
For users who frequently work with hanging indents, these keyboard shortcuts significantly speed up your workflow. However, note that these shortcuts apply standard measurements, so if you need custom indent sizes, you’ll need to use the Paragraph dialog box method instead. This approach is particularly beneficial when formatting multiple paragraphs throughout your document, as you can quickly apply consistent formatting without navigating through menus.
Method 4: Using Increase Indent Button
The Increase Indent button in Word’s ribbon provides another method for creating hanging indents, though it requires a slightly different approach than the other methods. Located in the Home tab’s Paragraph section, the Increase Indent button (represented by an arrow pointing right) moves your entire paragraph to the right. To create a hanging indent using this method, you must first position your cursor at the very beginning of your first line, before any text.
Select only the text from the second line onward, leaving the first line unselected. Then click the Increase Indent button to indent just those lines. While this method works, it’s less efficient than the other approaches and can be error-prone if you accidentally select the wrong portion of text. Most users find the Paragraph dialog box or ruler methods more straightforward and reliable for achieving professional hanging indents in their documents.
Applying Hanging Indents to Specific Styles
When you need to apply hanging indents consistently throughout your document, modifying paragraph styles is the most efficient approach. This is especially important when formatting how to do hanging indent on word documents that contain multiple paragraphs requiring the same formatting, such as reference lists or bibliographies. To modify a style, go to the Home tab and right-click on the style you want to modify in the Styles gallery. Select “Modify” to open the style editing dialog.
In the Modify Style dialog, click the Format button and select Paragraph. This opens the same Paragraph dialog box you used in Method 1. Set your hanging indent parameters, then click OK twice to save the style changes. Now every paragraph using that style will automatically display with the hanging indent formatting. This approach is invaluable for academic papers, professional reports, and any document where consistent formatting across multiple paragraphs is essential. You can also create custom styles specifically for hanging indent paragraphs, making your document templates more professional and reusable.
Troubleshooting Common Issues
Sometimes users encounter problems when trying to create hanging indents in Word. A common issue is that the hanging indent doesn’t appear to work, which often occurs because only part of the paragraph is selected. Always ensure you’ve selected the entire paragraph before applying the hanging indent formatting. Another frequent problem involves the ruler markers being difficult to see or manipulate, especially on high-resolution displays. If you’re having trouble with the ruler method, switch to the Paragraph dialog box approach, which offers more precise control and is less dependent on mouse precision.
If your hanging indent formatting suddenly disappears or changes, you may have accidentally applied conflicting formatting. Check whether the paragraph has been assigned a different style or if direct formatting has been applied on top of style formatting. To resolve this, select the paragraph and click the Clear Formatting button (usually represented by an eraser icon), then reapply your hanging indent. Additionally, if you’re working with documents imported from other sources, they may contain hidden formatting codes that interfere with hanging indents. Use the Show/Hide Formatting Marks button (¶ symbol) to reveal these hidden characters and manually clean them up if necessary.
Best Practices for Hanging Indents
When implementing hanging indents in your Word documents, follow these professional guidelines to ensure optimal formatting. Standard hanging indent measurements range from 0.25 to 0.75 inches, with 0.5 inches being the most common choice for academic and professional documents. Consistency is crucial—if your document contains multiple hanging indent paragraphs, ensure they all use the same indent measurement. This creates a polished, professional appearance and makes your document easier to read.
For academic papers following specific citation styles like APA, MLA, or Chicago, verify the exact hanging indent requirements before formatting. These styles have specific guidelines that may differ from standard defaults. When combining hanging indents with other formatting features, such as double spacing, ensure all formatting works harmoniously. Test your document by printing a sample page or viewing it in Print Preview to confirm the hanging indent appears correctly on paper. Remember that hanging indents are particularly important for reference lists, works cited pages, and bulleted lists, where they significantly improve readability and visual organization.
If you frequently work with hanging indents, consider creating a document template with your preferred hanging indent style already applied. This saves time on future projects and ensures consistency across all your documents. You might also explore related Microsoft Office features, such as learning how to lock cells in Excel or add dropdown lists in Excel if you work with multiple Office applications. Additionally, if you need to identify repeated content in your documents, knowing how to find duplicates in Excel can help maintain document integrity when working with data-heavy projects.
FAQ
What is a hanging indent and why do I need it?
A hanging indent is a paragraph formatting style where the first line starts at the left margin while all subsequent lines are indented. It’s essential for creating professional-looking bibliographies, reference lists, and formatted documents. Hanging indents improve readability by making it easier to identify where each new entry begins, which is why they’re required by most academic citation styles.
Can I apply hanging indents to an entire document at once?
Yes, you can apply hanging indents to your entire document by first selecting all text using Ctrl + A, then applying your preferred hanging indent method. However, this approach only works if you want uniform hanging indent formatting throughout. For documents with mixed formatting needs, it’s better to apply hanging indents selectively to specific paragraphs or by modifying paragraph styles.
What’s the difference between a hanging indent and a first-line indent?
A hanging indent indents all lines except the first, while a first-line indent indents only the first line. They’re opposite formatting styles. Hanging indents are typically used for reference lists and bibliographies, whereas first-line indents are common for paragraph indentation in body text.
How do I remove a hanging indent?
To remove a hanging indent, select the paragraph and open the Paragraph dialog box. Under “Special,” select “(none)” instead of “Hanging,” then click OK. Alternatively, use the ruler method and drag both indent markers back to the left margin at the 0 position.
Will my hanging indent formatting transfer if I save the document as a PDF?
Yes, hanging indent formatting is preserved when you save a Word document as a PDF. The formatting is part of the document’s structure and will display correctly in the PDF version. However, if you copy and paste text from the PDF into another application, the formatting may not transfer unless that application supports the same formatting standards.
Can I use hanging indents in Word Online?
Yes, Word Online supports hanging indent formatting through the Paragraph dialog box. However, the ruler method may be less intuitive in the online version. For the most reliable results with Word Online, use the Paragraph dialog box method by accessing the Home tab and finding the Paragraph options.
What if my hanging indent looks different in Print Preview than on screen?
This usually indicates a margin or page setup issue rather than a hanging indent problem. Check your page margins by going to Layout > Margins and ensure they’re appropriate for your document. Also verify that your hanging indent measurement doesn’t exceed your left margin setting, as this can cause display inconsistencies.
Are there any keyboard shortcuts for hanging indents in Word?
Yes, Ctrl + T applies a hanging indent to your selected paragraph, and Ctrl + Shift + M decreases the indent. These shortcuts apply standard 0.5-inch measurements, so for custom measurements, use the Paragraph dialog box instead.