

Learning how to cook eye of round roast is one of those kitchen skills that separates decent home cooks from great ones. This lean, affordable cut can be tricky—it’s prone to drying out if you’re not careful—but nail the technique and you’ll get tender, juicy results that’ll impress anyone at your table. I’ve cooked dozens of these roasts, and I’m going to walk you through exactly what works.
Table of Contents
Understanding Eye of Round
The eye of round comes from the round primal, which is the rear leg of the cow. It’s one of the leanest cuts available, which is great for your waistline but challenging for cooking. With minimal marbling and fat content, this roast has almost no built-in insurance against drying out. That’s why every step matters—from selection to the final slice.
This cut typically weighs between 2 to 4 pounds and has a distinctive round shape with a small eye of fat in the center. The grain runs lengthwise, which is crucial information for later when we talk about slicing. Most butchers will tie these roasts with kitchen twine, which helps them cook evenly and maintain their shape.
Why Prep Matters Most
Don’t skip this step. Remove your roast from the refrigerator 45 minutes to an hour before cooking. This allows the meat to come closer to room temperature, ensuring more even cooking throughout. Cold meat straight from the fridge will take longer to cook through, and the outside might overcook before the inside reaches the target temperature.
Pat the surface completely dry with paper towels. Moisture is the enemy of browning, and browning is where flavor lives. A wet surface steams instead of sears, and you’ll miss out on that delicious crust. Don’t be shy—really dry that thing off.
Inspect the surface for any thick pieces of fat or silver skin. While a thin fat cap is fine, remove anything thicker than a quarter-inch. Silver skin (that translucent connective tissue) should come off entirely—it won’t tenderize during cooking and will create chewy spots in your final dish.
Seasoning Strategy
Keep it simple with salt and freshly ground black pepper. Apply these generously about 30 minutes before cooking, right after the roast comes out of the fridge. The salt has time to penetrate the meat and enhance its natural flavors. This is better than seasoning right before cooking, which just sits on the surface.
If you want to get fancy, add garlic powder, onion powder, or dried herbs like thyme and rosemary. A light hand is better than heavy—you want to taste the beef, not mask it. About 1 teaspoon of each per 3-pound roast is my sweet spot.
Some folks like to make a paste with minced garlic, olive oil, and herbs and rub it all over the roast. This works great, but make sure you pat off excess before searing, or you’ll get burned bits that taste bitter.
The Searing Technique
Heat your oven to 325°F. While it preheats, get a heavy-bottomed pan—cast iron or stainless steel—screaming hot over medium-high heat. Add a splash of oil with a high smoke point (avocado oil or refined vegetable oil). You want the pan so hot that a drop of water immediately sizzles and evaporates.
Carefully place the roast in the pan. Don’t move it. Let it sit for 3-4 minutes until you get a dark brown crust. Flip it and sear the other side for another 3-4 minutes. Sear the ends and any exposed sides for about 2 minutes each. This whole process takes roughly 15 minutes and creates a flavorful crust through the Maillard reaction.
If the pan starts smoking heavily, lower the heat slightly. You want browning, not burning. The goal is a deep mahogany color, not black char.
Roasting Methods Explained
You’ve got two main approaches: the traditional oven method and the slow-cooker method. For the oven approach, transfer your seared roast to a roasting pan. Add about ½ cup of beef broth to the bottom—this keeps things moist and creates pan drippings for gravy. You could also use water or red wine if that’s what you’ve got.
For a slow-cooker method (similar to our barbacoa recipe slow cooker approach), skip the searing step or do it briefly in a skillet first, then transfer to the slow cooker with 1 cup of broth. Cook on low for 6-8 hours. This method is foolproof for tenderness but won’t develop the same crust.
I prefer the oven method for better texture and crust development. Place your roasting pan in the preheated 325°F oven. Insert a meat thermometer into the thickest part of the roast, making sure it’s not touching bone or fat.
Temperature and Timing
Timing depends on weight and your oven, but expect roughly 20-25 minutes per pound at 325°F. A 3-pound roast typically takes 60-75 minutes. Use a meat thermometer—it’s the only reliable way to know when you’re done.
For medium-rare, pull the roast when the thermometer reads 130-135°F. For medium, aim for 135-145°F. Remember that carryover cooking will raise the temperature another 5 degrees as it rests, so pull it slightly early.
Check the thermometer every 15 minutes or so after the 45-minute mark. Insert it in different spots—the thickest part, the center, and toward the edges. The most important reading is from the thickest section.
If your roast isn’t reaching temperature after the expected time, your oven might be running cool. You can bump the temperature up to 350°F for the final 15-20 minutes to speed things up, but don’t go higher or you risk drying it out.
Resting Is Non-Negotiable
This is where most home cooks fail. Remove the roast when it hits 130°F internal temperature and place it on a cutting board. Tent it loosely with aluminum foil and let it rest for 15-20 minutes. During this time, the muscle fibers relax and reabsorb moisture that was driven to the surface during cooking.
If you skip this step and slice immediately, all those juices run right out onto the board instead of staying in the meat. I’ve seen people cut into a perfectly cooked roast and watch it bleed out because they got impatient. Don’t be that person.
Use this resting time to make gravy from the pan drippings. Pour the liquid into a saucepan, skim off excess fat, and reduce it over medium-high heat. Add a tablespoon of cornstarch mixed with water if you want it thicker, or just let it reduce by half for a more concentrated flavor.
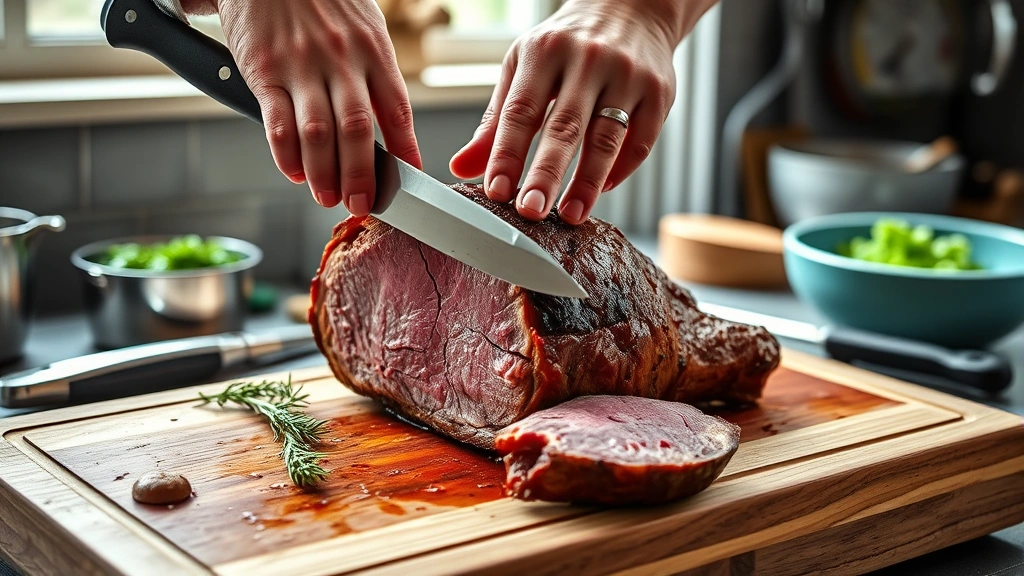
Slicing Against the Grain
This is critical. Look at the roast and identify the direction the muscle fibers run. You want to cut perpendicular to those fibers, not parallel. Cutting against the grain breaks up the fibers and makes every bite more tender.
Use a sharp carving knife and make slices about ¼-inch thick. Angle your knife slightly as you go for more surface area. If you’re unsure about the grain direction, make a test cut on one end first. If the meat seems tough, rotate your cutting angle by 90 degrees and try again.
Arrange your slices on a serving platter and pour any accumulated juices over the top. This keeps the meat moist and looks beautiful.
Roasting Methods Explained
You’ve got two main approaches: the traditional oven method and the slow-cooker method. For the oven approach, transfer your seared roast to a roasting pan. Add about ½ cup of beef broth to the bottom—this keeps things moist and creates pan drippings for gravy. You could also use water or red wine if that’s what you’ve got.
For a slow-cooker method (similar to our barbacoa recipe slow cooker approach), skip the searing step or do it briefly in a skillet first, then transfer to the slow cooker with 1 cup of broth. Cook on low for 6-8 hours. This method is foolproof for tenderness but won’t develop the same crust.
I prefer the oven method for better texture and crust development. Place your roasting pan in the preheated 325°F oven. Insert a meat thermometer into the thickest part of the roast, making sure it’s not touching bone or fat.
Common Problems Solved
Your roast came out tough? You probably cooked it too hot or didn’t rest it long enough. Next time, stick to 325°F and rest for at least 15 minutes. Also make sure you’re slicing against the grain—this makes a huge difference with lean cuts.
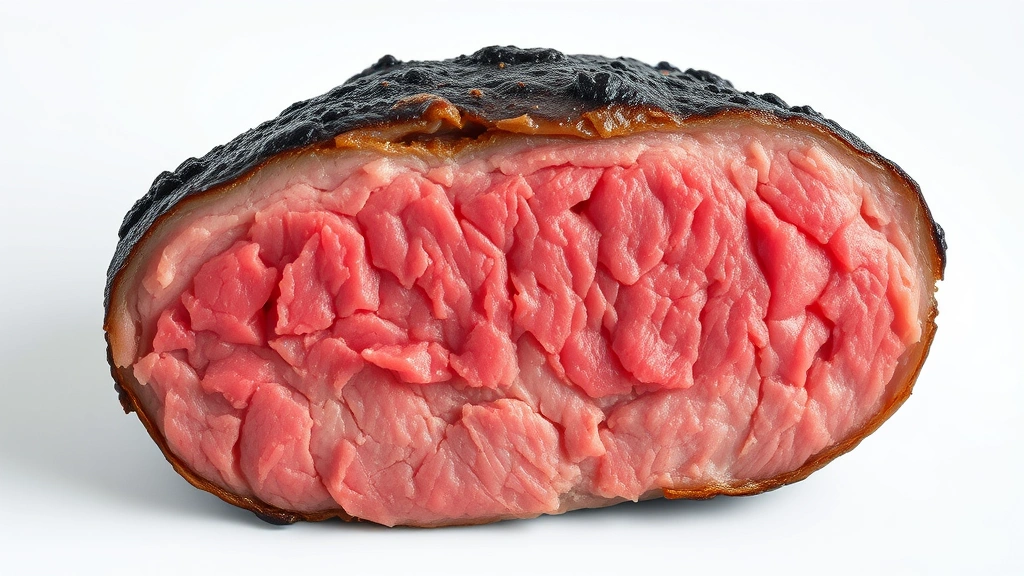
It’s dry and stringy? You likely overcooked it. Pull at 130°F internal temp, not 160°F. This cut is best served medium-rare. If you prefer more done meat, consider a fattier cut like chuck roast, which forgives overcooking better.
The outside is burned but inside is cold? Your oven temperature is probably off. Use an oven thermometer to verify. You might also need to tent the roast with foil after the first 30 minutes to slow the browning while the inside catches up.
The bottom is burning? Lower the oven rack position so the roast sits farther from the heating element. You could also place a baking sheet on the rack below to catch drippings and prevent them from burning on the oven floor.
Storage and Leftovers
Slice any leftovers and store them in an airtight container in the refrigerator for up to 4 days. The slices will dry out faster than a whole roast, so keep them in a bit of broth or gravy if possible. You can also freeze sliced roast for up to 3 months.
Leftover roast is fantastic in sandwiches, especially with horseradish cream or au jus for dipping. You can also reheat slices gently in a warm oven (300°F) with a splash of broth, or use them cold in salads. For other protein cooking inspiration, check out our guide on how long to cook whole chicken in oven.
If you have pan drippings left over, freeze them in ice cube trays. These flavor bombs are perfect for adding to soups, stews, or gravies down the road. Store them in a freezer bag once frozen.
Frequently Asked Questions
Can I cook eye of round at a higher temperature to save time?
You can bump it to 350°F, but you risk drying out this lean cut. The lower, slower approach at 325°F gives you better results. If you’re in a time crunch, use a slow cooker on high for 4-5 hours instead.
Should I use a meat thermometer or rely on cooking time?
Always use a meat thermometer. Oven temperatures vary, roasts vary in shape, and cooking time is just an estimate. A thermometer takes the guesswork out and guarantees doneness.
What’s the difference between eye of round and round roast?
Eye of round is a specific cut from the round primal. It’s smaller and leaner than a full round roast. Cook them the same way, but adjust timing based on weight.
Can I marinate eye of round before cooking?
Absolutely. An acidic marinade (vinegar, wine, citrus) for 4-8 hours can help tenderize it. Pat it dry before searing though, or you won’t get a good crust.
Is this cut good for slow cooking?
Yes, it’s actually excellent for slow cooking because the low heat and moisture break down the muscle fibers. Just know it won’t develop a crust, so sear it first if you want that flavor.
What temperature is medium-rare for this roast?
Pull it at 130-135°F internal temperature. It’ll rise to 135-140°F while resting, giving you a perfect medium-rare with a slight pink center.
Learning how to cook eye of round roast isn’t complicated, but it does demand attention to detail. Prep it right, sear it hard, roast it low and slow, rest it properly, and slice it correctly. Follow these steps and you’ll serve a roast that rivals anything from a steakhouse. The key is respecting the cut’s limitations and working with them instead of against them. Your family will thank you.


