
Learning how to cook country style ribs in the oven is one of those kitchen skills that’ll make you look like a pro without breaking a sweat. These meaty, flavorful cuts are forgiving, affordable, and deliver fall-apart tenderness when you know the right technique. No smoker needed, no babysitting required—just your oven, some basic seasoning, and a little patience.
Table of Contents
What Are Country Style Ribs?
First things first—country style ribs aren’t actually ribs in the traditional sense. They’re cut from the shoulder end of the pork loin and contain more meat and bone than typical baby back or spare ribs. This makes them perfect for oven cooking because they’re thick enough to withstand heat without drying out. The marbling of fat throughout keeps them juicy, which is why they’re so forgiving when you’re learning the ropes.
These cuts typically weigh between 4-8 ounces each and have that perfect ratio of meat to bone that makes them satisfying without being overwhelming. You’ll find them in most grocery stores year-round, usually priced better than other rib cuts.
Prep Your Ribs Properly
Don’t skip the prep work—it takes five minutes and makes a real difference. Start by patting your ribs dry with paper towels. Moisture is the enemy of good browning, so get them as dry as possible. If your ribs came in a package with liquid, drain it completely and pat them down.
Next, remove the thin membrane on the back side if it’s still there. You can do this by sliding a butter knife under the membrane and peeling it back. This helps seasonings penetrate and makes the meat easier to eat. Some butchers remove this already, so check before you start.
Trim any excess fat if you’re concerned about it, but honestly, a little fat is your friend here. It bastes the meat as it cooks and keeps everything tender. Just don’t go overboard—you want a thin layer, not a thick cap.
Seasoning Options & Rubs
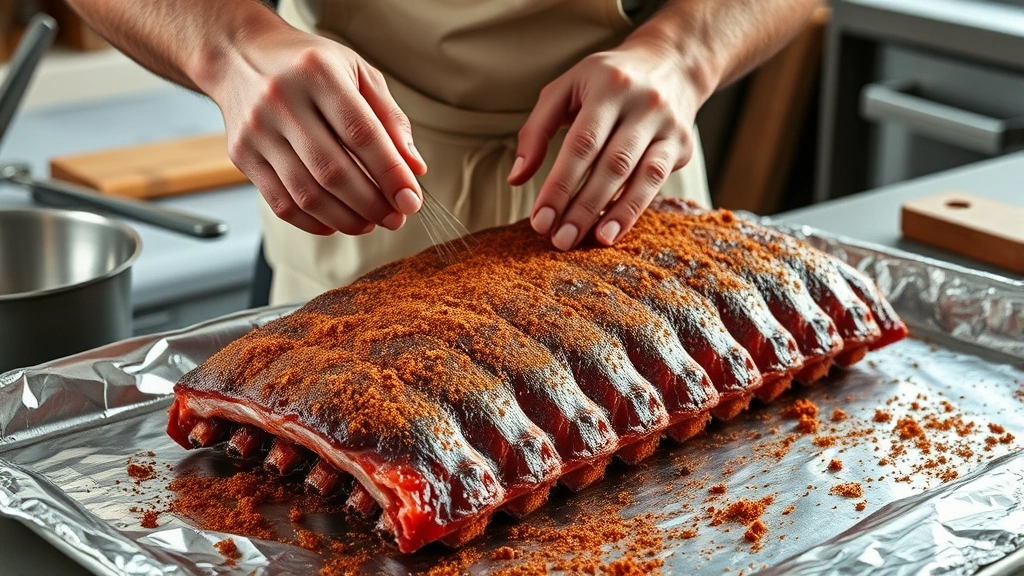
This is where you get creative. Country style ribs take well to almost any seasoning profile. A simple approach uses salt, pepper, paprika, garlic powder, and brown sugar. The sugar caramelizes slightly during cooking and adds depth.
Mix your dry rub in a small bowl before applying. Use about 2-3 tablespoons per rack of ribs. Apply the rub generously on both sides, working it into the meat with your fingers. Let the seasoned ribs sit for 15-30 minutes before cooking—this gives the flavors time to penetrate.
If you’re planning to use a sauce, go lighter on the rub since the sauce will add its own flavors. You can complement your ribs with options like Buffalo Sauce Recipe for a tangy kick, or Adobo Sauce Recipe for something with more depth and spice.
Oven Cooking Method
Preheat your oven to 300°F. This low temperature is the secret to tender, fall-apart ribs. Higher heat will dry them out and toughen the meat.
Line a large baking sheet with aluminum foil for easy cleanup. Arrange your seasoned ribs on the sheet in a single layer, bone-side down. They can touch slightly, but avoid stacking them. If you’re cooking multiple racks, use two baking sheets rather than crowding them.
Cover the entire pan tightly with aluminum foil. This creates a steaming environment that keeps moisture in and helps break down the connective tissue. This is crucial—don’t skip the foil cover.
Place the pan in your preheated oven. Set a timer for 2.5 hours. Don’t open the oven door during this time. The oven temperature will fluctuate slightly each time you peek, and you want to maintain that steady, low heat.
Low & Slow Wins
The low-and-slow approach is what separates mediocre ribs from incredible ones. At 300°F, the collagen in the meat slowly converts to gelatin, which creates that tender, almost creamy texture. Rush this process with higher heat, and you’ll end up with tough, stringy meat.
Think of it like this: you’re not really cooking the meat so much as gently transforming it. The low temperature allows the fat to render slowly, basting the meat from the inside out. This is why country style ribs are so forgiving—they’ve got enough fat that even if you go a bit longer, they’ll stay moist.
If you’re cooking a big batch for a gathering, this method is fantastic because everything finishes at roughly the same time, and you can hold them warm without drying them out.
Sauce Application Timing
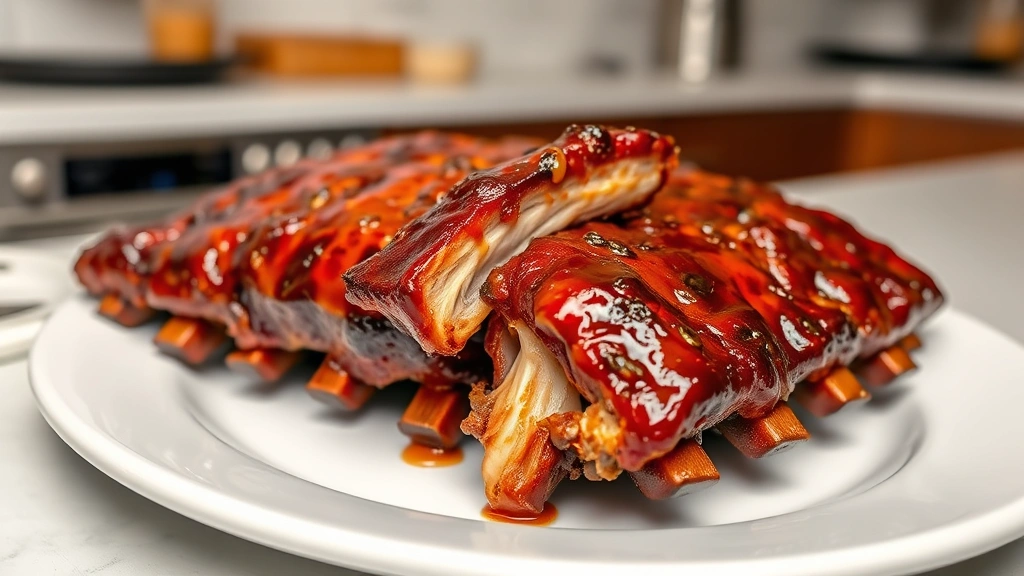
Here’s where technique matters. After 2.5 hours, carefully remove the foil (watch out for steam). The ribs should be very tender at this point. If you’re using sauce, brush it on now and return the uncovered pan to the oven for another 20-30 minutes.
This final stint without foil caramelizes the sauce and creates a slight crust. If you’re using a thicker sauce with sugar, watch carefully—sugar can burn quickly, so don’t exceed 30 minutes. You want the sauce to set and glaze, not char.
If you prefer your ribs without sauce, you can skip this step entirely. They’re delicious plain, especially if you used a good rub. The meat will have developed a nice color and texture during the covered cooking time.
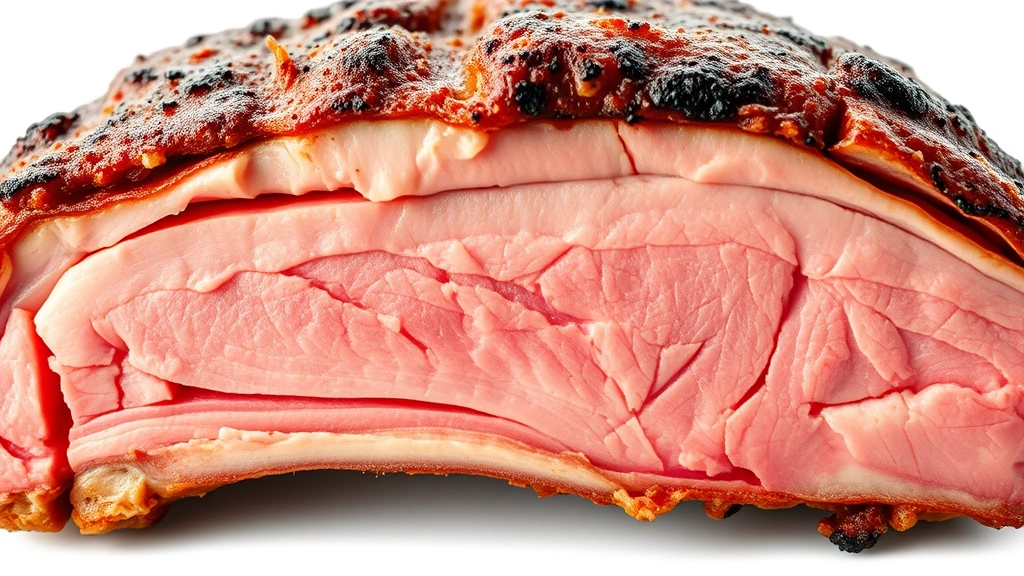
Testing for Doneness
The bend test is your friend here. Pick up a rib with tongs. If it bends easily and nearly breaks in half, you’re golden. If it’s still quite stiff, give it another 20-30 minutes.
Another way to check: the meat should pull back from the bone slightly, exposing about a quarter inch of bone at the ends. If the meat is still covering the bone tightly, it needs more time.
A meat thermometer should read 190-203°F when inserted into the thickest part of the meat (not touching bone). This temperature range indicates the collagen has fully converted and the meat is maximally tender.
Resting & Serving
After removing from the oven, let your ribs rest for 5-10 minutes before serving. This allows the juices to redistribute throughout the meat. If you cut into them immediately, those juices run out onto the plate instead of staying in the meat.
Arrange them on a serving platter. If you didn’t sauce them during cooking, you can brush sauce on now. Some folks like to serve sauce on the side so everyone can customize their portion.
Country style ribs pair well with traditional sides: coleslaw, baked beans, cornbread, or potato salad. They’re hearty enough to be the star of the plate, so you don’t need much else.
Common Cooking Problems
Ribs came out tough: You likely cooked them too hot or didn’t cook them long enough. Stick to 300°F and give them the full 2.5-3 hours. The meat needs time to break down.
Ribs are dry: This usually means you uncovered them too early or cooked them uncovered the whole time. Keep that foil on for at least 2.5 hours. The steam is essential.
Sauce burned: Your oven might run hot, or you left them in too long during the final saucing stage. Check at 15 minutes instead of waiting the full 30.
Uneven cooking: Make sure your oven racks are positioned correctly and the pan is centered. Rotate the pan halfway through if your oven has hot spots.
Ribs still have a gamey taste: This sometimes happens with pork. Soaking the ribs in buttermilk for 2-4 hours before cooking can help neutralize this flavor. Rinse and pat dry before seasoning.
Frequently Asked Questions
Can I cook country style ribs at a higher temperature to save time?
You can, but it’s not recommended. Cooking at 350°F will cut the time to about 2 hours, but the meat won’t be as tender. The whole point of country style ribs is that they’re forgiving—use that to your advantage with low-and-slow cooking. The results are worth the wait.
How long can I store cooked country style ribs?
Refrigerate them in an airtight container for up to 4 days. You can also freeze them for up to 3 months. Reheat gently in a 300°F oven, covered with foil, for about 20 minutes. Add a splash of broth or sauce to keep them moist during reheating.
Do I need to flip the ribs halfway through cooking?
Nope. The foil traps steam that cooks them evenly from all sides. Flipping isn’t necessary and just lets heat and moisture escape. Leave them alone and let the oven do its thing.
What’s the difference between country style ribs and baby back ribs?
Country style ribs are much larger, meatier, and come from the shoulder. Baby backs are smaller, leaner, and come from the rib section. Country style ribs are better for oven cooking because they’re thicker and less likely to dry out.
Can I use this method for other rib types?
Absolutely. The same low-and-slow technique works for spare ribs and baby backs, though they’ll cook faster (1.5-2 hours for baby backs, 2-2.5 hours for spares) because they’re thinner.
Should I remove the membrane before cooking?
Yes, if it’s still there. The membrane prevents seasonings from penetrating and makes the ribs harder to eat. It takes 30 seconds to remove, so it’s worth doing.
Can I cook ribs without foil?
You can, but they won’t be as tender. Uncovered cooking at 300°F takes about 4 hours and results in drier meat. The foil creates a moist cooking environment that’s key to tenderness.
What if my ribs are still tough after 3 hours?
Keep cooking. Some ribs need an extra 30 minutes. The meat will eventually break down. You can also increase the temperature slightly to 325°F if you’re in a time crunch, but expect slightly less tender results.
Can I prep the ribs the night before?
Absolutely. Season them, wrap tightly in plastic wrap, and refrigerate overnight. The flavors will penetrate even more. Just bring them to room temperature for 20-30 minutes before cooking, or add 15-20 minutes to your cooking time.
What sauces work best with country style ribs?
Tangy sauces like Cheddar Cheese Sauce Recipe add richness, while spicy options provide contrast to the fatty meat. You can also go classic with a tomato-based barbecue sauce or a mustard-based sauce for something lighter.
Final Thoughts
Cooking country style ribs in the oven is genuinely one of the easiest ways to produce restaurant-quality results at home. The method is forgiving, the timing is predictable, and the payoff is spectacular. You’re not fighting against the meat—you’re working with it, using gentle heat and steam to transform it into something tender and delicious.
Start with the basic technique: 300°F, covered, for 2.5 hours. Once you nail that, experiment with different rubs and sauces. Try pairing them with Boiling Crab Recipe for a surf-and-turf dinner, or go full seafood with Air Fryer Tilapia Recipe for a lighter alternative on other nights.
The beauty of this method is that it’s scalable—whether you’re cooking for two or twenty, the technique stays the same. The ribs finish at the same time, they stay warm without drying out, and you’ll have time to prepare sides or just relax while they cook.
Next time you’re planning a meal and want something impressive but low-stress, reach for country style ribs. Your oven is about to become your secret weapon for amazing food.


