
Learning how to cook ahi tuna is one of those kitchen skills that looks fancy but honestly couldn’t be simpler. I’ve been searing ahi tuna steaks for years, and the secret isn’t some complicated technique—it’s understanding your heat, respecting the fish, and knowing when to stop. Most people overthink it and end up with rubbery, overcooked fish. That’s not happening on my watch. This guide walks you through everything from selecting quality ahi at the market to plating a restaurant-quality meal in your own kitchen.
Table of Contents
Selecting Quality Ahi Tuna
You can’t make great ahi tuna if you start with mediocre fish. When you’re at the fish counter, look for steaks that are bright red or deep pink—that’s your first indicator of freshness. The flesh should look firm and moist, never dull or brown. Ask the fishmonger when the fish came in. Ideally, you want something that arrived within the last 24 hours. If they can’t tell you, that’s a red flag.
Ahi tuna steaks should be at least 1 to 1.5 inches thick. Anything thinner than that and you’ll struggle to get a proper sear without cooking the center solid. I always ask for sushi-grade ahi if I’m planning to serve it rare or medium-rare, which is the way ahi is meant to be eaten. Sushi-grade means it’s been handled and frozen according to strict food safety standards that kill parasites. It’s worth the extra couple bucks.
Prep Work Matters
Here’s where most home cooks cut corners, and it shows in the final dish. Remove your ahi tuna steaks from the refrigerator about 15-20 minutes before cooking. Cold fish won’t sear properly—it’ll steam instead. While the fish comes to room temperature, pat it completely dry with paper towels. Moisture is the enemy of a good crust. Don’t be shy about this step.
Season generously with kosher salt and freshly ground black pepper on both sides. Some people add garlic powder or sesame seeds if they’re going that direction, but honestly, good ahi doesn’t need much. The fish itself is the star. If you’re using a marinade or glaze, apply it after searing, not before. Wet surfaces prevent browning, and browning is what creates flavor.
Searing Technique Breakdown
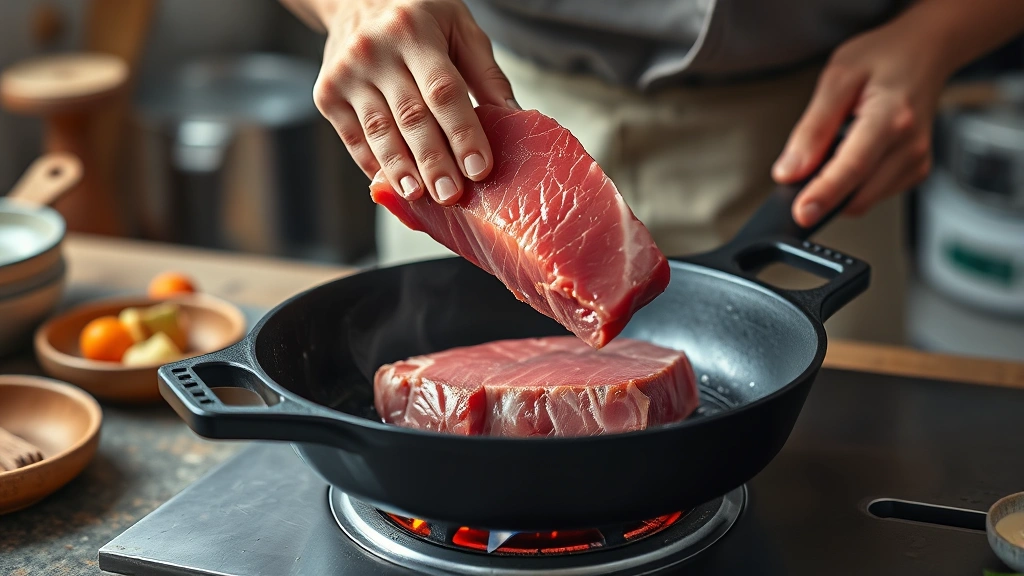
This is where the magic happens. Get your pan screaming hot—and I mean properly hot. I use a cast iron skillet or a stainless steel pan. Non-stick won’t get hot enough to give you the crust you want. Heat your pan over medium-high to high heat for about 2-3 minutes. You’ll know it’s ready when a drop of water immediately sizzles and evaporates.
Add a high-smoke-point oil—avocado oil or grapeseed oil work great. Don’t use olive oil for this; it’ll burn. Let the oil heat for 30 seconds, then carefully place your ahi steaks in the pan. You should hear an immediate, aggressive sizzle. Don’t move them. Seriously, leave them alone for 90 seconds to 2 minutes. Flipping constantly is a rookie move that ruins the crust.
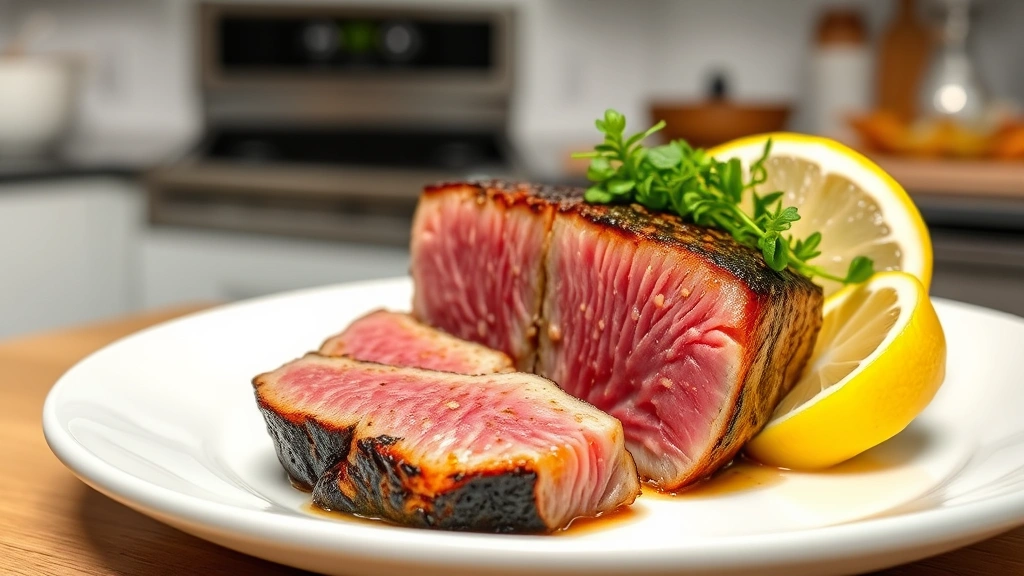
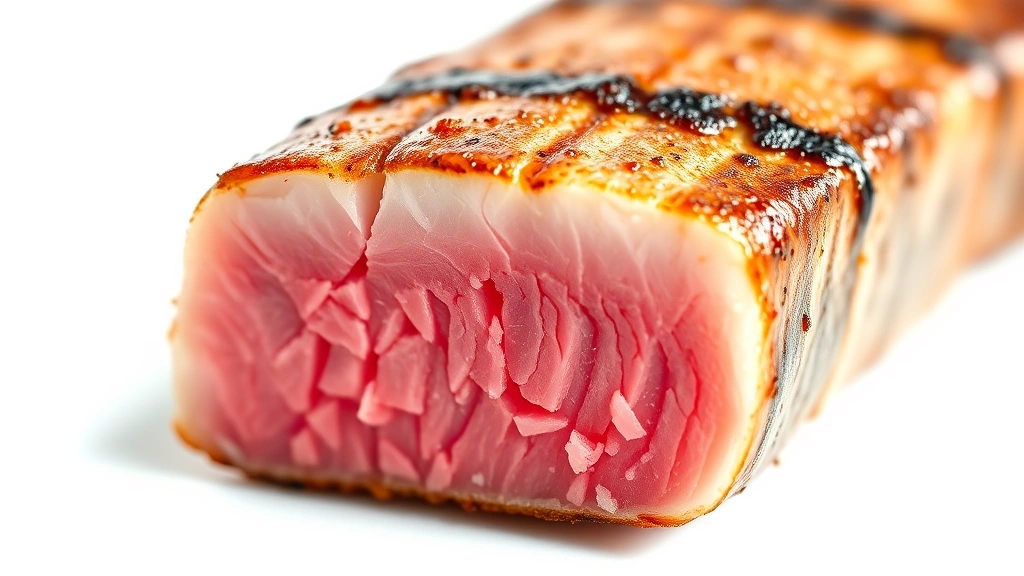
After that first side develops a beautiful golden-brown crust, flip once and sear the other side for another 90 seconds to 2 minutes. The entire cooking time should be 3-4 minutes total for a medium-rare center. That’s it. You’re done. The residual heat will continue cooking the fish slightly after you pull it from the pan.
Temperature Guide for Doneness
If you want to be precise, use an instant-read thermometer. For rare ahi, pull it at 110-115°F internal temperature. For medium-rare (my recommendation), aim for 120-125°F. Medium is around 130-135°F, though at that point you’re starting to lose what makes ahi special. I never recommend cooking ahi beyond medium because the texture becomes mealy and dry.
The thermometer should go into the thickest part of the steak, inserted from the side so it reads the center without hitting the pan-seared crust. Remember that carryover cooking will raise the temperature another 5 degrees or so after you remove it from heat, so pull it a few degrees before your target temperature.
Pan Selection and Heat
Cast iron is my go-to for ahi tuna. It retains heat incredibly well and distributes it evenly, which means consistent crust development. If you don’t have cast iron, a heavy stainless steel pan works just as well. Avoid thin pans that heat unevenly—you’ll end up with hot spots that burn while other areas barely brown.
The pan needs to be big enough that your steaks aren’t crowded. If they’re touching or crammed in there, they’ll steam instead of sear. You want air circulation around each steak. If you’re cooking multiple steaks, work in batches rather than overcrowding the pan. It takes an extra few minutes, but the results are worth it.
Flavor Combinations That Work
After searing, this is where you can get creative. A simple squeeze of fresh lemon or lime brightens the fish beautifully. A drizzle of soy sauce with a touch of sesame oil and ginger creates an Asian-inspired profile that complements ahi perfectly. Some people finish with a wasabi mayo or sriracha aioli. I’m partial to a quick pan sauce made with white wine, butter, and capers.
If you’re marinating before cooking, keep it light and acidic—think lime juice, soy, and a bit of ginger. Don’t marinate for more than 30 minutes, though, because the acid will start breaking down the fish’s texture. The beauty of quality ahi is that it doesn’t need much. Sometimes the best preparation is just salt, pepper, and heat, then a squeeze of citrus at the end.
Common Mistakes to Avoid
The biggest mistake is cooking it too long. Ahi tuna is lean, so it dries out fast. You’re not trying to cook it through—you’re searing the outside while keeping the inside tender and moist. If you’re nervous about undercooking it, remember that sushi-grade ahi is safe to eat raw, so medium-rare is absolutely fine.
Another common error is starting with cold fish straight from the fridge. You’ll get a gray band of overcooked flesh between the crust and the rare center. That’s why the 15-20 minute rest is crucial. Also, don’t skip the drying step. Water on the surface prevents browning and creates steam, which is the opposite of what you want.
People also often use the wrong oil or don’t get the pan hot enough. If your pan isn’t screaming hot, you won’t get that beautiful crust. And if you use an oil with a low smoke point, it’ll burn and taste bitter. High-smoke-point oils like avocado, grapeseed, or refined coconut oil are your friends here.
Serving Suggestions
Seared ahi tuna is incredibly versatile. Serve it sliced over a bed of greens with a sesame-ginger dressing. Layer it on sushi rice with avocado and cucumber for a poke bowl situation. Pair it with roasted vegetables like asparagus or Brussels sprouts. A simple grain like quinoa or jasmine rice works great as a base.
For protein-focused meals, you might pair your ahi with how to cook a sirloin tip roast techniques for understanding proper searing, or check out how long to bake chicken breast at 425 for other protein timing references. If you’re planning a larger meal, consider preparing how to bake chicken wings in the oven as an appetizer alongside your ahi course.
Wine pairing matters too. A crisp Sauvignon Blanc, a light Pinot Grigio, or even a dry rosé complements seared ahi beautifully. If you’re doing an Asian-inspired preparation, sake or a light Japanese beer works perfectly. The key is choosing something that won’t overpower the delicate fish flavor.
Frequently Asked Questions
Can I cook ahi tuna in the oven?
You technically can, but you won’t get the same crust. The stovetop sear method is really the best approach for ahi. If you must use an oven, sear it first on the stovetop for the crust, then finish it in a 400°F oven for a minute or two if needed. This hybrid method gives you the best of both worlds.
How do I know if my ahi tuna is done?
Use a meat thermometer—120-125°F for medium-rare is ideal. Alternatively, you can cut into the thickest part with a small knife and check the color. The center should still be bright red or deep pink, not gray. If you’re uncomfortable with that, aim for 130°F for medium, but know you’re risking dryness.
Is it safe to eat ahi tuna rare?
Yes, as long as you buy sushi-grade ahi. Sushi-grade fish has been frozen at temperatures that kill parasites, making it safe to eat raw or rare. Regular grocery store ahi hasn’t necessarily undergone this process, so stick with sushi-grade if you want to serve it rare or medium-rare.
What’s the difference between ahi tuna and yellowfin?
Ahi and yellowfin are actually the same fish—ahi is the Hawaiian name for yellowfin tuna. They’re the same species, so don’t let the different names confuse you at the fish counter. Both refer to that beautiful red flesh and mild, slightly sweet flavor.
Can I make ahi tuna ahead of time?
Ahi is best served immediately after searing, while it’s still warm. You can sear it earlier in the day and serve it cold as part of a salad or poke bowl, but reheating it is not recommended—it’ll dry out. If you’re meal prepping, sear it fresh and eat within a day.
What should I do with leftover ahi tuna?
Leftover seared ahi works great in salads, grain bowls, or even flaked into pasta. You can also dice it up and make ahi poke. Just store it in an airtight container in the fridge for up to 2 days. Don’t reheat it; serve it cold instead.
Final Thoughts
Cooking how to cook ahi tuna perfectly really comes down to a few key principles: start with quality fish, get your pan screaming hot, sear hard and fast, and stop before you think it’s done. It sounds simple because it is. The fish does most of the work—your job is just to get out of its way and let it shine. Once you nail this technique, you’ll find yourself making seared ahi tuna regularly. It’s restaurant-quality food that you can put on the table in about 20 minutes total, from counter to plate. That’s a win in my book.


