
Learning how to cook a chuck roast in the oven is one of those kitchen skills that transforms tougher cuts of meat into fall-apart tender masterpieces. I’ve been roasting chuck roasts for years, and honestly, it’s become my go-to move when I want something that tastes like it took all day but actually fits into a normal weeknight schedule. The beauty of this method is that you’re not standing over a stove—you’re just letting your oven do the heavy lifting while you handle other things.
Table of Contents
Why Chuck Roast Works Best
Chuck roast is basically the perfect candidate for oven cooking. This cut comes from the shoulder area of the cow, packed with connective tissue and marbling that breaks down beautifully under low, moist heat. When you apply gentle warmth over time, those tough fibers transform into gelatin, creating that luxurious, tender texture that makes people think you spent hours in the kitchen.
The fat content is another reason chuck roast shines. Unlike leaner cuts that can dry out, the marbling keeps everything juicy and flavorful throughout the cooking process. This is why braising—cooking in liquid in a covered pot—works so well with chuck roast. You’re essentially creating an environment where the meat can’t possibly dry out.
Selecting and Preparing Your Meat
Head to your butcher counter and look for a chuck roast that’s roughly 3 to 4 pounds. You want one with visible white fat running through the meat—that’s your insurance policy for tenderness and flavor. Avoid anything that looks gray or has been sitting in the case too long.
Once you get it home, let the roast sit at room temperature for about 30 minutes before cooking. This sounds simple, but it makes a real difference. Cold meat won’t sear properly, and you’ll miss out on that caramelized crust that adds serious depth to your finished dish. Pat the roast completely dry with paper towels—moisture is the enemy of a good sear.
Building Flavor with Seasoning
Don’t be shy with your seasoning. This is where you set the tone for the entire dish. I use kosher salt and freshly ground black pepper as my foundation—at least a tablespoon of salt for a 3-pound roast. The salt doesn’t just sit on the surface; it penetrates the meat and seasons it throughout.
Beyond the basics, think about what flavors you want. Garlic powder, onion powder, smoked paprika, and dried thyme are my usual suspects. You can also get creative—a touch of cayenne adds complexity without heat, and a pinch of coffee powder deepens the savory notes. Mix your seasonings together and rub them all over the roast, getting into every crevice. This is when you’re building the foundation for incredible flavor.
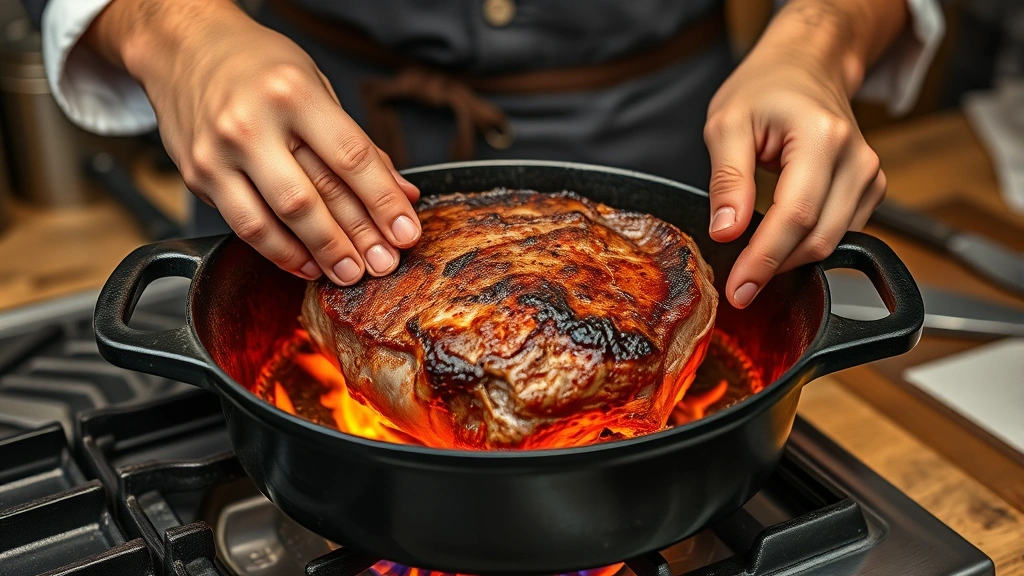
Searing for Depth and Color
Heat a heavy-bottomed Dutch oven or large oven-safe pot over medium-high heat. Add a couple tablespoons of high-heat oil—vegetable or avocado oil works great. When the oil is shimmering and just starting to smoke, carefully place your seasoned roast in the pot.
Here’s the critical part: don’t move it. Let it sit for 4 to 5 minutes until a deep brown crust forms on the bottom. Flip it and repeat on all sides. You’re looking for a mahogany-colored crust all around. This process, called the Maillard reaction, creates hundreds of complex flavors that you simply can’t get any other way. It’s the difference between a good pot roast and one that tastes restaurant-quality.
Creating the Perfect Braising Liquid
After searing, remove the roast and set it aside. In the same pot, add diced onions, carrots, and celery—the classic mirepoix. Let these cook for about 5 minutes until they start to soften and release their aromatics. This builds another layer of flavor.
Pour in about 2 to 3 cups of liquid. Beef broth is the standard choice, but you can also use a combination of beef broth and red wine for richness, or even just beef broth with a splash of Worcestershire sauce. The liquid should come about halfway up the sides of the roast—not submerged, but enough to create steam and moisture.
Add a few sprigs of fresh thyme, a couple of bay leaves, and some crushed garlic cloves. These aromatics infuse the braising liquid and the meat as everything cooks together. This is when you’re really setting yourself up for success.
Oven Cooking Time and Temperature
Place the lid on your Dutch oven and slide it into a 325-degree Fahrenheit oven. This low temperature is key—it allows the connective tissue to break down slowly and evenly without the outside of the meat getting tough. For a 3-pound roast, plan on about 3 to 3.5 hours of cooking time.
You don’t need to do much during this time, but I like to check it halfway through and give the roast a gentle turn. This ensures even cooking on all sides. The braising liquid should be gently simmering—you might see an occasional bubble breaking the surface, but it shouldn’t be at a rolling boil.
If you’re planning a pot roast with vegetables like potatoes and carrots, add them about 45 minutes before the roast is done. This gives them enough time to become tender without falling apart.
Testing for Perfect Doneness
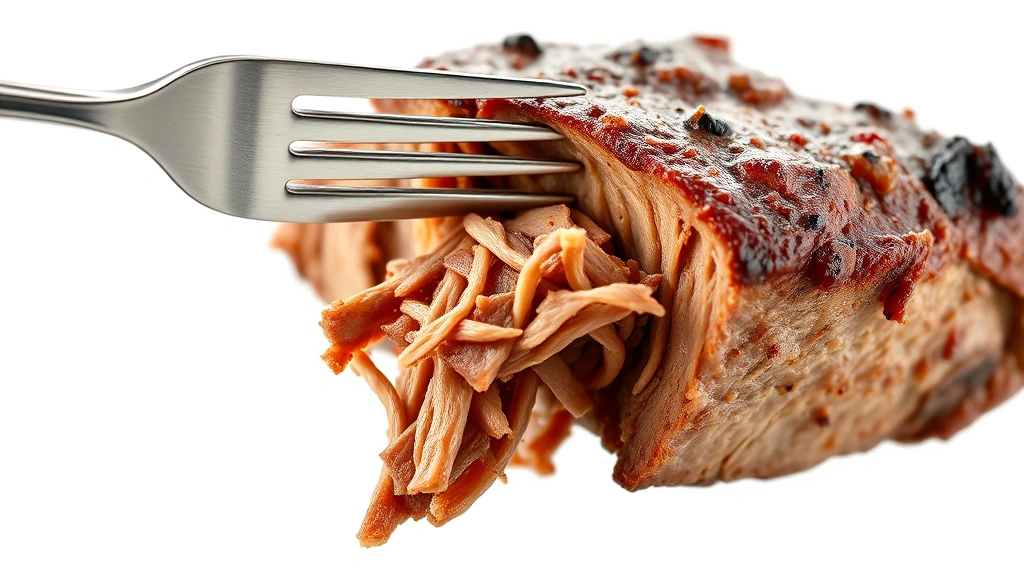
The real test of doneness isn’t a thermometer reading—it’s the fork test. After about 3 hours, pierce the thickest part of the roast with a fork and try to pull a chunk away. If it shreds easily and falls apart, you’re done. If it still feels firm, give it another 20 to 30 minutes and test again.
A meat thermometer should read around 190 to 210 degrees Fahrenheit for that fall-apart tender texture. Some people stop at 160 to 165 degrees for a firmer result, but honestly, for chuck roast, you want it hot and tender. That’s the whole point.
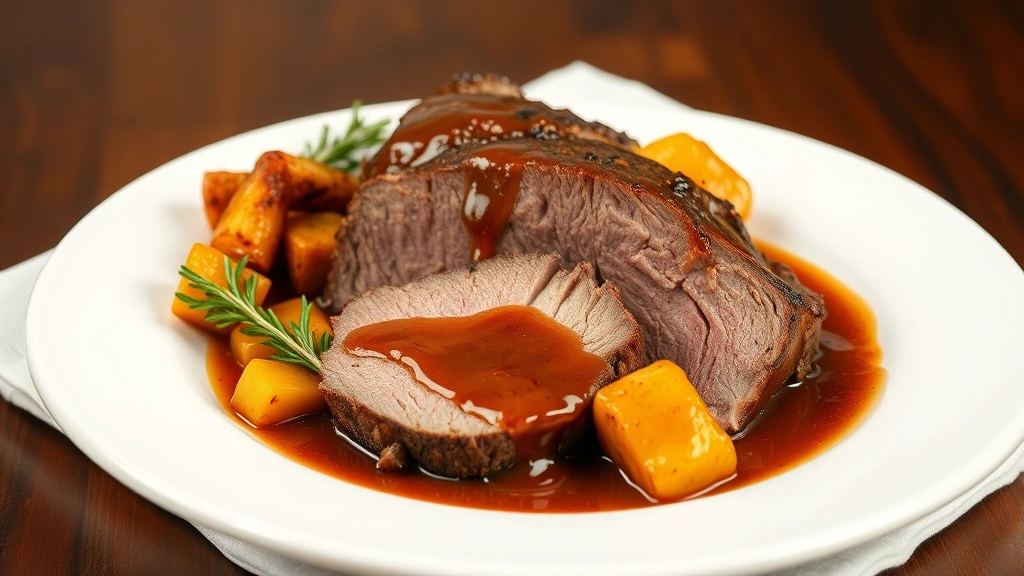
Resting and Slicing Like a Pro
Remove the pot from the oven and let the roast rest in the braising liquid for at least 10 minutes. This allows the juices to redistribute throughout the meat. If you cut into it immediately, all those precious juices run out onto the cutting board instead of staying in your meat.
Transfer the roast to a cutting board and tent it loosely with foil. While it rests, you can strain the braising liquid and vegetables. If you want to make a sauce, pour the liquid into a saucepan and simmer it down to concentrate the flavors. A slurry of cornstarch and water stirred in at the end creates a silky gravy.
Slice the roast against the grain—this shortens the muscle fibers and makes each bite more tender. You’ll notice the meat practically falls apart as you cut it. That’s when you know you’ve nailed it.
Serving Suggestions and Sides
Chuck roast pairs beautifully with classic comfort food sides. Creamy mashed potatoes are the obvious choice, but roasted root vegetables work just as well. If you’re looking for something lighter, a simple green salad or steamed broccoli balances the richness of the meat.
The braising liquid and vegetables are part of the meal—don’t skip them. Spoon that silky sauce over the meat and vegetables. Everything works together as one cohesive dish. If you want to explore other cooking methods, check out our guide on how to bake frozen salmon for another approach to oven cooking, or our best summer recipes for lighter options during warmer months.
Storing and Reheating Leftovers
Chuck roast actually improves the next day as the flavors continue to develop and meld. Store it in an airtight container in the refrigerator for up to 4 days. The braising liquid will gel slightly as it cools—that’s the gelatin from the meat, and it’s pure flavor.
To reheat, place the roast and liquid in a covered pot and warm it gently over medium-low heat until it reaches serving temperature. You can also reheat it in the oven at 325 degrees, covered, for about 20 to 30 minutes. Never use high heat for reheating—you’ll risk drying out the meat.
Frequently Asked Questions
Can I cook chuck roast at a higher temperature to save time?
You technically can, but I wouldn’t recommend it. Higher temperatures will toughen the exterior of the meat before the interior becomes tender. The low-and-slow method at 325 degrees is what transforms chuck roast into something special. Patience is the secret ingredient here.
What if my roast turns out tough?
This usually means it didn’t cook long enough. Chuck roast needs time for the connective tissue to break down completely. If it’s tough, it’s undercooked. Next time, cook it longer—aim for that 190-degree internal temperature and the fork-shred test.
Can I use a slow cooker instead of the oven?
Absolutely. A slow cooker works great for chuck roast. Follow the same searing process, then transfer everything to your slow cooker on low for 8 to 10 hours. You’ll get similar results, though you’ll miss out on that beautiful seared crust if you skip the initial browning step.
Is it necessary to sear the roast first?
Technically, no. You can skip searing and go straight to braising. But you’ll lose significant flavor. That caramelized crust adds depth and complexity that you can’t replicate any other way. It’s worth the extra 15 minutes.
What wine should I use for braising?
A dry red wine works best—something like a Cabernet Sauvignon or Merlot. Avoid anything too expensive since the flavors will concentrate and intensify. If you don’t want to use wine, stick with beef broth and Worcestershire sauce for similar depth.
Can I freeze leftover chuck roast?
Yes, it freezes beautifully. Store it in the braising liquid in an airtight container for up to 3 months. Thaw it overnight in the refrigerator and reheat gently. The flavors actually seem to improve after freezing.
What’s the best way to slice chuck roast?
Always slice against the grain—this means cutting perpendicular to the direction the muscle fibers run. You’ll notice the difference immediately in tenderness. If you’re unsure which direction is the grain, look at the surface of the meat and slice perpendicular to those lines.
For more cooking inspiration, check out our apple butter recipe crockpot for another slow-cooking technique, or explore our al pastor recipe for a completely different flavor profile. If you’re learning other defrosting techniques, our guide on how to unfreeze chicken covers proper food safety practices.
Final Thoughts
Cooking a chuck roast in the oven is honestly one of the most forgiving cooking methods out there. The low, moist heat does most of the work for you. Once you nail the basics—proper seasoning, a good sear, enough braising liquid, and patience—you’ll be making restaurant-quality pot roasts at home regularly. The smell alone will have people asking what’s for dinner before they even walk in the door. Start with these fundamentals, and don’t be afraid to experiment with different aromatics and liquids as you get more comfortable. You’ve got this.


