

Your iPhone speaker sounds like it’s underwater. You’re holding it up to your ear during a call and the person on the other end sounds muffled, distant, tinny. Sound familiar? The problem isn’t your phone dying—it’s likely just dust, lint, and debris clogging up the speaker grilles. The good news: how to clean iPhone speaker is straightforward, and you can do it right now with stuff you probably have at home. The bad news: most people either skip this maintenance entirely or accidentally damage their speaker trying to force a solution. This guide walks you through the safest, most effective methods to restore your audio without voiding your warranty or breaking anything.
Why iPhone Speakers Get Dirty
Before we dive into how to clean iPhone speaker, let’s understand what’s actually happening. Your iPhone has multiple speaker grilles—the main speaker at the bottom, the earpiece at the top (which is technically also a speaker), and sometimes a secondary speaker. These grilles are tiny mesh openings, and they’re basically dust magnets.
Think of it like a screen door. Dust, lint from your pocket, dried skin cells, and microscopic debris accumulate over time. If you keep your phone in your pocket or bag, you’re feeding it lint daily. If you use it while eating or in dusty environments, particles get sucked into those grilles. Some of it sits on top; some works its way deeper into the speaker chamber itself.
The result? Sound gets muffled. The speaker driver (the actual component that vibrates to produce sound) has to work harder to push sound through the blockage, which can actually reduce its lifespan if left unchecked for months.
Before You Start: Safety First
Here’s the real talk: iPhone speakers are delicate. The mesh grilles protect the speaker driver underneath, but that driver is tiny and can be damaged if you’re too aggressive. Before you grab any tool, understand what you’re working with.
Safety Warning: Never use sharp metal objects, toothpicks, or anything that can puncture the mesh. Never use liquid cleaners, water, or solvents directly on the speaker. Never stick anything deep into the speaker opening. These actions void your warranty and can permanently damage the speaker.
First, power off your iPhone completely. This isn’t strictly necessary for cleaning, but it’s good practice—if something goes wrong, you don’t want the device powered on. Also, make sure your hands are clean and dry. Moisture is the enemy here.
Second, inspect the speaker grille with good lighting. Use a flashlight or move to a bright window. Can you actually see debris, or does it just sound muffled? Sometimes muffled audio is a software issue (check your mute switch, volume settings, and whether you have a case blocking the speaker). But if you can visibly see lint or dust in the grilles, you’re good to proceed.
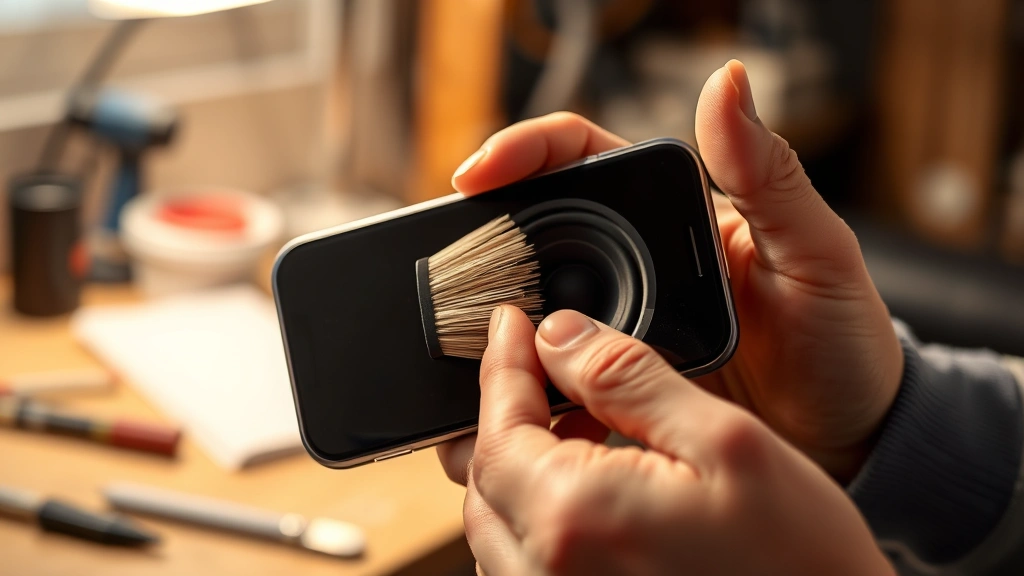
Method 1: Soft Brush Technique (Safest Option)
This is the method I recommend starting with because it’s the least risky. You’re going to use a soft brush to gently dislodge debris without applying pressure that could damage the speaker mesh.
What you’ll need:
- Soft-bristled brush (a clean toothbrush works, but an old makeup brush or anti-static brush is even better)
- Good lighting
- Optional: a small handheld vacuum nearby to catch loose debris
The process:
- Position your iPhone with the speaker grille facing down or to the side (gravity helps debris fall away, not deeper in).
- Hold the brush at a shallow angle—don’t press straight down into the grille.
- Gently brush across the mesh in one direction, using light pressure. Think of it like brushing dust off a picture frame, not scrubbing a pot.
- Rotate your iPhone and brush from different angles to dislodge debris from various sides.
- Let gravity do the work. Tilt the phone so loose particles fall away.
- Repeat 3-4 times, checking your progress with the flashlight.
- Test the speaker by playing audio at medium volume.
This method works best for surface-level lint and dust. If the debris is packed in tight, you might need to escalate to Method 2.
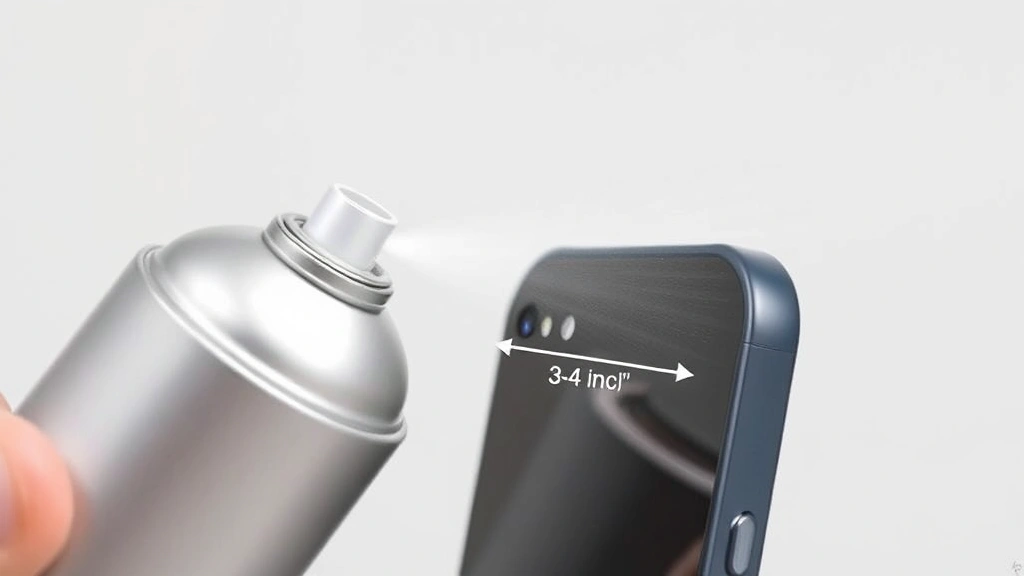
Method 2: Compressed Air (The Nuclear Option)
Compressed air is powerful and effective, but it requires care. Too much pressure or the wrong angle can actually force debris deeper into the speaker chamber or damage the mesh. That said, if soft brushing didn’t work, compressed air is your next move.
What you’ll need:
- Compressed air canister (the kind used for cleaning keyboards and cameras—available at any electronics store for $5-10)
- A straw attachment (most canisters come with one)
- Good ventilation (compressed air can spray liquid if you hold the canister wrong)
The process:
- Hold your iPhone upright with the speaker grille facing horizontally or downward.
- Keep the compressed air canister upright (not tilted or inverted, or you’ll spray liquid instead of air).
- Attach the straw to the nozzle if available—this gives you better control and direction.
- Hold the canister 3-4 inches away from the speaker grille. This distance matters. Too close and you risk forcing debris deeper; too far and the air disperses.
- Give 2-3 short bursts of air, directing the stream across the grille (not straight into it).
- Wait a few seconds between bursts to let debris settle and fall away.
- Rotate the phone and repeat from different angles.
- Test the speaker.
Pro tip: Do this over a trash can or outside so you can actually see the debris being expelled. This confirms it’s working and gives you visual feedback on how much buildup there was.
According to Family Handyman, compressed air is a standard tool for cleaning electronics precisely because it’s non-invasive and doesn’t introduce moisture. Just respect the pressure and distance.
Method 3: Adhesive Tape Trick (For Stubborn Debris)
This method sounds weird, but it works for lint that’s stuck to the mesh. You’re essentially using tape as a lint roller for your speaker.
What you’ll need:
- Painter’s tape, masking tape, or low-tack adhesive tape (NOT duct tape or packing tape—too sticky)
- Scissors
The process:
- Cut a small piece of tape, about 1 inch by 1.5 inches.
- Roll it into a loose loop with the sticky side facing outward.
- Gently press the tape loop onto the speaker grille mesh and immediately pull it away.
- Inspect the tape—you should see lint and dust stuck to it.
- Repeat with fresh tape pieces until no more debris sticks to the tape.
- Test the speaker.
This method works surprisingly well for lint that’s woven into the mesh. The key is using low-tack tape so you don’t damage the mesh itself. If the tape is pulling at the mesh or feels like it’s sticking too aggressively, stop immediately.
What NOT to Do When Cleaning iPhone Speaker
Before we talk prevention, let’s be crystal clear about what will damage your speaker and void your warranty.
Do NOT do any of these things:
- Use water or liquid cleaners. Your iPhone has water resistance, but the speaker mesh isn’t sealed. Liquid can seep past the mesh and damage the speaker driver or internal components.
- Use sharp objects like needles, pins, or toothpicks. These puncture the mesh and destroy the speaker’s protective barrier. Once the mesh is compromised, dust goes straight to the driver.
- Use a vacuum cleaner directly on the speaker. The suction is too strong and can damage the mesh or even pull components loose.
- Poke or prod aggressively. The speaker driver is delicate. Rough handling can break it permanently.
- Use isopropyl alcohol or solvents. These can seep past the mesh and corrode components inside.
- Blow on the speaker with your mouth. Your breath contains moisture, which is exactly what you’re trying to avoid.
- Disassemble the phone yourself. Unless you’re a trained technician, you’ll break something. Apple’s repair costs for speaker damage are steep.
If you’ve already damaged your speaker or these methods aren’t working, your best bet is visiting an Apple Store or authorized repair center. Speaker replacement is usually $50-100, which is cheaper than buying a new phone.
Prevention: Keep Your Speaker Clean Longer
The best maintenance is the kind that stops problems before they start. Here’s how to keep your iPhone speaker clean without constant deep cleaning.
Use a protective case. A good case creates a barrier between your phone and pocket lint. Yes, some cases can muffle sound slightly, but the trade-off is worth it if you’re someone who keeps their phone in a pocket or bag constantly.
Keep your phone out of your pocket. I know this isn’t practical for everyone, but if you’re noticing frequent speaker issues, your pocket environment is the culprit. Pockets are lint factories. Consider a small bag or holster instead.
Clean your speaker monthly. Don’t wait until sound is muffled. A quick 30-second brush with a soft brush once a month prevents major buildup. Think of it like dusting furniture—a little maintenance beats a deep clean.
Avoid eating while using your phone. Crumbs and food particles are surprisingly common speaker contaminants. If you’re snacking, put the phone down.
Be mindful in dusty environments. If you’re working in a workshop, garage, or construction site, keep your phone in a sealed pocket or bag. Sawdust and drywall particles are nightmare-fuel for speakers.
Also consider how to clean iPhone charging port as part of your regular maintenance routine. Both the speaker and charging port accumulate debris over time and benefit from the same preventive approach.
If you’re frequently making voice calls or sending audio messages, keeping your speaker in good condition is essential. Check out our guide on how to send voice message on iPhone for tips on maximizing audio quality.
Frequently Asked Questions
Will cleaning my iPhone speaker void my warranty?
– No, not if you use safe methods. Apple’s warranty covers manufacturing defects, not normal wear and tear. Using a soft brush, compressed air, or low-tack tape is non-invasive and won’t void anything. However, if you damage the speaker mesh or introduce liquid, Apple can refuse warranty service. Stick to the gentle methods and you’re fine.
How often should I clean my iPhone speaker?
– For most people, monthly maintenance is sufficient. If you keep your phone in your pocket constantly or work in dusty environments, clean it every 2-3 weeks. If you notice muffled sound, that’s your signal to clean immediately rather than waiting.
Can I use a toothbrush to clean my iPhone speaker?
– A regular toothbrush can work, but only if it’s soft-bristled and you’re extremely gentle. Medium or hard-bristled toothbrushes can damage the mesh. An old makeup brush, anti-static brush, or soft cleaning brush designed for electronics is safer. If you only have a medium toothbrush available, use it very lightly and at a shallow angle.
What if compressed air doesn’t work?
– If soft brush and compressed air haven’t restored your speaker, the debris might be packed deep inside the speaker chamber, or the problem might not be debris at all. Try the adhesive tape method next. If that doesn’t work, the issue could be software-related (check your volume settings, mute switch, and whether a case is blocking the speaker). If it’s still not working, contact Apple Support or visit an Apple Store. The speaker driver itself might be failing, which requires professional replacement.
Is my speaker damaged if it still sounds muffled after cleaning?
– Not necessarily. Muffled sound can be caused by debris, but it can also be caused by a case blocking the speaker, software issues, or a failing speaker driver. After cleaning, test with the case removed and at different volume levels. If sound is still muffled across all apps and volume levels, the speaker driver might need replacement. If sound is clear at high volumes but muffled at low volumes, that’s often a software issue—restart your phone or check if you have any audio apps with EQ settings enabled.
Can I use a small handheld vacuum to clean my iPhone speaker?
– Not directly on the speaker. The suction is too strong and can damage the mesh or dislodge components. However, having a small vacuum nearby while using compressed air or a brush is useful for catching debris that falls away. Just don’t point the vacuum at the speaker itself.
What’s the difference between the bottom speaker and the earpiece speaker?
– Your iPhone has two speakers: the earpiece at the top (used during calls and for some audio) and the main speaker at the bottom (used for music, videos, and speaker calls). Both can get dirty and both should be cleaned using the same safe methods. If only one is muffled, that’s the one to focus on. However, if both are muffled, you might have a software issue rather than a debris problem.
Should I clean my iPhone speaker before or after using a protective case?
– Clean it before applying a case. This ensures you’re starting fresh. After cleaning and confirming the speaker sounds good, then apply your case. If you’re already using a case, remove it before cleaning so you can access the speaker grille fully and see what you’re doing.


