

Learning how to clean golf clubs is one of the easiest ways to extend their lifespan and keep your game sharp. Whether you’re a weekend warrior or a serious golfer, dirty clubs don’t just look bad—they actually perform worse. The buildup of dirt, grass, and moisture can affect your swing mechanics and reduce contact quality with the ball.
Table of Contents
Why Clean Clubs Matter
Your golf clubs take a beating every time you step onto the course. Dirt, grass clippings, sand, and moisture accumulate on the clubheads and shafts, creating a grimy layer that impacts performance. When grooves on your irons and wedges get clogged, they can’t grip the ball properly, affecting spin and trajectory. Even worse, moisture trapped against metal can lead to rust and corrosion over time.
Regular cleaning isn’t just about aesthetics—it’s about maintaining your investment. A set of quality golf clubs represents serious money, and proper maintenance preserves both their function and resale value. Think of it like maintaining a car: you wouldn’t skip oil changes, and you shouldn’t skip club cleaning either.
Gather Your Cleaning Supplies
Before you start, round up the right tools. You don’t need anything fancy or expensive. Here’s what works:
- Warm water (lukewarm, not hot)
- Mild dish soap (a few drops is plenty)
- Soft-bristled brush (an old toothbrush works great)
- Microfiber towels (lint-free is key)
- Bucket (large enough for soaking)
- Groove cleaner or old credit card (for stubborn buildup)
- Dry towel (for final buffing)
Skip the harsh chemicals and abrasive scrubbers. They’ll damage the finish on your clubs faster than you can say “fore.” A simple soap-and-water approach works just as well and won’t harm protective coatings or paint.
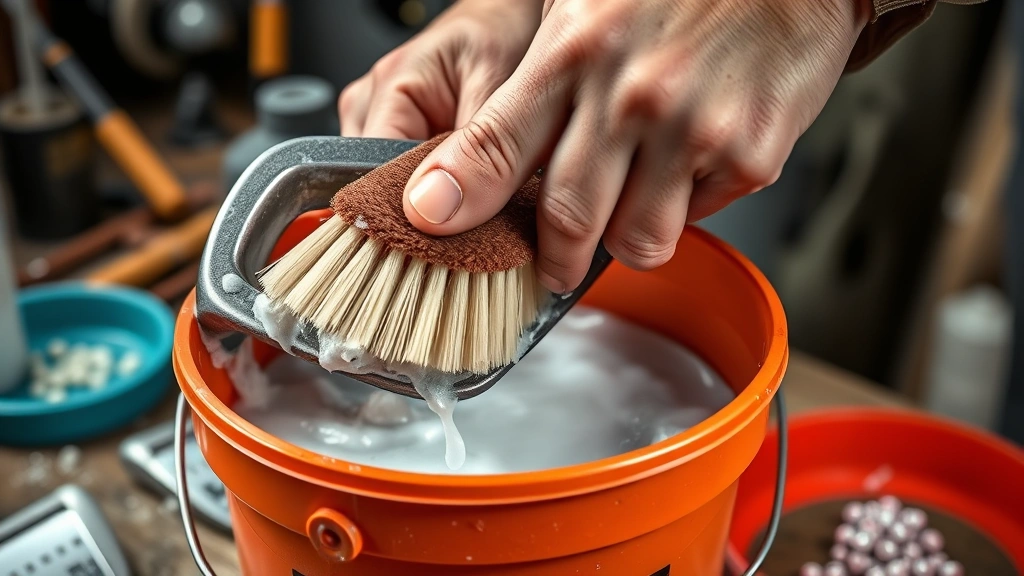
Clean the Club Heads First
Start by filling your bucket with warm water and adding just a squirt of dish soap. The water should be warm enough to loosen grime but not so hot it damages any adhesives in the clubhead construction. Submerge the clubheads (not the shafts or grips) for about 30 seconds to let the warm water soften any dried-on dirt.
Pull out one club and use your soft-bristled brush to scrub the clubhead in circular motions. Pay special attention to the sole and back of the head where dirt loves to hide. For the face of the club, use gentle strokes to avoid scratching. Work methodically through all your irons and wedges this way—it only takes a few minutes per club.
For drivers and woods, be extra gentle around any paint or graphics. The brush should do most of the work without needing much pressure. If you notice stubborn spots that won’t budge, let the club soak for another minute and try again rather than scrubbing harder.
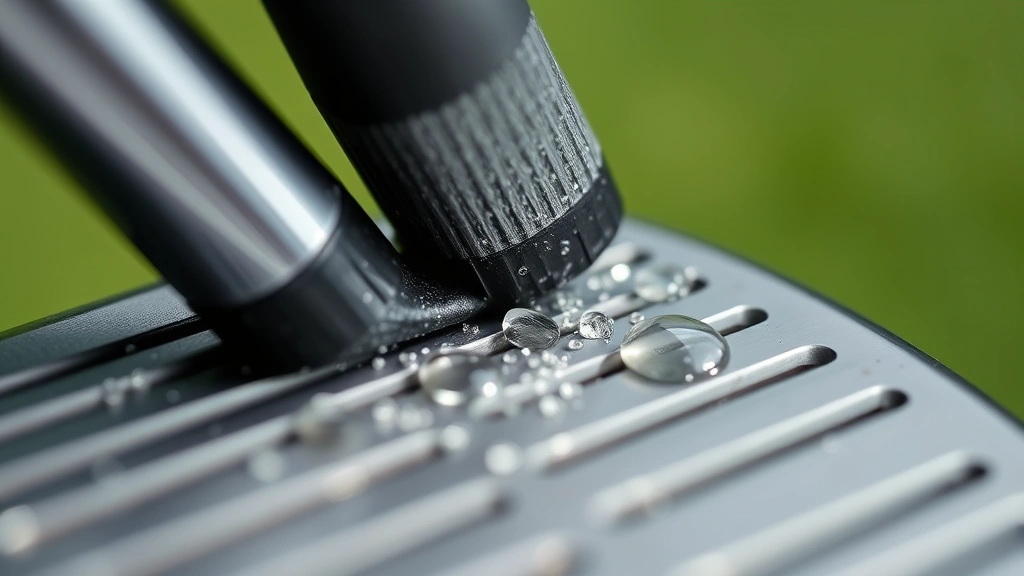
Scrub Those Grooves Deep
The grooves on your irons and wedges are where the magic happens—they’re also where dirt loves to camp out. After your initial brush scrubbing, take a groove cleaner or an old credit card and work it along each groove. You’re not trying to gouge the club; just use steady pressure to dislodge packed-in dirt and grass.
Work from the heel to the toe, following the groove pattern. You’ll be surprised how much gunk comes out. If you don’t have a dedicated groove cleaner, a plastic credit card or old gift card works perfectly. The edge is just rigid enough to clean without damaging the groove walls.
For really stubborn buildup, dip your brush back in the soapy water and hit the grooves again. Repeat the groove cleaner pass. Clean grooves aren’t just about looks—they directly affect how the club interacts with the ball, so this step actually matters for your game.
Handle Your Grips Right
Your grips get sweaty, dirty, and grimy from constant hand contact. Clean them separately from the clubheads to avoid getting water on the shafts where it shouldn’t be. Dip just the grip end into your soapy water bucket and scrub with your brush using the same circular motions you used on the heads.
Pay attention to the underside of the grip where your fingers grip during the swing—that’s where the most buildup occurs. A quick scrub here makes a huge difference in feel and traction. If your grips are really caked with dirt, let them soak for a minute before scrubbing.
Don’t submerge the entire club. Keep the shaft and hosel dry. Water sitting in the hosel (where the shaft meets the clubhead) can cause rust and weaken the bond between components. Grips are replaceable; shafts aren’t always worth fixing.
Dry Everything Properly
This step separates the careful maintainers from the lazy ones. After cleaning, immediately dry each club with a microfiber towel. Start with the clubhead, making sure to get into the grooves and any crevices. Then dry the shaft thoroughly, working your way down to the grip.
Don’t just wipe once and call it done. Really dry the grooves where water likes to hide. Moisture left sitting on your clubs will eventually cause spotting, corrosion, or rust. Spend an extra 30 seconds per club making sure it’s completely dry—it’s worth it.
Lay the clubs out on a towel in an open area for a final air-dry before storing them. If you cleaned multiple clubs, spread them out so air can circulate around each one. This takes maybe five minutes and ensures no trapped moisture lingers.
Protect the Finish Long-Term
Once your clubs are clean and dry, consider applying a light protective coating. Many golfers use a thin coat of car wax on the clubheads (not the face) to protect the finish and make future cleaning easier. Apply it sparingly with a soft cloth, let it sit for a minute, then buff it away with a clean microfiber towel.
This step isn’t necessary every time you clean, but doing it once or twice a season keeps your clubs looking showroom-fresh and provides a barrier against moisture and oxidation. It takes maybe two minutes and makes a noticeable difference in appearance and protection.
For the shaft, a light wipe with a slightly damp cloth followed by immediate drying is all you need. Don’t apply wax to the shaft itself—that can make it slippery and affect your grip. The goal is protecting the clubhead while maintaining functionality everywhere else.
Cleaning Frequency Schedule
How often should you clean? It depends on how often you play and what conditions you encounter. Here’s a practical schedule:
- After every round: Quick rinse and dry of clubheads and grips (5 minutes)
- Every two weeks: Full cleaning with soap, water, and brush (20 minutes)
- Monthly: Deep groove cleaning and protective coating (30 minutes)
- Seasonally: Complete inspection and detailed maintenance
If you play in wet or sandy conditions frequently, bump up the cleaning frequency. If you’re a casual golfer who plays monthly, a thorough cleaning every few months is fine. The key is preventing long-term buildup rather than waiting until your clubs look terrible.
For those serious about their game, a quick post-round rinse makes the next full cleaning much easier. Just 30 seconds of rinsing clubheads under a faucet prevents dirt from drying and hardening, saving you time later.
Frequently Asked Questions
Can I use hot water to clean my golf clubs?
Avoid hot water. Stick with lukewarm water instead. Hot water can damage adhesives in clubhead construction and potentially affect the finish. Lukewarm water is warm enough to loosen grime without risking damage.
Is it safe to soak the entire club in water?
No. Only soak the clubhead, keeping the shaft and grip dry. Water sitting in the hosel or shaft can cause rust and weaken the bond between components. Protect your investment by keeping moisture away from areas where it doesn’t belong.
What if my clubs have rust spots?
Light surface rust can be removed with a soft brush and a tiny bit of white vinegar on a cloth. For serious rust, consult a professional club repair service. Prevention through regular drying is much easier than dealing with rust after the fact.
Should I clean the clubface differently than the back?
The clubface (where you hit the ball) should be cleaned gently to avoid scratching. The back and sole can handle more aggressive scrubbing. Use your brush with light pressure on the face and normal pressure elsewhere.
Can I use a pressure washer on my clubs?
Absolutely not. Pressure washers will damage the finish, force water into areas it shouldn’t go, and potentially dislodge components. Stick with hand cleaning using a soft brush and warm soapy water.
How do I know when to replace my grips?
If grips feel slippery even after cleaning, are cracked or peeling, or have lost their tackiness, it’s time for replacement. A good cleaning should restore most grips to working condition, but worn grips eventually need replacing for safety and performance.
Keep Your Clubs Tournament-Ready
Learning how to clean golf clubs properly takes maybe 30 minutes for a full set, and the payoff is huge. You’ll extend the life of your clubs, maintain their performance, and keep them looking great. More importantly, clean clubs actually perform better—you’ll notice improved contact and consistency on the course.
Make cleaning part of your regular golf routine, not an afterthought. Your clubs will thank you with better performance, and your game will benefit from the improved equipment quality. Plus, there’s something satisfying about seeing your clubs shine after a good cleaning session.
If you’re serious about maintaining your equipment, check out our guide on training routines to keep your own body in peak golfing condition. And for those weekend golf trips, our travel distance guide helps you plan your golf getaways. For post-round meals, check out our hoagie bread recipe for satisfying fuel after 18 holes.


