
Learning how to clean coffee maker with vinegar is one of those workshop skills that’ll save you money and keep your morning brew tasting fresh. I’m talking about a deep clean that dissolves mineral buildup, kills bacteria, and costs you maybe a dollar in white vinegar. No fancy descaling solutions needed.
Table of Contents
Why Vinegar Works So Well
Vinegar isn’t just for salads and pickles. White vinegar contains acetic acid—about 5% by volume—which dissolves mineral deposits like calcium and magnesium that build up inside your coffee maker over time. These minerals are what make your coffee taste flat or bitter. They also slow down water flow and make your machine work harder than it needs to. When you run vinegar through your brewer, the acid eats away at these deposits without damaging plastic or metal components the way harsh chemicals might. Plus, it’s food-safe, cheap, and you probably already have a bottle under your sink.
What You’ll Need to Start
Here’s the beauty of this project—your materials list is short. Grab white vinegar (the regular 5% distilled kind works perfect), fresh water, and a clean cloth or sponge. That’s genuinely it. No special tools, no expensive descaling kits. If your coffee maker has a permanent filter basket, you might want a soft-bristled brush to get into tight corners, but it’s optional. Some folks keep a small bowl handy for soaking removable parts, but your sink works just fine too.
Step-by-Step Cleaning Process
The whole process takes about 30 minutes from start to finish, though most of that is just letting the machine do its thing. I break it into five core steps that work for drip coffee makers, which are the most common type. If you’ve got a French press or espresso machine, the vinegar approach still applies—just adjust the soaking times. The key is letting that acetic acid sit long enough to break down the buildup without rushing.
Fill the Reservoir and Run
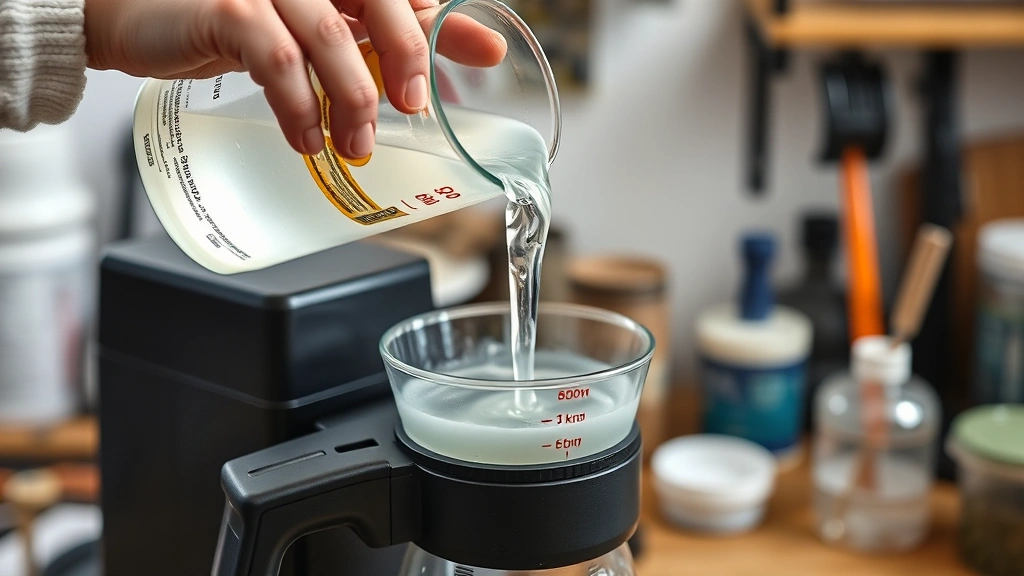
Empty your coffee maker completely. Remove any old grounds and the filter basket. Fill the water reservoir with a 50/50 mix of white vinegar and water. This ratio is strong enough to cut through buildup but won’t damage your machine. Pour it into the top just like you’re making regular coffee, but don’t add any grounds or a filter. Place an empty cup or carafe under the drip spout to catch the vinegar solution. Turn on your coffee maker and let it run through a full cycle. You’ll notice the vinegar smell right away—don’t worry, that goes away completely after rinsing. This first run dissolves the bulk of mineral deposits inside the heating element and tubes.
Soak the Filter Basket
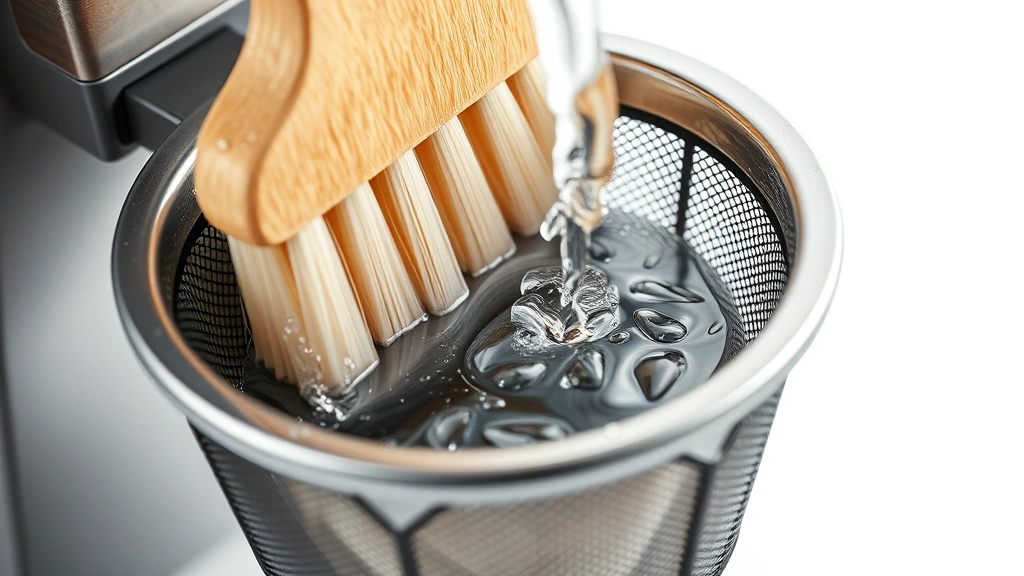
While the first cycle runs, take out your filter basket and any other removable parts. Fill your sink or a large bowl with the remaining vinegar solution and submerge the basket, lid, and any other plastic or metal components. Let them soak for 15 to 20 minutes. If you see stubborn brown stains on the basket, use a soft brush or old toothbrush to gently scrub them away. The vinegar softens the buildup, making it way easier to remove without scratching. For permanent filter baskets with fine mesh, be extra gentle—you don’t want to push debris deeper into the holes. Rinse each piece under running water when you’re done soaking and set them aside to air dry on a clean cloth.
Final Rinse Cycles Matter
Once the first vinegar cycle finishes, your coffee maker still has vinegar inside the heating chamber and tubes. This is crucial: run at least two more cycles using only fresh, clean water. Fill the reservoir with plain water, run a full cycle, and repeat. This flushes out all the vinegar residue and any loosened mineral particles. You might smell a faint vinegar scent during the first water cycle—that’s normal. By the second water cycle, it should smell neutral. Don’t skip this step. If you leave vinegar inside, your next pot of coffee will taste off, and you’ll defeat the whole purpose of cleaning in the first place.
Dry Everything Properly
Let all the removable parts air dry completely before reassembling. Wipe down the interior of the coffee maker with a damp cloth to catch any remaining mineral particles or vinegar smell. Make sure the heating element area and the tube that delivers water to the basket are clear. Once everything is dry—and I mean actually dry, not just damp—reassemble your coffee maker. Put the filter basket back in, add the lid, and fill the reservoir with fresh water. Run one more quick cycle with just water to make sure everything works smoothly and nothing got stuck during cleaning. Now you’re ready for a fresh pot of coffee that tastes the way it should.
How Often to Clean
If you use your coffee maker daily and have hard water, clean it with vinegar every month. In areas with soft water, every two to three months is fine. The simple test: if your coffee starts brewing slower than usual or tastes a bit off, it’s time to clean. Some folks do a quick vinegar run every other week just as maintenance, which honestly isn’t a bad habit. It takes 30 minutes and keeps your machine running like new. Think of it like changing the oil in your car—small regular maintenance beats big problems later. If you want to extend the time between deep cleans, consider using filtered water in your coffee maker instead of tap water. That reduces mineral buildup significantly.
Troubleshooting Common Issues
Sometimes your coffee maker might not cooperate. If the water won’t flow during the vinegar cycle, the machine might be severely clogged. Try running the vinegar solution through in short bursts—turn it on for 10 seconds, wait 30 seconds, repeat. This gives the vinegar time to work without overwhelming the system. If you smell vinegar after the water rinse cycles, you didn’t run enough fresh water through. Do one or two more cycles. If your machine suddenly stops mid-cycle during cleaning, it might have a safety feature that kicks in when it detects mineral buildup. Let it cool for 15 minutes and try again. Never force anything or use boiling vinegar—that can damage seals and plastic components. If you’ve got a coffee maker with a “clean” light that won’t turn off after vinegar cleaning, check your manual. Some machines need a specific sequence to reset the indicator. When in doubt, run more plain water cycles. You can’t over-rinse a coffee maker.
Frequently Asked Questions
Can I use apple cider vinegar instead of white vinegar?
Technically yes, but white vinegar is better. Apple cider vinegar has more sediment and can leave residue inside your machine. Stick with distilled white vinegar—it’s cleaner and cheaper.
Will vinegar smell ruin my coffee maker permanently?
No. The vinegar smell comes from the acetic acid, which evaporates completely during the water rinse cycles. If you smell vinegar in your coffee after cleaning, you just need to run more plain water through.
Is it safe to use vinegar on all coffee makers?
Yes, for standard drip makers, yes. The vinegar solution won’t damage stainless steel, aluminum, or food-grade plastic. However, if your manual specifically warns against vinegar, follow that guidance. Some specialty machines might have coatings that react poorly, though this is rare.
How much vinegar do I actually need?
For a standard 12-cup coffee maker, one cup of white vinegar mixed with one cup of water is perfect. Adjust proportions for smaller machines. You want enough to fill the reservoir completely.
Can I clean my coffee maker more frequently than recommended?
Yes, monthly vinegar cleaning is safe even for machines used daily. Some people do it every two weeks without issues. Just make sure you’re running thorough water rinse cycles afterward.
What if my coffee maker has a built-in water filter?
Replace the filter before your vinegar cleaning cycle. The vinegar won’t damage most filters, but a fresh filter after cleaning ensures better taste. Check your manual for specific filter replacement timing.


