
Knowing how to check tire pressure is one of the most overlooked yet critical maintenance tasks you can do for your vehicle. Proper tire pressure keeps you safe on the road, extends tire life, improves fuel economy, and prevents blowouts. Most people drive around with underinflated tires without even realizing it—and that’s costing them money and safety. In this guide, I’ll walk you through the exact steps to check your tire pressure like a pro, plus everything you need to know about keeping your tires in top shape.
Table of Contents
Why Tire Pressure Matters
Before we dive into the how, let’s talk about the why. Your tires are literally where the rubber meets the road, and tire pressure is everything. When your tires are properly inflated, they wear evenly, handle better in corners, and give you better traction in wet conditions. Underinflated tires flex more than they should, which generates heat and causes premature wear—plus it kills your fuel economy by up to 3%. Overinflated tires are just as bad; they wear faster in the center and give you a harsher ride.
The National Highway Traffic Safety Administration (NHTSA) estimates that properly maintained tire pressure could prevent thousands of accidents annually. That’s not just about comfort—it’s about keeping you and your family safe. A tire that’s even 10 PSI below the recommended pressure can significantly affect your vehicle’s handling and braking distance.
Tools You Need
Here’s the good news: checking tire pressure requires almost no investment. You need one thing—a tire pressure gauge. That’s it. There are three types:
Stick Gauges: These are the cheapest option (usually under $10) and work fine for basic checking. They’re simple—you press them onto the valve stem and read the number on the stick. They’re durable and don’t require batteries, but they’re less precise than other options.
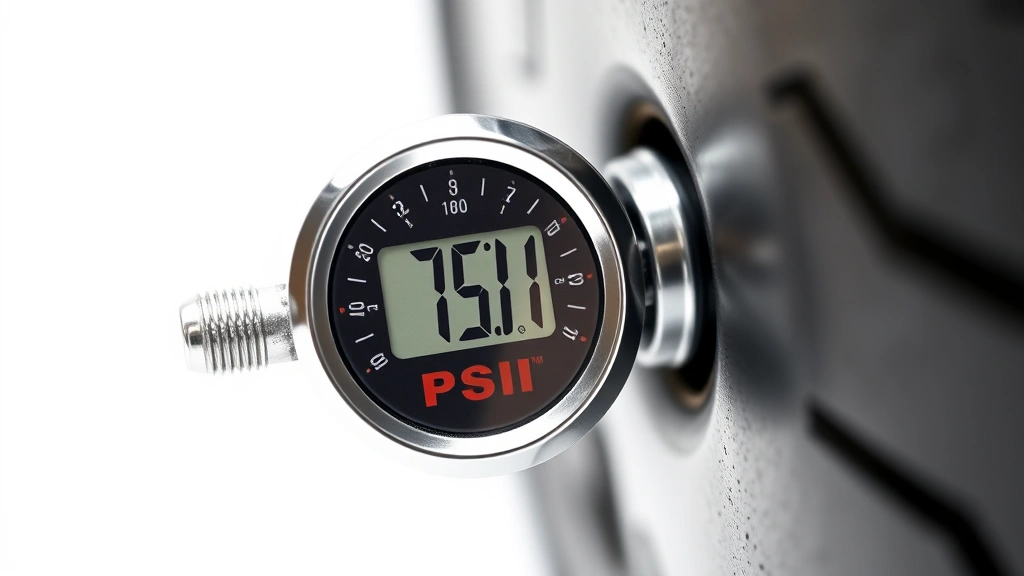
Digital Gauges: These run $15-30 and display the reading on a small screen. They’re easier to read, especially in low light, and they’re quite accurate. Most have a backlit display, which is handy in dim garages.
Dial Gauges: These are the middle ground—$10-20—with a round face and needle indicator. They’re very reliable and last forever, though they can be harder to read quickly.
My recommendation? Grab a digital gauge. The extra few bucks is worth the ease of use and accuracy. Keep it in your glove compartment. You’ll also want access to an air pump, which most gas stations have for free or cheap. Many modern vehicles come with a small portable compressor in the trunk—check yours.
Find Your Correct Pressure
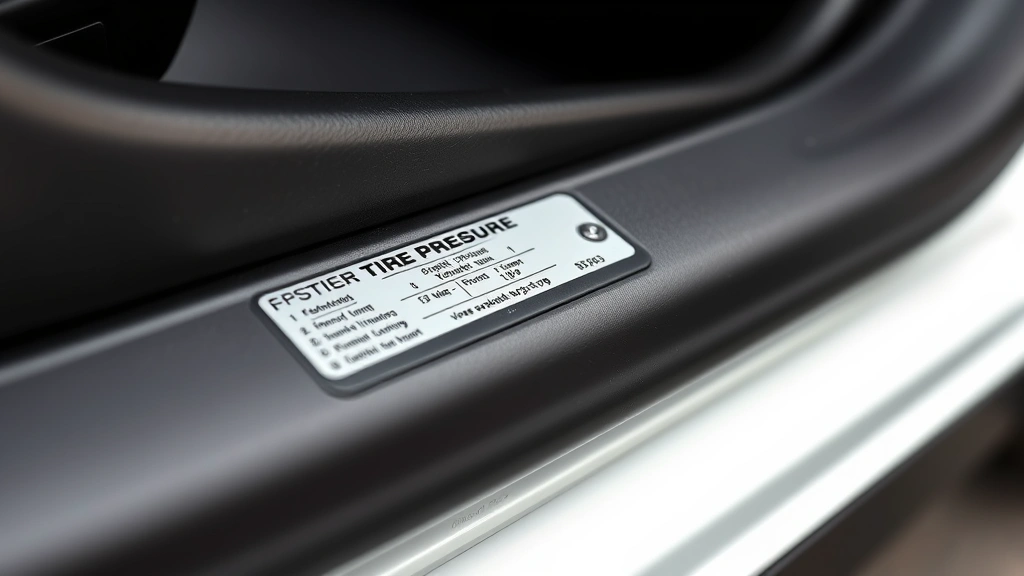
This is critical: the correct tire pressure for your vehicle is NOT the number on the tire itself. That number (usually 44-51 PSI) is the maximum pressure the tire can safely hold, not the recommended operating pressure. Your vehicle’s manufacturer specifies the correct pressure, and you’ll find it in one of these places:
Driver’s door jamb: Open your driver’s side door and look at the edge of the door frame. There’s usually a sticker or placard with tire pressure information. This is the most common location.
Owner’s manual: Check the tire maintenance section.
Fuel door: Some vehicles have this information inside the fuel door.
Manufacturer website: If you can’t find it anywhere, the vehicle manufacturer’s website will have the specs.
Write this number down and keep it somewhere accessible—your phone, your car’s sun visor, or your wallet. Most vehicles recommend between 30-35 PSI, but this varies. Some SUVs and trucks run higher. Never guess.
Step-by-Step Process
Now let’s get into the actual steps. This takes about 10 minutes for all four tires, and you only need to do it monthly (or before long trips).
Step 1: Check When Tires Are Cold
Always check tire pressure when your vehicle has been parked for at least three hours, or hasn’t been driven more than a couple of miles at low speed. Driving heats up the tires, which increases the air pressure inside. If you check after driving, you’ll get an inaccurate reading that’s higher than reality. Cold checks give you the true baseline pressure. Morning checks are ideal.

Step 2: Remove the Valve Cap
Walk around to the first tire. You’ll see a small plastic or metal cap on the valve stem (the little nub sticking out of the wheel). Unscrew this cap and set it somewhere you won’t lose it. Some people put it in their pocket or on a flat surface nearby. Don’t let it roll away.
Step 3: Press the Gauge Firmly
Take your tire pressure gauge and press it firmly straight onto the valve stem. You need a good seal, or air will escape and your reading will be wrong. Press hard and straight—don’t angle it. You should hear a slight hiss of air, which is normal. On a stick gauge, the stick will pop out. On a digital gauge, the reading will appear on the screen. On a dial gauge, the needle will move to indicate pressure.
Step 4: Record the Reading
Write down the pressure for each tire. Yes, actually write it down. You want to track trends over time. If one tire is consistently lower than the others, you might have a slow leak. If all tires drop pressure over a month, that’s normal (you lose about 1 PSI per month naturally). If one drops 5+ PSI in a month, have it inspected for leaks.
Step 5: Repeat for All Four Tires
Don’t forget the spare tire if your vehicle has one. It’s easy to overlook, but if you ever need it, you want it ready. Check all four wheels, then replace the valve caps. Make sure they’re tight so no dirt gets into the valve stem.
Reading the Gauge
Different gauges read differently, so let’s break this down. On a stick gauge, the number where the stick stops is your pressure in PSI (pounds per square inch). On a digital gauge, the number appears on the screen—easy. On a dial gauge, you read where the needle points, just like a clock. All measurements are in PSI.
One thing to watch: some gauges have a small button or valve on the back. Don’t accidentally press this while checking—it releases air. Just press the gauge onto the stem and hold it still for a second until you get a stable reading.
When to Check Pressure
Make tire pressure checking a monthly habit. Set a reminder on your phone for the first of each month. Check before long road trips, even if it’s only been a week since your last check. Also check:
After any tire work or repair, after hitting a pothole or curb hard, or if your tire pressure warning light comes on. That light (usually a little tire with an exclamation mark) means at least one tire has dropped 25% below the recommended pressure. Don’t ignore it—get to a gas station and check immediately.
Many modern vehicles have tire pressure monitoring systems (TPMS) that alert you electronically. This is helpful, but it’s not a replacement for manual checking. The system only tells you when pressure is critically low. Manual checks catch problems earlier.
Seasonal Adjustments
Here’s something most people don’t know: tire pressure changes with temperature. For every 10 degrees Fahrenheit that the temperature drops, tire pressure decreases by about 1 PSI. This means you might need to add air in winter and release some in summer.
If you live somewhere with real seasons, expect to check and adjust pressure twice a year—once in fall when temperatures drop, and once in spring when they rise. This isn’t a major adjustment; you’re probably talking 2-3 PSI difference. But it matters for safety and tire life.
Common Mistakes to Avoid
Let me save you some frustration by calling out the most common errors I see:
Checking hot tires: This is the #1 mistake. You’ll get a reading that’s 4-6 PSI higher than reality, then you’ll release air thinking you’re overinflated. Then you drive and the tires cool down, and now you’re underinflated. Always check cold.
Using the tire’s maximum pressure: That number on the sidewall is not your target. It’s the max. Use the manufacturer’s recommended pressure from your door jamb.
Not checking the spare: A flat spare when you need it is a disaster. Check it every six months.
Forgetting to replace valve caps: These aren’t just decorative. They keep dirt and moisture out of the valve stem. A dirty valve can leak slowly over time.
Over-correcting: If a tire is 2 PSI low, don’t overfill it to 5 PSI high to compensate. Just bring it to the correct pressure. Overinflated tires are just as problematic as underinflated ones.
One more thing: if you find yourself constantly adding air to one tire, have a tire shop inspect it for a slow leak. A valve stem leak, puncture, or bead leak (where the tire meets the rim) needs professional attention. Don’t just keep adding air and hoping—that’s a safety issue waiting to happen.
Frequently Asked Questions
How often should I check tire pressure?
Monthly is the standard recommendation, or before long trips. You should also check whenever the temperature drops significantly (seasonal changes) or if you notice your tire pressure warning light. Many people find it helpful to check when they fill up with gas—you’re already at the gas station where the air pump is.
What’s the difference between PSI and bar?
PSI (pounds per square inch) is used in the United States. Bar is used in many other countries. One bar equals approximately 14.5 PSI. Most tire gauges sold in the US show PSI, but some digital gauges show both. Your vehicle’s door jamb will specify which unit to use—usually PSI if you’re in the US.
Can I check tire pressure without removing the valve cap?
Technically yes, but you don’t need to. The valve cap comes off in half a second. Removing it ensures you can see the valve stem clearly and press the gauge on straight. It’s worth the extra three seconds.
What happens if my tire pressure is too high?
Overinflated tires wear faster in the center of the tread, give you a harsher ride, and reduce traction slightly. They’re also more prone to damage from potholes because the tire is too rigid. Let air out until you reach the correct pressure.
Should I adjust pressure for a heavy load?
Yes, if you’re loading your vehicle significantly (like for a road trip with luggage), check your door jamb for load-specific pressure recommendations. Many vehicles have a separate recommended pressure for loaded conditions. It’s usually 2-4 PSI higher than the standard pressure.
Why does my tire pressure warning light keep coming on?
Check all four tires and the spare immediately. If one is significantly lower, you probably have a slow leak. Take it to a tire shop for inspection. If all tires are at the correct pressure but the light stays on, you might have a faulty TPMS sensor, which requires professional diagnosis.
Can I drive on a tire that’s 5 PSI low?
Technically yes, but you shouldn’t make it a habit. A tire that’s 5 PSI low is underinflated enough to affect handling, increase wear, and reduce fuel economy. Get to an air pump and add air. It’s a quick fix.
How do I know if my tire has a leak?
If a tire loses more than 1-2 PSI per month, it has a leak. Some leaks are slow (you might lose 1 PSI per week) and others are fast. If you notice a tire going flat over a few days, you have a significant leak. A tire shop can locate the leak using soapy water—leaks will bubble. Small punctures can be patched; valve stem leaks require new stems; bead leaks require tire removal and reseating.
Conclusion
Checking tire pressure is genuinely one of the easiest maintenance tasks you can do, and the payoff is huge—better safety, longer tire life, better fuel economy, and peace of mind. It takes 10 minutes a month and costs nothing if you use the free air at a gas station. Grab a digital tire gauge, find your vehicle’s recommended pressure, set a monthly reminder, and you’re done. Your tires will thank you, your wallet will thank you, and most importantly, you and your passengers will be safer on the road.
If you’re interested in other vehicle maintenance tasks, check out guides like how to remove battery corrosion and how to program garage door opener for other practical skills. For comprehensive vehicle care information, visit the NHTSA website for safety standards. Family Handyman has great vehicle maintenance guides, and Bob Vila’s site covers everything from home to automotive care.


