
Learning how to check engine oil is one of the most fundamental maintenance tasks you can do to keep your vehicle running smoothly and avoid costly engine damage down the road. It takes just five minutes, requires zero mechanical skills, and could save you thousands in repairs. Let’s walk through this essential skill together.
Table of Contents
Why Regular Oil Checks Matter
Your engine oil does heavy lifting—it lubricates moving parts, reduces friction, cools components, and carries away contaminants. When oil levels drop too low, your engine works harder and hotter, accelerating wear. Checking your oil regularly catches problems before they become expensive. Most manufacturers recommend checking oil at least monthly, and it’s especially important before long road trips. Think of it as a five-minute insurance policy for your engine’s health.
What You’ll Need
Here’s the good news: you need almost nothing. Grab a clean, lint-free rag or paper towel—that’s it. Some folks keep an old t-shirt scrap in their car specifically for this. You might also want to have your vehicle’s owner’s manual handy to understand your specific oil type and capacity, though it’s not required for the basic check. If your oil is low, you’ll need the correct oil for your vehicle, which you can find in your manual or by asking at any auto parts store.
Park on Level Ground
This step is critical and often overlooked. Park your car on flat, level ground and let it sit for at least five minutes after turning off the engine. This allows oil to drain back down into the pan where the dipstick can accurately measure it. If you check immediately after driving or on an incline, you’ll get a false reading. The oil needs time to settle, so patience here pays off. On a hot day, waiting a bit longer helps the oil cool slightly, giving you a more accurate measurement.
Locate Your Dipstick
Pop your hood and look for the dipstick—it’s usually a long, thin rod with a yellow or orange handle. Consult your owner’s manual if you’re unsure, as different vehicles place it in different spots. Most dipsticks are located near the front or center of the engine bay. Once you’ve found it, you’re halfway there. Some newer vehicles have electronic oil level sensors instead of traditional dipsticks, so check your manual if you can’t locate one. If your vehicle has an electronic system, you can typically check the oil level through your dashboard display.
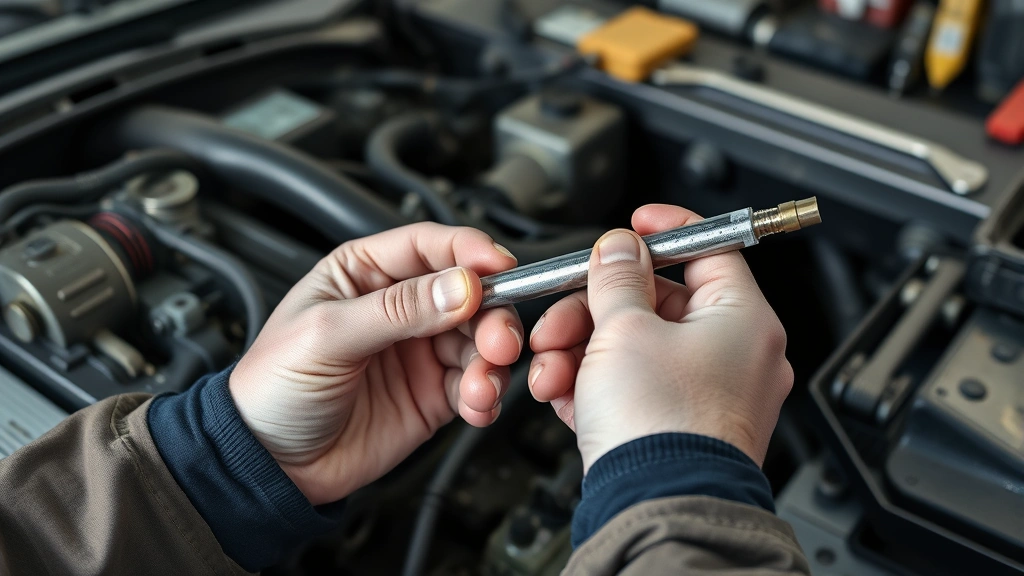
Pull, Wipe, and Reinsert
Grab the handle and pull the dipstick straight out—don’t twist it. You’ll notice it’s covered in oil. This is where your rag comes in: wipe it completely clean. Use firm strokes to remove all the oil, leaving the rod dry. This is essential because any residual oil will give you a false high reading. Once it’s clean, reinsert the dipstick all the way back into its tube until it seats fully. You should hear or feel a slight click or resistance. Now pull it out again—this second reading is your accurate measurement.
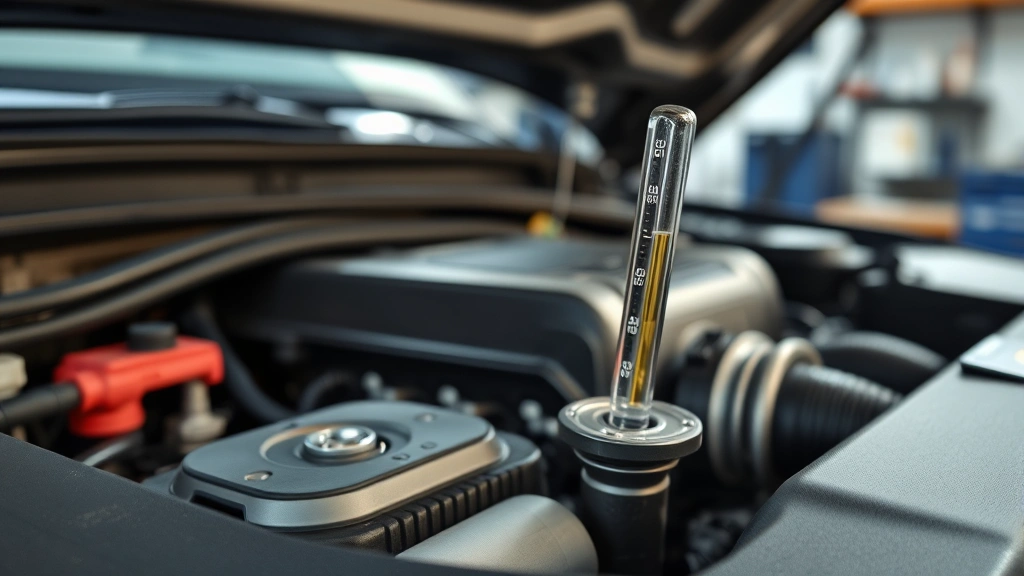
Read Your Oil Level
Look at the end of the dipstick. You’ll see two marks or a hatched area indicating the minimum and maximum levels. Your oil should fall somewhere between these marks, ideally closer to the maximum line. If it’s at the minimum, you need to add oil. If it’s below the minimum, don’t delay—add oil before your next drive. The space between minimum and maximum typically represents about one quart of oil. Some dipsticks have a crosshatch pattern instead of lines; your oil should wet the entire crosshatched area.
Understand Oil Condition
While you’re checking the level, take a moment to observe the oil’s color and consistency. New oil is amber or light brown. As it ages, it darkens—this is normal. However, if your oil looks black, gritty, or has a burnt smell, it’s time for an oil change. You might also notice a milky appearance, which suggests water contamination and warrants a mechanic visit. The oil should be slick between your fingers, not gritty or thick. These visual clues help you understand your engine’s health beyond just the level reading.
Add Oil If Needed
If your oil is low, locate the oil filler cap on top of your engine—it usually says “Oil” or has an oil can symbol. Twist it counterclockwise to remove it. Before adding new oil, check your owner’s manual for the correct type and viscosity grade. Add oil slowly using a funnel to avoid spills, checking frequently with your dipstick. Add a half-quart, wait a minute for it to drain down, then check again. It’s easier to add more than to remove excess. Once you’re at the proper level, replace the cap and twist it clockwise until snug—don’t overtighten. If you’re uncertain about oil types, most auto parts stores offer free advice, and many will even add oil for you.
Create a Checking Schedule
Make this a habit. Set a phone reminder to check your oil on the first of every month, or tie it to another routine task like filling your gas tank. Newer vehicles with synthetic oil can sometimes go longer between checks, while older cars or high-mileage vehicles might need more frequent monitoring. If you notice you’re adding oil frequently between changes, that’s a sign something’s wrong—possibly a leak or internal burning—and you should have a mechanic investigate. Regular checking catches these issues early, preventing major engine damage and saving money on repairs like those discussed in guides on how often to replace cabin air filter and other preventive maintenance.
Frequently Asked Questions
How often should I check my engine oil?
Check your oil at least once a month, or before any long road trip. Older vehicles and those with higher mileage might benefit from weekly checks. Your owner’s manual provides specific recommendations for your vehicle.
Can I check oil while the engine is hot?
It’s best to check oil when the engine is cold or has cooled for at least five minutes. Hot oil expands and gives inaccurate readings. Also, hot oil can burn you, so always prioritize safety.
What does it mean if my oil is below the minimum line?
Low oil means your engine isn’t properly lubricated. Add the correct oil type immediately and don’t drive long distances. If oil keeps dropping, you may have a leak or internal issue requiring professional diagnosis.

Is synthetic oil better than conventional?
Synthetic oil lasts longer and performs better in extreme temperatures, but it costs more. Conventional oil is fine for most vehicles. Follow your owner’s manual recommendation—mixing types isn’t ideal, but won’t harm your engine if done occasionally.
What if I overfill my oil?
Excess oil can damage your engine by increasing pressure and causing leaks. If you overfill, you can remove excess using a syringe or turkey baster inserted into the dipstick tube, or take it to a shop for a quick drain.
Why is my oil dark if it’s only been a month?
Oil darkens as it works, which is completely normal. Dark oil doesn’t mean it’s bad—it means it’s doing its job. Change it according to your manual’s schedule, not by color alone.
Can I use any oil in my vehicle?
No. Your vehicle requires a specific oil viscosity grade (like 5W-30) and type (conventional, synthetic, or blend). Using the wrong oil can reduce performance and damage your engine. Always check your owner’s manual.
Conclusion
Checking your engine oil is genuinely one of the easiest and most valuable maintenance tasks you can perform. It takes five minutes, costs nothing, and protects your most expensive investment. Now that you know how to check engine oil, make it part of your routine. You’ll catch problems early, extend your engine’s life, and maintain peak performance. Keep that rag handy, set a monthly reminder, and you’re golden. Your future self—and your wallet—will thank you.
External Resources: For more detailed maintenance guidance, visit Family Handyman, This Old House, and Bob Vila for trusted automotive advice.


