
Learning how to check brake pads is one of the most important safety skills any car owner can master. Your brakes are literally what keep you and your passengers safe on the road, so knowing when they need attention isn’t just smart maintenance—it’s essential. The good news? You don’t need a fancy shop or special certifications to do this yourself. In about 10 minutes with basic tools, you can inspect your brake pads and determine if they’re still good or headed for replacement.
Table of Contents
Why Regular Brake Checks Matter
Your brake pads are the friction material that stops your vehicle when you press the pedal. Over time, they wear down—it’s inevitable physics. The thinner they get, the less stopping power you have and the harder your brakes have to work. Worn pads also damage your rotors (the metal discs the pads squeeze against), which turns a simple pad replacement into an expensive rotor replacement too.
Think of it like this: checking your brake pads is preventive medicine for your car. Catch them early, and you’ll save money and stay safe. Ignore them, and you’re gambling with your life every time you hit the brakes. Most mechanics recommend checking your pads at least once a year, or every 15,000 miles—whichever comes first.
Tools You’ll Actually Need
Here’s what you’ll grab from your garage or toolbox:
- Jack and jack stands (or wheel ramps for safety)
- Lug wrench (to remove wheels)
- Flashlight or headlamp (you’ll be looking at dark spaces)
- Ruler or calipers (to measure pad thickness)
- Brake cleaner spray (optional but helpful)
- Work gloves (brake dust isn’t something you want on your skin)
That’s it. You don’t need expensive diagnostic equipment. This is basic, hands-on work that any DIY enthusiast can handle. If you’re not comfortable with jacks and lifts, use wheel ramps instead—they’re safer and more stable.
Step 1: Visual Inspection Method
Park your car on level ground and engage the parking brake. Remove the wheel by loosening lug nuts with the car still on the ground, then jack up the vehicle safely. Once it’s secure on jack stands, remove the wheel completely.
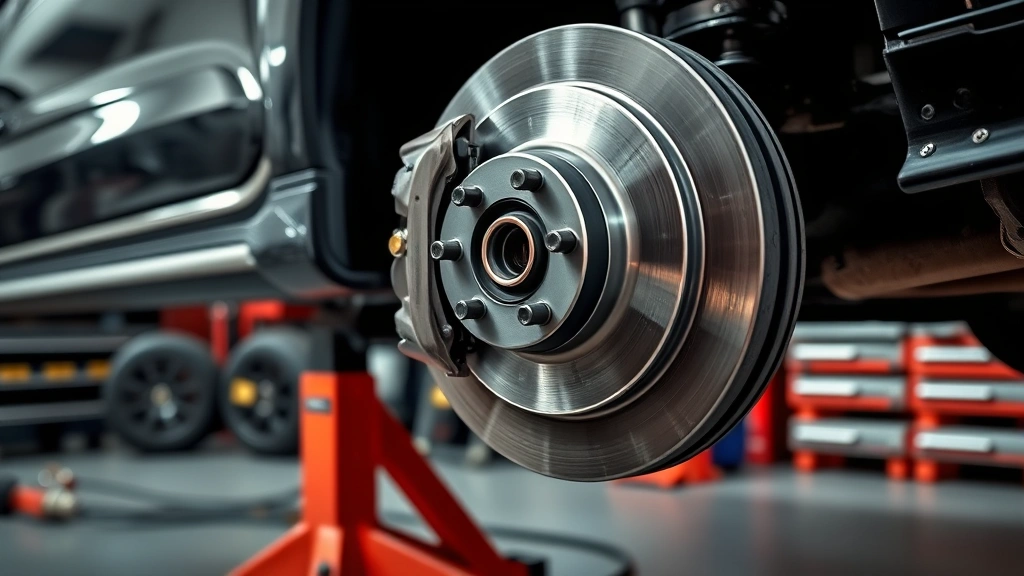
Now look at the brake caliper (the metal clamp-like device) and the brake pads inside. You’ll see two pads—one on each side of the rotor. The pads should have a thick layer of friction material bonded to a metal backing plate. If you can see the metal backing plate through the friction material, your pads are done.
Spray a little brake cleaner on the pads to clear away dust and grime. This gives you a cleaner view of the actual pad material. Look for even wear across the entire pad surface. If one side is worn more than the other, you might have a caliper alignment issue that needs attention.
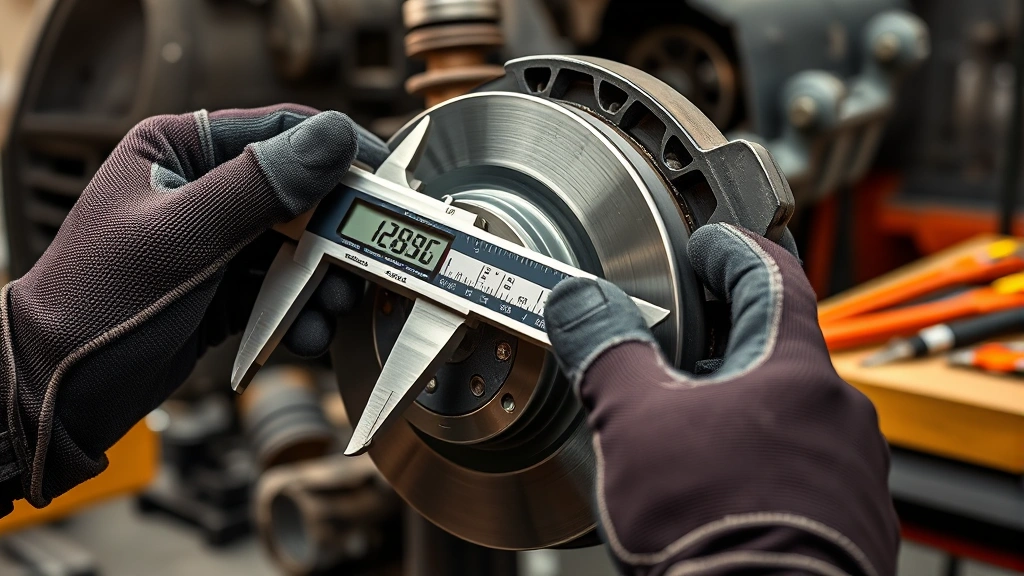
Step 2: Measure Pad Thickness
This is where you get specific numbers. Use a ruler or digital calipers to measure the thickness of the friction material on your pads. Most pads come factory at about 10-12mm thick. Here’s the simple rule: when they reach 3mm, it’s time to replace them. At 2mm, you’re pushing it. At 1mm or less, you’re risking rotor damage.
Measure in at least three spots on each pad—top, middle, and bottom—because wear isn’t always perfectly even. If the thinnest spot is 3mm or less, add brake pad replacement to your to-do list. Don’t wait. Don’t procrastinate. Just schedule it.
Some cars have wear indicators—little metal tabs that touch the rotor when pads get thin and create a squealing noise. If you hear that squeal, your pads are definitely ready to go.
Step 3: Listen for Warning Signs
Before you even get under the car, pay attention to what your brakes are telling you. A high-pitched squealing sound when you brake is your first warning sign. That’s usually the wear indicator doing its job. Some cars have electronic sensors that trigger a dashboard warning light—pay attention to those too.
A grinding noise is worse. That means metal is grinding on metal because the friction material is completely gone. If you hear grinding, your pads are past due and your rotors are probably damaged. This turns a $100-200 job into a $400-600 job real fast.
Soft or spongy brake pedal feel? Brake fluid issues. Pulsing when you brake? Warped rotors. These symptoms tell you something’s wrong before you even look at the pads. Your car’s trying to communicate—listen to it.
Step 4: Check Rotor Condition
While you’re under there, inspect the rotor too. Run your finger across the rotor surface—it should feel smooth, not deeply grooved. Light scoring is normal, but deep grooves mean the rotor’s taking damage from worn pads.
Look for uneven wear patterns. If one side of the rotor is more worn than the other, your caliper might not be seating properly. You’ll also want to check rotor thickness with calipers if you have them. Most rotors have a minimum thickness stamped on them—if they’re at or below that number, they need replacement alongside your pads.
Rotors should be flat and parallel. If they’re warped, you’ll feel vibration when braking. A warped rotor needs replacement, not resurfacing (that’s old-school thinking that doesn’t work anymore).
Step 5: Verify Brake Fluid Level
Pop your hood and locate the brake fluid reservoir—it’s usually a translucent plastic container near the back of the engine bay. The fluid level should be between the minimum and maximum lines marked on the container. If it’s low, that’s a sign your pads are wearing and the caliper pistons are extending further to compensate.
If the fluid is dark brown or black instead of clear amber, it’s old and needs flushing. Brake fluid absorbs moisture over time, which reduces braking efficiency and can cause corrosion inside your brake system. If you’re replacing pads, this is a good time to consider a brake fluid flush as part of your maintenance routine.
Never ignore low brake fluid. It’s not just an inconvenience—it’s a safety issue. Top it off with the correct type for your vehicle (check your owner’s manual), and investigate why it’s low. Usually it’s just normal pad wear, but sometimes it indicates a leak.
When to Replace Your Pads
So you’ve done your inspection. What’s the verdict? Here’s your decision tree:
- Above 4mm thickness: You’re good. Check again in 6 months or 5,000 miles.
- 3-4mm thickness: Start planning replacement. No rush, but don’t ignore it.
- 2-3mm thickness: Schedule replacement soon. Within the next week or two.
- Below 2mm or grinding noise: Stop. Replace today. You’re compromising safety and damaging expensive rotors.
Weather and driving habits affect wear rates. Aggressive braking, lots of stop-and-go city driving, and mountainous terrain all accelerate pad wear. Highway driving is gentler on brakes. If you tow a trailer or live in a hilly area, check your pads more frequently.
Once you know your pads need replacement, you can tackle it yourself if you’re mechanically inclined, or take it to a shop. Either way, you’ve already saved money by catching the problem early and knowing exactly what needs to be done.
Avoid These Common Mistakes
Don’t skip the rotor check. Plenty of DIYers replace pads and ignore rotors, then wonder why they still have brake problems. Inspect rotors every time you check pads.
Don’t use the wrong measurement. Some people measure the entire pad assembly instead of just the friction material. Measure only the friction layer—the dark material bonded to the backing plate.

Don’t ignore warning signs. If your brakes feel soft, pulsate, or make noise, something’s wrong. Don’t assume it’ll go away. Get under there and look.
Don’t forget about brake fluid. It’s easy to overlook, but old, contaminated brake fluid compromises your entire braking system. Check it every time you check pads.
Don’t use the penny test. You’ve probably heard the old trick about sticking a penny into the tread to measure wear. That’s for tires, not brakes. Use actual measurement tools for pads—your safety depends on accuracy.
As part of your broader vehicle maintenance routine, don’t forget about other systems either. Regular tire rotation keeps your vehicle balanced, and periodic checks like understanding your car battery help you stay ahead of problems.
Frequently Asked Questions
How often should I check my brake pads?
Check them at least once a year or every 15,000 miles. If you do a lot of city driving, tow trailers, or live in mountainous terrain, check every 6 months or 7,500 miles. It takes 10 minutes and could save your life.
Can I drive with 2mm brake pads?
Technically yes, but you shouldn’t. At 2mm, you’re risking rotor damage and have minimal safety margin. Replace them before you hit 2mm. Don’t gamble with brakes.
What’s the difference between OEM and aftermarket brake pads?
OEM pads are made by your car’s manufacturer. Aftermarket pads are made by third-party companies. Both can be good quality—it depends on the brand. Ceramic pads are quieter and last longer. Organic pads are cheaper but wear faster. Semi-metallic pads offer a balance.
Do I need to replace both front and rear pads at the same time?
Not necessarily. Check all four wheels. Usually front pads wear faster than rear pads because the front wheels do most of the braking work. Replace whichever pads are actually worn, but if one side is near the replacement threshold, do both sides of that axle together for even braking.
What does brake dust mean for my pads?
Brake dust is normal—it’s particles of friction material and rotor surface that come off during braking. Black dust is normal. If it’s metallic-looking, your pads might be wearing too fast. Excessive dust can indicate a problem with your braking system.
Can I check brake pads without removing the wheel?
Sometimes. If your car has large wheels and you can see the caliper clearly, you might peek at pad thickness. But you can’t do a thorough inspection without removing the wheel. Do it right—take the wheel off and get a complete picture.


