

Learning how to charge automotive air conditioning is one of those skills that’ll save you hundreds at the shop and keep your car cool when it matters most. Whether you’re sweating through summer traffic or just noticed your AC isn’t blowing as cold as it used to, a low refrigerant charge is often the culprit. The good news? You can handle this yourself with the right tools and a little patience.
Table of Contents
- Understanding Your AC System
- Tools and Materials You’ll Need
- Safety First: Critical Precautions
- Locating the Service Ports
- Checking Current Pressure Levels
- Preparing Your Charging Equipment
- The Charging Process Explained
- Monitoring Temperature and Performance
- Common Mistakes to Avoid
- Keeping Your AC Running Strong
- Frequently Asked Questions
Understanding Your AC System
Before you touch anything, you need to know what you’re working with. Your car’s air conditioning system is a sealed loop that circulates refrigerant (usually R-134a in modern vehicles) through a compressor, condenser, expansion valve, and evaporator. When the system loses refrigerant—usually through tiny leaks—the whole thing becomes less efficient. The compressor can’t do its job properly, and you get weak, warm air instead of that crisp cold breeze.
The refrigerant is pressurized, which is why you can’t just pour it in like motor oil. You need proper gauges to monitor pressure on both the low and high sides of the system. Think of it like tuning an instrument—you’re looking for that sweet spot where pressure readings fall within the manufacturer’s specifications.
Tools and Materials You’ll Need
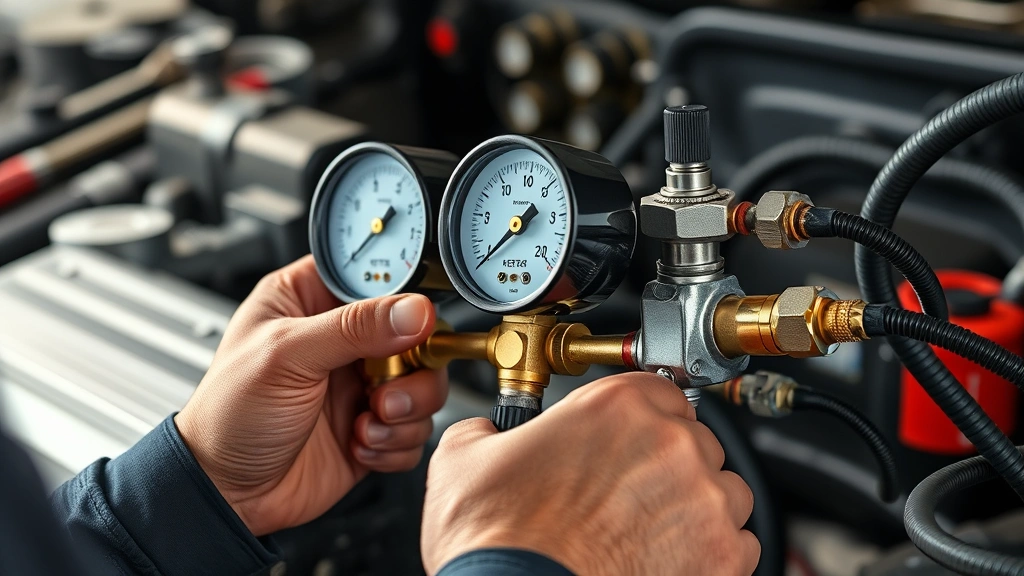
Don’t cheap out on equipment here. You’ll need an AC manifold gauge set (also called a charging kit), which typically includes two gauges—one for the low side and one for the high side—along with hoses and a valve. A quality set runs $50-150 and is worth every penny. You’ll also grab a can or canister of R-134a refrigerant with a dispenser valve attached. Most auto parts stores sell these in single-can quantities.
Beyond that, grab a thermometer to measure actual air temperature coming from your vents, safety glasses, and work gloves. Some folks also use a vacuum pump and recovery machine, but that’s more advanced territory. For a basic top-up charge, the manifold gauge set and refrigerant are your main players. A clean workspace and your vehicle’s service manual (check online if you don’t have the physical copy) round out your toolkit.
Safety First: Critical Precautions
This is non-negotiable: refrigerant can cause frostbite if it contacts your skin, and inhaling it isn’t healthy either. Always wear safety glasses and gloves rated for refrigerant work. Work in a well-ventilated area—your driveway is fine, but don’t do this in a closed garage. If you have any respiratory issues, consider wearing a respirator mask rated for refrigerant exposure.
Never overpressurize the system. Too much refrigerant causes the compressor to work harder, generates excessive heat, and can damage components. The gauge set is your safety net here—it tells you exactly when to stop. Also, never mix refrigerant types. If your car uses R-134a, stick with R-134a. Mixing creates unpredictable pressure and can ruin your compressor.
One more thing: if you smell sweet odors coming from your AC vents or see oily residue around fittings, you’ve got a leak. Charging a leaking system is like filling a bucket with a hole in the bottom—pointless. Get that leak fixed first, or you’ll be right back here in a few weeks.
Locating the Service Ports
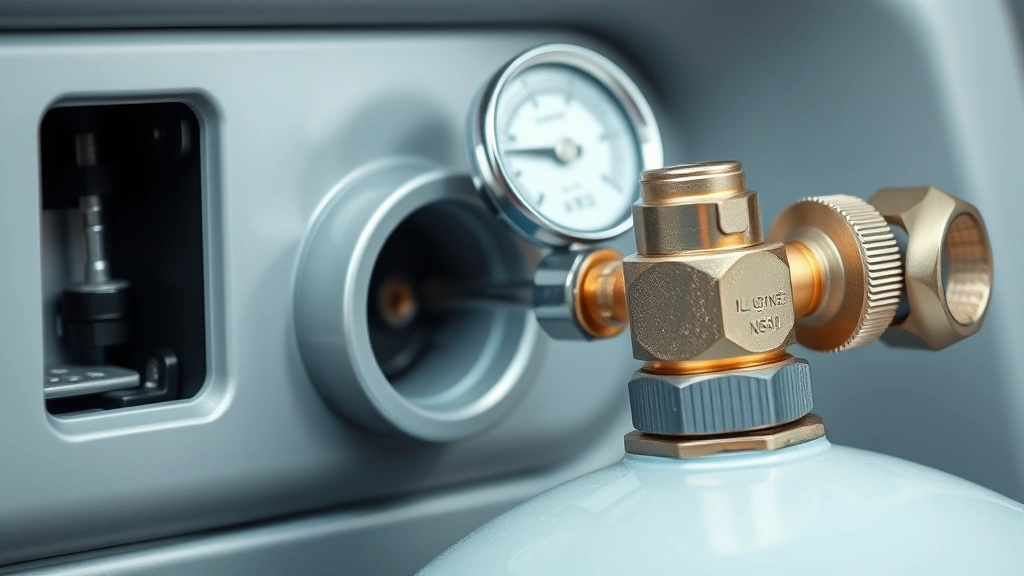
Your AC system has two service ports: a low-side port (smaller) and a high-side port (larger). This design prevents accidental connection to the wrong side—the fittings literally won’t fit if you try to force it. The low-side port is where you’ll connect your gauges and refrigerant dispenser. It’s usually located on the accumulator or suction line near the compressor, often wrapped in a blue or black cap.
The high-side port sits on the discharge line coming directly from the compressor and typically wears a red cap. You’ll connect your high-side gauge here to monitor pressure, but you won’t inject refrigerant through this port. Pop your hood and trace the lines from the compressor—they’re metal tubes, usually about finger-thick. Your service manual will have exact locations for your specific model, so reference that before you start hunting.
Checking Current Pressure Levels
Start your engine and let it idle for a minute to get the compressor running. This is crucial—you need the system pressurized to get accurate readings. Connect your manifold gauge set’s low-side hose to the low-side port and the high-side hose to the high-side port. The gauges will show you current pressure in both lines.
Now check your vehicle’s service manual or look for a label under the hood that lists target pressure ranges. Most vehicles want low-side pressure between 25-40 psi and high-side pressure between 200-300 psi when the engine is running and the AC is on full blast. If your readings are significantly lower than these ranges, you’ve got low refrigerant. If they’re way too high, you might have too much refrigerant or a compressor issue—but that’s beyond basic charging territory.
Preparing Your Charging Equipment
Grab your refrigerant canister and examine it carefully. You’ll see a dispenser valve on top with threads. Some canisters come with a trigger-style dispenser already attached; others need you to screw one on. Read the instructions that come with your specific canister—they vary. The dispenser valve is what controls how much refrigerant flows into your system.
Before connecting anything, ensure all your hoses are properly seated and valves on the manifold gauge set are closed. The manifold has two hand-operated valves—one for the low side and one for the high side. These should both be closed (turned clockwise) before you start. This prevents accidental pressure release and gives you control over the charging process. Double-check this step; it’s easy to overlook and can lead to messy situations.
The Charging Process Explained
With the engine running and AC on maximum, screw your refrigerant canister onto the dispenser valve. Now slowly open the low-side valve on your manifold gauge set by turning it counterclockwise. You’ll hear a slight hiss as refrigerant begins flowing into the system. Watch your low-side gauge—it should start climbing.
Here’s the key: charge in short bursts. Open the valve for 5-10 seconds, then close it and let the system stabilize for 30 seconds. Check your gauges. Repeat this process, gradually bringing your pressure up to the target range. This slow approach prevents overpressurization and gives you fine control. Most cans hold about 12 ounces of refrigerant, and you might need one to three cans depending on how low you started.
Keep monitoring both gauges. The high-side pressure will rise as you add refrigerant, and the low-side will stabilize. Once both gauges show readings within the manufacturer’s spec, you’re done. Feel the air coming from your vents—it should be noticeably colder. If you’re not seeing improvement after two cans, stop and investigate. You might have a leak or a compressor issue that charging alone won’t fix.
Monitoring Temperature and Performance
After charging, let the system run for a few minutes with the AC on full blast. Use your thermometer to measure the actual temperature of air blowing from the center vents—it should be in the 35-45°F range for properly functioning systems. Anything warmer suggests either incomplete charging or a deeper problem like a compressor that’s not engaging properly.
Listen to the compressor. You should hear it kick in when you turn on the AC, and you might notice a slight RPM drop as the engine works harder to power it. If the compressor doesn’t seem to engage at all, you might have an electrical issue or a compressor clutch problem—again, beyond basic charging.
Take your car for a test drive. The AC should maintain consistent cold air at highway speeds. If it gets warmer at idle or when you’re stuck in traffic, that’s normal—the system relies on airflow through the condenser to dissipate heat. But overall performance should be dramatically better than before you started.
Common Mistakes to Avoid
The biggest mistake is overcharging. People think “more refrigerant equals colder air” and dump can after can into the system. Wrong. Overcharging raises pressure excessively, makes the compressor work too hard, and can cause it to fail catastrophically. Your gauges exist for a reason—trust them and stop when you hit target pressure.
Another common error is charging with the engine off. You need the compressor running to circulate refrigerant and create proper pressure readings. Charging a stationary system gives false readings and wastes refrigerant. Always run the engine and have the AC on maximum while charging.
People also forget to check for leaks before charging. If your system is losing refrigerant, you’re just throwing money away. Small leaks often show themselves as oily residue around fittings or a sweet smell from the vents. If you suspect a leak, use a UV dye kit (add it to the refrigerant before charging) and a UV light to locate it, then get it sealed by a professional before charging.
Finally, don’t mix refrigerant types. R-134a is standard for cars made after 1994, but older vehicles might use R-12. Mixing them creates dangerous pressure combinations and can destroy your compressor. Know what your car uses before you buy anything.
Keeping Your AC Running Strong
Once you’ve charged your system, maintain it properly. Run your AC for at least 10 minutes every week, even in winter. This keeps the compressor lubricated and seals conditioned. A system that sits unused for months is more prone to leaks and compressor failure.
Have your AC system professionally inspected every two years. They can check for leaks using specialized equipment, verify refrigerant levels, and spot early signs of compressor wear. This costs $100-150 but prevents expensive repairs down the road. Think of it like getting your teeth cleaned—preventive maintenance beats emergency dentistry every time.
Keep your condenser clean. The condenser sits in front of your radiator and can get clogged with bugs, leaves, and road debris. A clogged condenser works harder and heats up excessively, reducing AC efficiency. Gently rinse it with a garden hose (low pressure) when you wash your car. If it’s really dirty, use a soft brush and water.
If your AC keeps losing charge despite no visible leaks, you’ve got a slow leak somewhere. This is frustrating but common. You can add a UV dye to your refrigerant (available at auto parts stores) and use a UV light to pinpoint the leak. Most leaks occur at connection points, hoses, or the compressor shaft seal. Once located, a professional can replace the affected component and reseal the system.
Frequently Asked Questions
How often should I charge my car’s AC?
Ideally, never. A properly sealed system should maintain its charge indefinitely. If you’re charging every year, you’ve got a leak that needs fixing. Most people charge their AC once every 3-5 years if at all, and only if they notice performance dropping.
Can I charge my AC without a manifold gauge set?
Technically, some refrigerant canisters come with simple pressure gauges built in, but they’re not accurate enough for safe charging. Invest in a proper manifold gauge set. It’s the only way to ensure you’re charging to the correct pressure and not over-filling the system.
What’s the difference between R-134a and R-12 refrigerant?
R-12 is the older refrigerant used in cars before 1994 and was phased out due to environmental concerns. R-134a replaced it and is what modern vehicles use. They’re not compatible—mixing them damages your system. If you have an older car, you’ll need R-12, which is harder to find and more expensive.
Why is my AC cold at highway speeds but warm at idle?
This is usually normal. At highway speeds, more air flows through the condenser, helping it dissipate heat. At idle, airflow is minimal, so the system has to work harder. If the AC is barely cold even at highway speeds, your charge is probably still too low, or you have a compressor issue.
Should I add UV dye to my refrigerant?
Only if you suspect a leak. UV dye helps technicians locate small leaks using a special light. If you’re just topping up a system that’s been reliable, skip it. If you add dye and later need professional service, tell the technician—some shops charge extra to flush out dye before working on the system.
Can I damage my compressor by charging the AC myself?
Yes, if you overcharge. Excessive pressure damages the compressor clutch and can cause catastrophic failure. That’s why you use gauges and stop at the correct pressure. Follow the process carefully, and you’ll be fine. Rush the job or ignore the gauges, and you risk a $500+ compressor replacement.
What does it cost to have a shop charge my AC?
Most shops charge $150-300 for a basic AC recharge. Some charge by the hour (usually $100-150/hour) plus refrigerant costs. Doing it yourself costs $30-60 for the refrigerant and maybe $100-150 for the gauge set if you don’t already have one. The math favors DIY if you’re comfortable with the process.
Is it legal to charge my own AC?
In the United States, you can legally purchase and use refrigerant for personal use on your own vehicle. However, some states have restrictions on selling refrigerant to unlicensed individuals. Check your local regulations. If you’re in a state that restricts sales, you might need to go to a shop, or you can have a certified technician do the work.
Final Thoughts
Charging your automotive air conditioning yourself is absolutely doable and saves serious money. The process isn’t complicated—it’s mostly about patience, following procedures, and respecting the pressurized refrigerant you’re working with. Take your time, use proper tools, and trust your gauges. Your reward is ice-cold AC blowing through your car all summer long, and the satisfaction of knowing you handled it yourself.
If at any point you feel unsure—whether it’s locating ports, reading gauges, or interpreting pressure readings—stop and consult your service manual or call a shop. There’s no shame in getting professional help, and it’s better than accidentally damaging your system. But if you follow this guide carefully, you’ve got this. Stay cool out there.


