
Learning how to change colors in crochet is one of those game-changing skills that transforms your projects from basic to beautiful. Whether you’re working on a striped blanket, a colorful granny square, or a intricate tapestry design, knowing the right techniques makes all the difference between messy transitions and professional-looking results. I’ve spent years perfecting these methods, and I’m excited to walk you through every approach—from the classic yarn-over technique to sneaky weaving methods that’ll make your color changes virtually invisible.
Table of Contents
Color Change Basics Explained
Before diving into techniques, let’s talk fundamentals. A color change in crochet happens when you switch from one yarn color to another mid-project. The timing and method matter enormously because they affect how your finished piece looks. The basic principle is simple: you complete your last stitch with the old color, then begin your next stitch with the new color. Sounds straightforward, right? But there’s nuance here that separates amateur work from polished results.
The key is understanding that in crochet, you’re always working with two loops on your hook. Your color change happens during that final yarn-over and pull-through of your last stitch with the old color. This is where precision matters. You want that transition clean and tight, with no loose gaps or color bleeding. Think of it like changing lanes on a highway—smooth, controlled, and intentional.
Classic Yarn-Over Technique
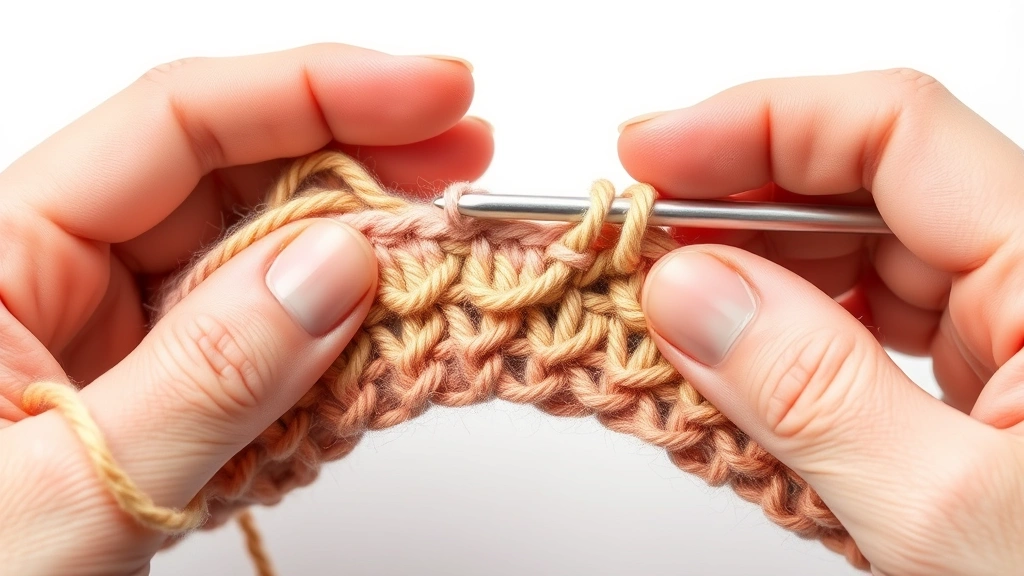
This is the bread-and-butter method, and honestly, it’s what I use about 80% of the time. Here’s exactly how it works: You’re working your last stitch with your current color. Let’s say you’re doing a single crochet row and you’re on your final stitch before the color change. Insert your hook into the stitch, yarn over with the old color, and pull through. Now here’s the critical part: you have two loops on your hook. This is where you switch.
Drop the old color yarn (don’t cut it yet—we’ll talk about that), pick up your new color yarn, and complete the stitch by yarning over with the new color and pulling through both loops. That’s it. Your color change is complete. The old color is now secured inside that stitch, and your new color takes over.
The beauty of this method is its simplicity and reliability. It works for single crochet, half-double crochet, double crochet—basically any stitch. The transition point sits right at the edge of your work, creating a clean line. If you’re working stripes, this creates that satisfying color block effect.
Invisible Color Transitions
Now, if you want your color changes to be nearly invisible—like when you’re doing tapestry crochet or intricate colorwork—you need a different approach. This technique involves carrying your unused yarn inside your stitches as you work. It’s more advanced, but absolutely worth mastering.
Start by positioning your new color yarn along the top of your previous row. As you work your stitches, you’ll crochet over this yarn, encasing it inside your stitches. This keeps the unused color hidden and ready for when you need it again. The color change itself happens the same way—complete your last stitch with the old color, then switch to the new color for the final yarn-over and pull-through.
The magic here is that because you’ve been carrying the new color inside your stitches, there’s no gap or loose yarn. The transition is seamless. Your piece looks like one cohesive fabric rather than distinct color blocks. This technique is perfect for projects where color precision matters, like tapestry blankets or intricate designs.
Carrying Yarn Between Rows
Here’s where things get really interesting. When you’re working with multiple colors and switching frequently, carrying yarn is your secret weapon. Instead of cutting and weaving in ends constantly, you literally carry the unused colors along the edge of your work as you go.
Position your unused yarn along the edge of your previous row. As you work your edge stitches (usually single crochet), crochet right over this yarn. It gets trapped inside those edge stitches, completely hidden. Then when you need that color again, it’s right there, ready to go. No hunting for yarn ends, no weaving in later.
This works beautifully for projects with regular color patterns—think striped blankets, geometric designs, or afghans with repeating color sequences. The technique saves time and creates incredibly clean edges. Just make sure your edge stitches are tight enough to secure the carried yarn firmly. Loose edges will let your carried yarn slip out.
Managing Yarn Ends Neatly
Let’s be real: every color change creates yarn ends that need dealing with eventually. You can either carry yarn (which we just discussed) or you’ll need to weave in those ends. The better your color change technique, the less noticeable your ends will be.
When you do need to weave in ends, do it as you go if possible rather than waiting until the end. Use a yarn needle and weave the end through several stitches along the edge or inside the fabric. For color work, weave your ends through stitches of the same color—this makes them virtually disappear. A trick I use: weave the end through at least 4-6 stitches, then weave back through 2-3 stitches in the opposite direction. This creates a secure anchor that won’t come loose.
Never just tie knots and hope for the best. Knots work loose in crochet, especially with regular handling or washing. Weaving is the professional standard, and once you get the rhythm down, it’s actually meditative work.
Color Changes in Patterns
Following a crochet pattern with color changes requires reading the pattern language carefully. Most patterns will specify exactly where color changes happen. They’ll say something like “Ch 1, turn. Change to color B, sc in each st across.” This tells you to chain one, turn your work, then make your color change before starting your single crochet row.
Pay attention to whether the pattern wants you to change colors at the beginning of a row or in the middle of a row. Changing at the beginning (like in striped projects) is straightforward. Changing mid-row (like in tapestry work) requires more planning. Some patterns will have you carry yarn; others will have you cut and rejoin colors. Read the whole pattern first to understand the color strategy before you start working.
One thing that trips up newer crocheters: the color change stitch counts. When you change colors mid-row, that color change stitch is still a stitch—it counts toward your stitch total. Don’t accidentally add extra stitches by miscounting around color changes.
Avoiding Common Mistakes
I see the same mistakes repeatedly, so let me save you some frustration. First mistake: cutting yarn too early. Always complete your color change stitch fully before cutting the old color. If you cut mid-stitch, you’ll have a loose end that unravels. Second mistake: pulling too tight on the new color. This creates a visible pinch at the color change point. Keep tension consistent and relaxed—your new color should flow smoothly from the old.
Third mistake: not securing carried yarn properly. If you’re carrying yarn between rows, make sure it’s actually caught inside your stitches, not just hanging loosely. Loose carried yarn will eventually slip out and create gaps. Fourth mistake: mixing up which loop to change colors on. Always change on the final yarn-over and pull-through of your last stitch with the old color. Not before, not after.
Fifth mistake: inconsistent tension around color changes. This is subtle but visible. Your stitches should look the same size before, during, and after a color change. If your tension changes at color change points, it’ll create visible bumps or loose spots. Practice maintaining even tension through the transition.
Troubleshooting Color Work
Got loose stitches at your color change? Usually this means you’re pulling too hard on the new color when you complete that final yarn-over. Relax your tension slightly. The stitch should be secure but not strangled. If you have visible gaps between colors, you might be changing colors too early or too late. Make sure you’re completing the entire last stitch with the old color before switching.
Noticing your colors are bleeding or mixing? This usually happens with very dark and very light colors, or with low-quality yarn. The solution: use higher-quality yarn with better dye lots, or choose colors with more contrast between them. Also check that you’re not accidentally picking up the wrong yarn color mid-stitch.
If your carried yarn keeps slipping out, your edge stitches are too loose. Tighten them up. Work your edge stitches firmly enough that they grip the carried yarn securely. You should feel resistance when you try to pull the carried yarn out. Also, make sure you’re actually crocheting over the yarn, not just laying it on top.
When your color changes create visible horizontal lines that look uneven, check your row tension. Sometimes the row where you change colors gets pulled tighter or looser than surrounding rows. Aim for consistent tension throughout, paying special attention to the color-change row.
Frequently Asked Questions
Should I cut yarn after every color change?
Not necessarily. If you’re coming back to that color soon (like in stripes), carry it. If you’re done with that color or won’t use it for many rows, cut it and weave in the end. Carrying works best when you return to a color within 5-10 rows. Beyond that, the carried yarn creates unnecessary bulk.
How do I prevent color changes from looking bumpy?
Maintain consistent tension throughout your work. Don’t pull tighter on the new color than your previous color. Also, make sure you’re changing colors at the right moment—on that final yarn-over and pull-through of the last stitch. Practice on swatches before starting large projects.
Can I change colors in the middle of a stitch?
Technically yes, but don’t. Change colors between stitches or at the completion of a stitch. Changing mid-stitch creates loose, messy transitions. The one exception is tapestry crochet, where you change colors at specific points within rows, but even then you’re completing stitches before switching.
What’s the best yarn for color work?
Use yarn with good stitch definition and consistent tension. Smooth yarns show color changes more clearly than fuzzy yarns. Also, try to use the same weight and fiber content for all your colors—mixing different yarn types creates texture inconsistencies. Quality matters here; cheap yarn often has color variations that make transitions look sloppy.
How many yarn ends do I really need to weave in?
Weave in every end that’s longer than about 2 inches. Shorter ends can be secured by working over them or by carefully tying a small knot and trimming close. For longer ends, weave through at least 4-6 stitches, preferably through stitches of matching color. The longer the end, the more stitches you should weave through.
Is carrying yarn heavier than cutting and reattaching?
Carrying yarn does add weight and bulk, but less than you might think if you’re doing it correctly. If your carried yarn is too loose or too tight, it creates problems. Carry yarn only when you’ll use it again soon. For projects where you use colors only occasionally, cutting and weaving ends is actually cleaner.
Final Thoughts
Mastering how to change colors in crochet opens up incredible creative possibilities. You’ll go from simple single-color projects to vibrant blankets, complex tapestries, and intricate designs. The techniques here—from basic yarn-over changes to invisible transitions—are professional-level skills that take your work from homemade to handcrafted.
Start with the classic yarn-over method on simple striped projects. Once that feels natural, experiment with carrying yarn and invisible transitions. Practice on swatches before committing to large projects. Every crocheter develops their own preferences and shortcuts, so don’t feel locked into one method. The goal is finding what works smoothly for your hands and your style.
Remember, the difference between amateur and polished crochet work often comes down to clean color changes and neat finishing. These details matter. Your color changes should be invisible or intentional—never sloppy or accidental. With practice, you’ll develop the muscle memory to make perfect transitions every single time, and your finished projects will reflect that professional attention to detail. Now grab some yarn in contrasting colors and start practicing. Your next colorwork masterpiece is waiting.


