

Learning how to change a light fixture is one of those DIY skills that feels intimidating until you actually do it—then you realize it’s just a few bolts and some wire connections away from a total room upgrade. Whether you’re swapping out an old builder-grade ceiling light for something with character or replacing a broken fixture, this project takes about 30 minutes and requires nothing fancier than a screwdriver and a ladder. No electrician degree needed.
Table of Contents
Safety First: Power Off Everything
Before you touch anything, flip the breaker switch that controls your light fixture. This isn’t optional—it’s the difference between a boring Tuesday and a trip to the emergency room. Walk back to the room and flip the light switch to confirm it’s actually dead. No juice, no light, nothing. If you’re not sure which breaker controls which fixture, turn off the main breaker to be safe. You’ve got time. Your future self will thank you for this five-second precaution.
Pro tip: Use a non-contact voltage tester on the existing wires after you’ve removed the fixture. These cost about $10 and give you absolute confirmation that there’s no power running through. It’s cheap peace of mind, and honestly, it should be part of your permanent toolkit.
Gather Your Tools and Materials
You don’t need much to complete this job. Grab a screwdriver (probably Phillips head), a ladder that reaches your ceiling without you doing gymnastics, wire strippers if you’re replacing old wiring, and wire nuts if they didn’t come with your new fixture. Your new fixture should include a mounting bracket, wires, and usually a couple of wire nuts. Check the box before you start climbing.
Have a helper nearby if possible—not required, but holding the fixture steady while you’re fumbling with wires makes life infinitely better. If you’re solo, you can use a temporary support like a wire or hook to hold the fixture weight while you make connections. Also grab a flashlight or headlamp because ceiling work always happens in your own shadow.
Remove the Old Fixture Completely
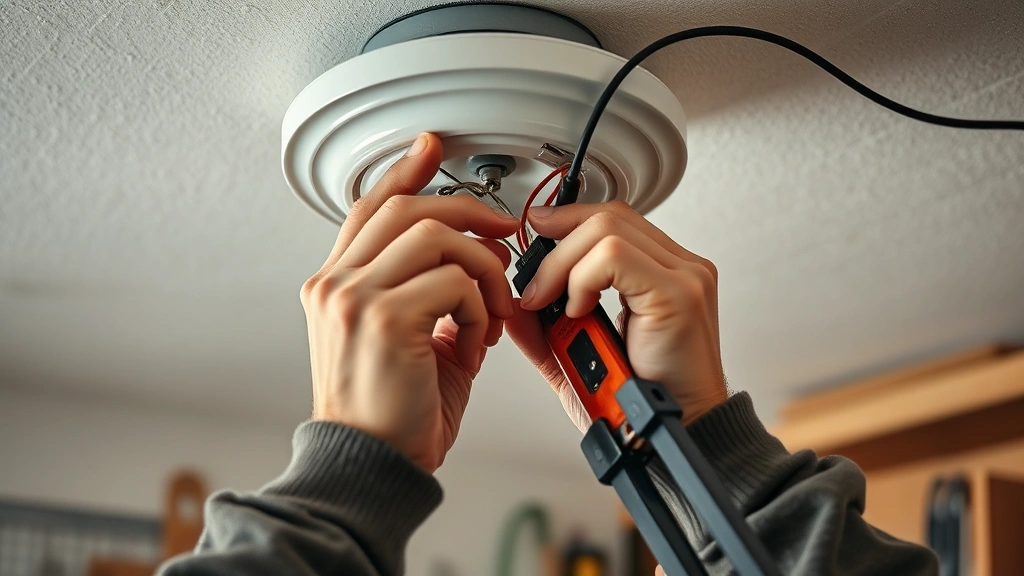
With the power confirmed off, unscrew the decorative canopy (the trim ring that hides the ceiling hole and wires). Set it aside gently—you might reuse it. Next, locate the mounting bolts that hold the fixture to the electrical box in your ceiling. Usually there are two or three. Unscrew these completely and carefully lower the fixture so you can access the wire connections.
Inside, you’ll see three wires: typically black (hot), white (neutral), and bare copper or green (ground). These are probably connected with wire nuts—little plastic caps that twist on. Gently untwist each wire nut counterclockwise and separate the wires. The old fixture should now come free. This is also a good time to clean out any dust or debris from the electrical box.
Prepare and Connect the Wires
Strip about half an inch of insulation from the ends of your house wires if they look crusty or old. Your new fixture probably came with pre-stripped wires, but double-check. Now match them up: black to black, white to white, and copper to copper. Twist each pair together firmly—about five full rotations—then cap with a wire nut. Twist until snug but don’t over-tighten or you’ll crack the nut.
The connections should feel solid when you tug gently on the wires. If they slip, you didn’t twist enough or your wire nut isn’t tight enough. Redo it. This is not the place to cut corners. Loose connections create heat, and heat in a ceiling fixture is how house fires start. Make it right.
Secure Your New Fixture in Place
With wires connected, carefully push the fixture back up toward the ceiling. Have your helper guide the wires or use that temporary support hook if you’re flying solo. Align the mounting bracket with the bolts in the electrical box and thread the bolts through. Tighten them evenly—don’t crank one side all the way down before the other or you’ll end up with a crooked fixture.
Once the fixture is snug and level, slide the decorative canopy up to cover the gap and wires. Screw it in place. Now install your bulbs—check your fixture specs for wattage limits because oversizing creates fire hazards—and attach any shades or diffusers that came with the unit.
Test Everything Before You Finish
Head back to the breaker panel and flip the power back on. Go to your light switch and flip it. If light appears, you’re golden. If nothing happens, flip the breaker back off and check your wire connections again. Most failures come from loose wire nuts or a wire nut that came off during installation. Check each connection, tighten if needed, and try again.
If you’ve got a dimmer switch, make sure your new fixture is dimmable before you install it. Not all fixtures work with dimmers, and forcing one will damage the electronics. The spec sheet will tell you. Once everything works, do a final visual inspection of your connections and canopy, then call it done.
Avoid These Common Mistakes
Don’t skip the power-off step. Ever. Don’t mix up your wire colors—black always goes to black, white to white. Don’t use wire nuts that are too small for your wire gauge; they’ll slip and create resistance. Don’t overtighten the mounting bolts or you’ll crack the electrical box. Don’t forget to turn the breaker back on (yes, people do this).
Another common error: forcing old wiring into new wire nuts when the insulation is cracked or the copper is corroded. If it looks questionable, strip it back further or replace that section of wire. And if your electrical box feels loose or moves when you push on it, that’s a sign of a deeper issue—stop and call an electrician. Not every problem is DIY-friendly, and that’s okay.
Fixture Upgrade Options to Consider
Now that you know how to change a light fixture, you’ve opened a world of possibilities. LED fixtures save money on electricity and last for years. Pendant lights add style to kitchens and dining areas. Flush mounts work great for low ceilings. Semi-flush designs give you a middle ground between recessed and hanging fixtures. Track lighting lets you direct light exactly where you need it. Family Handyman has excellent guides on fixture selection if you want to dive deeper into options.
Smart bulbs and fixtures are getting cheaper every year, so if you want app-controlled lighting or voice activation, now’s the time to explore it. The installation process is identical—only the bulb or fixture specs change. You might also consider upgrading to a fixture with a built-in dimmer or one that accepts multiple bulb types. The extra $20-30 upfront often pays dividends in flexibility.
Before you buy, measure your ceiling height and the space around your fixture. A massive chandelier looks ridiculous in a closet. A tiny fixture disappears in a vaulted great room. This Old House has a solid breakdown of fixture sizing that takes the guesswork out of proportions.
Final Thoughts
Changing a light fixture is genuinely one of the easiest home improvement projects you can tackle, and the impact is immediate and visible. You’ll walk into that room every day and see something you actually chose and installed yourself. That’s a real win. Once you’ve done it once, you’ll wonder why you ever hesitated. The second fixture takes half the time, and by the third one, you’re basically a pro.

Keep that breaker off, match your wires carefully, and don’t skip the test. Everything else is just mechanics. If you get stuck, Bob Vila’s installation guides are thorough and beginner-friendly. You’ve got this.
Frequently Asked Questions
Do I really need to turn off the breaker?
Yes, absolutely. Working with live electrical wires is dangerous and unnecessary. Flip the breaker, confirm the power is off with a voltage tester, and then proceed. It takes 30 seconds and keeps you safe.
What if my new fixture has four wires instead of three?
Some fixtures have a separate ground wire (usually green or bare copper) in addition to the three standard wires. Connect it the same way—green or bare to ground. If your house wiring doesn’t have a ground wire (older homes sometimes don’t), just cap the fixture’s ground wire with a wire nut by itself.
Can I install a heavier fixture in the same electrical box?
Not necessarily. Standard electrical boxes are rated for fixtures up to 50 pounds. If your new fixture is heavier, you need a reinforced box rated for the weight. Check your fixture specs and your box rating before installation. This is a job for an electrician if you’re unsure.
How do I know if my fixture is dimmable?
Check the product manual or packaging—it will clearly state if the fixture is compatible with dimmer switches. If you’re unsure, ask at the store or contact the manufacturer. Putting a non-dimmable fixture on a dimmer will damage it.
What if I have a ceiling fan instead of a light fixture?
The removal process is identical, but ceiling fans require a heavier-duty box and usually need to be mounted to a joist or reinforced support. This is beyond basic fixture replacement and worth hiring a pro for.
Can I do this if I’ve never done electrical work before?
Absolutely. This is the perfect beginner electrical project. The stakes are low, the process is straightforward, and the learning curve is minimal. Just follow the steps, don’t skip the safety part, and you’ll be fine.


