
Learning how to boil shrimp is one of the quickest skills you can master in the kitchen—seriously, this takes about 5 minutes from pot to plate. Whether you’re prepping for a seafood boil, making shrimp cocktail, or just want a quick protein for dinner, boiling is the most foolproof method. No fancy equipment needed, no complicated timing—just you, a pot of water, and some shrimp ready to go.
Table of Contents
Choose Your Shrimp
First things first—you need to pick the right shrimp. Size matters more than you’d think when boiling. I typically go with medium to large shrimp (16/20 or 21/25 count per pound) because they’re easier to monitor and less likely to overcook. Tiny shrimp cook in seconds and turn rubbery fast. Frozen shrimp work just fine; thaw them in the fridge overnight or run cold water over them for 15 minutes before cooking. Fresh shrimp are great too, but frozen is usually fresher than what’s sitting in the display case anyway.
The key difference is whether you buy them with shells on or peeled. Shell-on shrimp take a bit longer but develop better flavor. Peeled shrimp cook faster and are ready to eat immediately. Either way works—it’s just personal preference and how much time you want to spend.
Prep the Water
Fill a large pot with enough water to cover your shrimp by about 2 inches. I usually use 4-6 quarts of water for a pound of shrimp. Bring it to a rolling boil before the shrimp go in—this is non-negotiable. If you drop cold shrimp into lukewarm water, they’ll cook unevenly and you’ll end up with a rubbery mess.
Add salt to your water—about 1/4 cup per gallon. This isn’t just for flavor; it helps the shrimp cook evenly and prevents them from becoming mushy. You can also toss in a lemon, some bay leaves, or a tablespoon of Old Bay seasoning if you want to build flavor right into the water. This is similar to how you’d season pasta water, and it makes a real difference in the final taste.
Boil Timing Matters
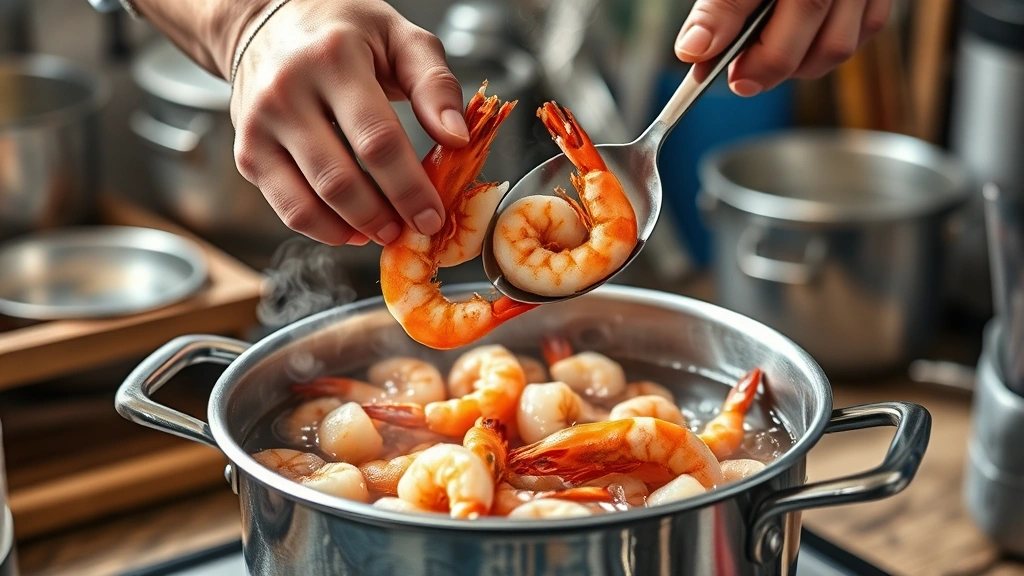
Once your water is at a rolling boil, carefully add the shrimp. The water will stop boiling for a moment—that’s normal. Let it come back to a boil, then start your timer. Here’s the golden rule: medium shrimp take 2-3 minutes, large shrimp take 3-4 minutes, and jumbo shrimp take 4-5 minutes. Set a timer on your phone because it’s too easy to lose track and end up with overcooked shrimp.
You’ll know they’re done when they float to the surface and have a nice pink-white color throughout. If you cut one open, the flesh should be opaque white with no translucent gray areas. The moment they hit that mark, you’re pulling them out. Even 30 seconds too long and they start getting tough. This is where patience pays off—watch them, don’t wander away.
Ice Bath Trick
This is the secret move that separates perfectly boiled shrimp from slightly overdone ones. The second your timer goes off, drain the shrimp and immediately plunge them into a bowl of ice water. This stops the cooking process dead in its tracks. The residual heat will keep cooking them for another minute or two if you skip this step, which is why so many home cooks end up with rubbery shrimp.
Let them sit in the ice bath for 2-3 minutes, then drain them well. Pat them dry with paper towels if you’re serving them cold. If you’re eating them warm, you can skip the ice bath and go straight to serving, but honestly, the ice bath keeps them tender even when warm, so I always do it.
Seasoning Options
You’ve got flexibility here. If you seasoned your boiling water, your shrimp are already flavorful. But you can also dress them up after cooking. Toss warm shrimp with melted butter, garlic, and fresh parsley. Or make a cocktail sauce with ketchup, horseradish, and lemon juice for serving cold. A simple squeeze of fresh lemon and a sprinkle of sea salt is hard to beat too.
If you’re making a full seafood boil like you’d find at a restaurant, this is when you’d add corn, potatoes, sausage, and crawfish to the same pot. Check out complementary recipes like our carne asada seasoning recipe for inspiration on building bold flavor profiles. The same principle of building layers applies whether you’re doing shrimp alone or a full boil.
Common Mistakes
The biggest mistake is overcooking. Shrimp cook fast, and there’s a narrow window between perfect and rubbery. Don’t skip the timer. Another common error is not using enough salt in the water—this makes the shrimp bland and soft. Some people also skip the ice bath and wonder why their shrimp are tough.
Don’t crowd the pot either. If you’re cooking more than 2 pounds, work in batches. Overcrowding drops the water temperature too much and you’ll end up with uneven cooking. And never, ever bring the water back to a boil after adding shrimp—keep it at a gentle rolling boil, not a violent one.
Serving Ideas
Boiled shrimp are incredibly versatile. Serve them cold with cocktail sauce as an appetizer. Toss them warm into pasta with garlic and oil. Add them to black beans and rice for a quick protein boost. Make shrimp tacos, shrimp salads, or shrimp fried rice. You can also pair them with sides like baked proteins for a complete meal.
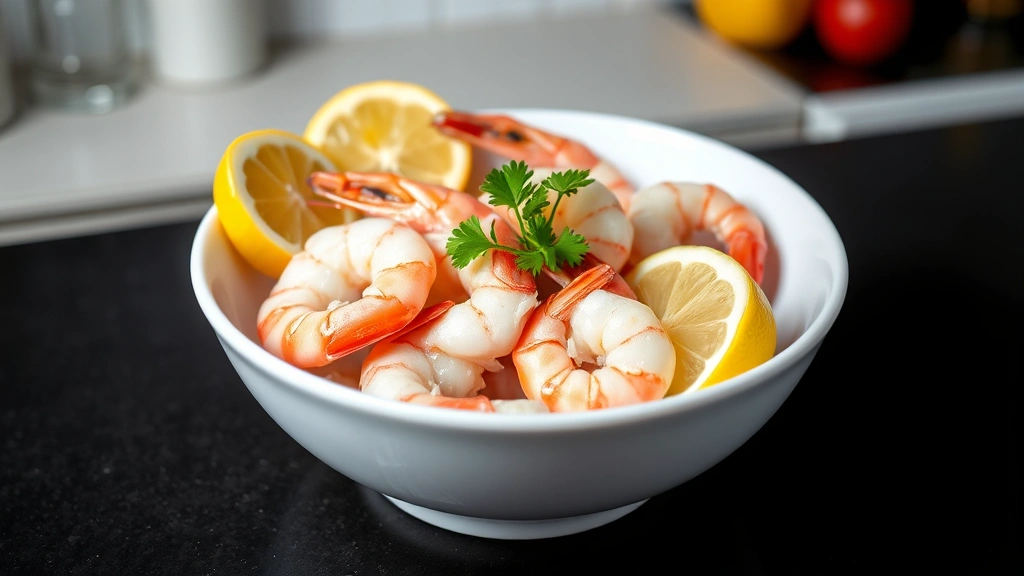
For a fancy presentation, arrange them on a platter with lemon wedges and fresh herbs. The pink-white color is naturally beautiful and doesn’t need much dressing up. If you’re serving at a party, boil them ahead and chill them completely—they’ll hold for 24 hours in the fridge.
Storage Tips
Boiled shrimp keep in the fridge for 3-4 days in an airtight container. Store them with a little of the cooking liquid to keep them moist. You can also freeze them for up to 3 months—just thaw them in the fridge before eating. Don’t refreeze shrimp that were previously frozen unless you cooked them first, which you did, so you’re good to go.
If you’re storing them for a specific meal, label the container with the date so you don’t forget how long they’ve been sitting around. They’re best eaten within 2 days though, when the flavor and texture are at their peak.
Frequently Asked Questions
Can I boil frozen shrimp without thawing?
Yes, but add 1-2 minutes to your cooking time. They’ll still turn out fine, though thawing first gives you more control over the final texture. It’s worth the extra 15 minutes of prep time.
Why are my boiled shrimp mushy?
You’re overcooking them. Set a timer and stick to it. The ice bath also helps—make sure you’re using that trick every time. If they’re mushy even with correct timing, your water temperature might not be hot enough when you add them.
Do I need to devein shrimp before boiling?
Nope. The vein is just the digestive tract and it’s harmless. You can devein before or after boiling—most people do it after because the shells come off easier anyway. For a fancier presentation, devein first.
What’s the difference between boiling and poaching?
Boiling uses a rolling boil; poaching uses a gentle simmer. Both work, but boiling is faster and more forgiving. Poaching is slightly gentler and keeps shrimp from bouncing around as much.
Can I reuse the boiling water?
Sure, strain it and save it for making seafood stock. It’s packed with flavor. Just store it in the fridge and use it within 2-3 days, or freeze it for later.
How do I know if my shrimp are fresh?
Fresh boiled shrimp should smell like the ocean, not fishy or ammonia-like. The meat should be firm and spring back when pressed. If they smell off, don’t eat them.
Final Thoughts
Boiling shrimp is genuinely one of the easiest cooking techniques you can master. Get your water hot, time it right, use the ice bath, and you’re done. The whole process takes less time than waiting for takeout delivery. Once you nail this basic method, you can experiment with different seasonings, serving styles, and flavor combinations. Check out recipes like our air fryer tilapia recipe for other quick seafood cooking methods, or explore how to keep ingredients fresh like our guide on preventing food discoloration. The foundation you build with perfectly boiled shrimp opens up endless possibilities for weeknight dinners and entertaining.


