
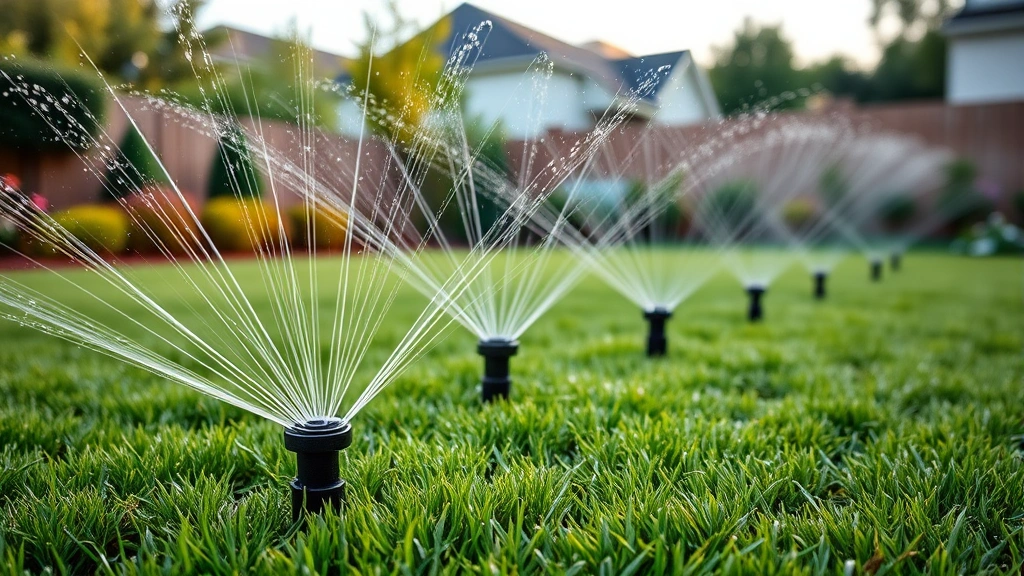
Learning how to adjust sprinkler heads is one of those skills that’ll save you money, time, and a whole lot of water waste. Whether your lawn’s looking patchy or your driveway’s getting soaked, misaligned sprinkler heads are usually the culprit. The good news? You don’t need a degree in irrigation engineering to fix them. I’m going to walk you through this like we’re standing in your yard together, tools in hand.
Table of Contents
Why Adjust Sprinkler Heads
Most people don’t think about their sprinkler system until something goes wrong. Your neighbor’s driveway gets flooded while your flower beds stay dry. That’s when you realize adjustment time has arrived. Sprinkler heads shift over time from foot traffic, weather, and general settling of your lawn. Rocks get kicked in front of nozzles. The system gets bumped by the lawn mower. Before you know it, you’re watering everything except what actually needs water.
Proper adjustment means better coverage, lower water bills, and a healthier lawn. You’re looking at potentially saving 20-30% on water usage just by getting the angles right. Plus, you won’t be that neighbor whose sprinkler system waters the street at 6 AM.
Tools You’ll Actually Need
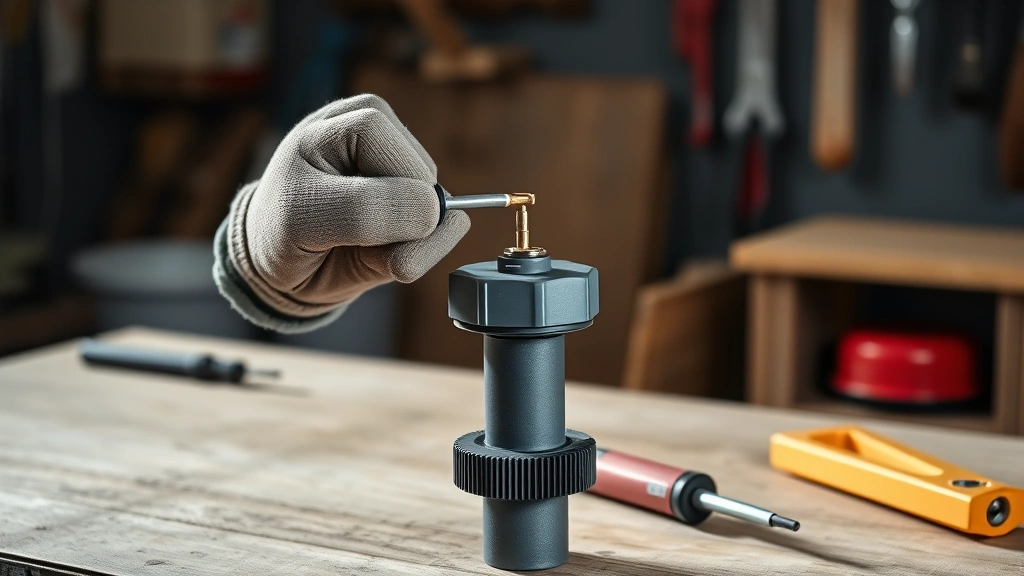
Here’s the beautiful part: you probably already have most of what you need. Grab a flathead screwdriver (the adjustable kind is ideal), a small adjustable wrench, and maybe a pair of needle-nose pliers. Some folks like to use a small adjustable wrench specifically for the nozzle adjustments. That’s it. No fancy equipment required. A bucket or hose is helpful for testing, and honestly, a pair of work gloves keeps your hands cleaner.
If you’ve got multiple head types in your system, you might need a couple different screwdriver sizes, but we’re talking basic stuff from any toolbox. The real tool here is patience and observation.
Types of Sprinkler Heads
Before you start twisting things, understand what you’re working with. Pop-up spray heads are the most common in residential systems—they pop up when water pressure hits them and spray in a fixed or adjustable pattern. Rotor heads are the bigger cousins that rotate back and forth, covering larger areas with a slower, deeper watering pattern. Shrub heads sit lower and are designed for smaller plants. Drip irrigation is a whole different animal and usually doesn’t need the same adjustments.
Most homeowners deal with pop-ups and rotors. Pop-ups are your quick-adjustment option. Rotors take longer to cover their zone but do it more efficiently. Knowing which you’ve got determines your adjustment strategy.
Adjusting Pop-Up Sprinklers
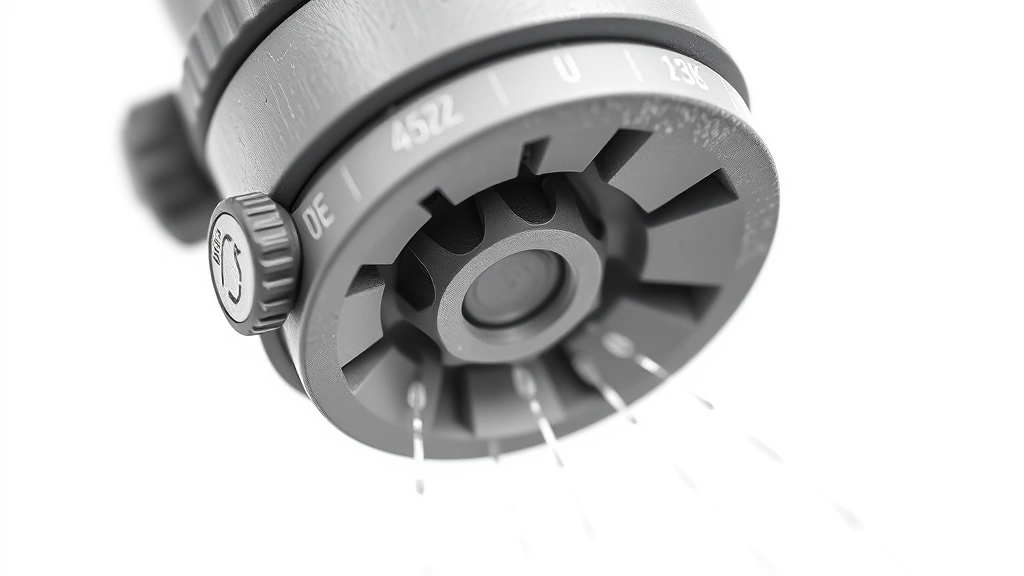
Pop-up heads are straightforward. First, turn on your system and let the heads pop up. Now look at where the water’s actually hitting versus where you want it to hit. The nozzle on top can usually rotate. Grab that nozzle with your screwdriver and turn it to point in the direction you want coverage. Most heads have a range of about 40-360 degrees depending on the model.
The adjustment screw on top controls the spray radius—how far the water shoots out. Turn it clockwise to reduce distance, counterclockwise to increase it. Make small quarter-turn adjustments and test between each one. You’re not trying to hit your neighbor’s roof; you’re trying to cover your lawn evenly.
Some pop-up heads have a separate arc adjustment. That little slot or dial controls how wide the spray pattern is—whether it covers a quarter circle, half circle, or full circle. Adjust this based on your lawn layout. A corner bed might need a quarter-circle pattern while an island planting needs a full circle.
Rotor Head Adjustments
Rotor heads are trickier but not impossible. These babies rotate back and forth, so you’re adjusting the start point and end point of their rotation. Look for adjustment screws on the top of the head—usually there are two: one for the start angle and one for the end angle or arc.
The start adjustment screw controls where the rotor begins its sweep. The arc adjustment determines how far it rotates. If you want it to cover from the driveway to the fence, you’d set the start point at the driveway and the arc to reach the fence. Again, quarter-turn adjustments and testing are your friends here. Building structures on your property might affect where you want sprinkler coverage, so plan accordingly.
Some rotor heads have a flow adjustment screw that controls how fast the water comes out. This affects how far it travels. Clockwise reduces flow and distance; counterclockwise increases it. This is separate from the spray pattern adjustment.
Fine-Tuning Spray Patterns
Once you’ve got the basic direction and distance set, it’s time to dial in the pattern. Walk around while the system’s running and watch where water actually lands. You want overlap between zones—about 50% overlap is ideal so you don’t get dry spots. That means where one head’s coverage ends, the next head’s coverage should already be starting.
Look for dry spots in the middle of zones. That usually means the radius is set too short. Look for water hitting hardscape or areas you don’t want watered. That means you need to adjust the direction or reduce the radius. This is detective work, and it takes observation.
The spray pattern nozzles themselves can sometimes be swapped out. If you’ve got a head that needs to spray a different pattern, you can often replace just the nozzle rather than the whole head. Check your system’s manufacturer to see what nozzle options are available.
Dealing with Pressure Problems
Sometimes the issue isn’t the angle—it’s the pressure. Low pressure means weak spray and short distance. High pressure means excessive misting and overspray. If your whole system seems weak, check for leaks upstream or a clogged filter. If only one zone is weak, you might have a valve issue or a leak in that line.
Most residential systems run at 40-60 PSI. If you’ve got a pressure gauge on your system, check it. Too high? You might need a pressure regulator. Too low? Could be a valve problem or a leak. Understanding water pressure systems helps here—they work on similar principles to irrigation systems.
Pressure problems can also come from debris in the nozzle. A tiny rock or bit of dirt can reduce flow dramatically. Pop the nozzle off and rinse it under clean water. Sometimes that’s all it takes.
Testing Coverage and Flow
The professional way to test coverage is with a catch-can method. Set out several small cans or cups across your lawn in the zone you’re testing. Run the system for 15 minutes. The amount of water in each can shows you coverage uniformity. You want roughly equal amounts in each can—that means even coverage.
If one area consistently gets more water than others, you’ve found a low spot that needs adjustment. If the outer edges are dry while the center is soaked, your radius is too short. If everything’s getting soaked except the edges, your radius is too long.
Don’t just eyeball it—actually measure the water. This takes 20 minutes and gives you real data instead of guesses. It’s the difference between a decent system and a really well-tuned system.
Common Mistakes to Avoid
The biggest mistake people make is adjusting while the system’s off. You can’t see where the water actually goes. Always run the system while you’re making changes. The second mistake is making huge adjustments instead of small ones. Those quarter-turns exist for a reason. You’ll overshoot and have to come back.
Don’t forget about seasonal changes. Summer’s hot and dry; you might need wider coverage. Winter’s wet; you might need to reduce overlap. Adjust seasonally, not just once and forget it.
Another common error is ignoring low spots in your yard. Water follows gravity. If your lawn has a slight slope, water will naturally flow downhill. You might need to adjust spray patterns to compensate. Understanding property drainage is relevant here—water management on your property extends to sprinkler systems.
Don’t over-water trying to fix dry spots. Often, dry spots aren’t because that zone isn’t getting water—it’s because that area needs better soil or different plants. Adjust the system to cover the area properly, but don’t expect a sprinkler system to fix every landscaping problem.
Seasonal Maintenance Tips
Spring’s the time to wake up your system. Turn it on, check every head for winter damage, and make adjustments. Debris accumulates over winter—clean out nozzles and check for clogs. This is also when you should do your catch-can testing and make major adjustments.
Summer’s about monitoring. Do a quick visual check every few weeks. Make sure heads haven’t shifted and patterns still look good. Watch for leaks or heads that aren’t popping up properly.
Fall’s when you prepare for winter. Blow out your lines if you’re in a freezing climate. Make sure all heads are working. Check for damage from summer foot traffic.
Winter depends on your climate. In mild areas, just monitor occasionally. In freezing areas, drain your system completely. Frozen water in lines and heads causes expensive damage.
Frequently Asked Questions
How often should I adjust my sprinkler heads?
Check them seasonally—at minimum spring and fall. After heavy rain or lawn work, do a quick visual inspection. You shouldn’t need major adjustments more than twice a year unless something breaks or gets damaged.
Can I adjust rotor heads without turning the system on?
Technically yes, but you can’t see what you’re doing. Always turn the system on to see actual spray patterns. You’re making blind adjustments otherwise, which defeats the purpose.
What’s the ideal overlap between sprinkler zones?
About 50% overlap is standard. That means if one head covers from 0 to 10 feet, the next should start covering around 5 feet so there’s no gap. Too much overlap wastes water; too little creates dry lines.
Why is my sprinkler head leaking at the base?
Usually a worn seal or cracked body. The seal’s easier to replace than the whole head. Try replacing the seal first. If it still leaks, the head body is damaged and needs replacement.
Can I use different nozzles on the same head?
Most systems use standardized connections, so yes, you can swap nozzles. Check your system’s manual for compatible nozzles. Different nozzles give different spray patterns and distances.
How do I know if my system has low pressure?
Weak, short sprays that don’t reach their intended area. Excessive misting instead of solid water streams. Use a pressure gauge if you have one—should read 40-60 PSI for most residential systems.
Final Thoughts
Adjusting sprinkler heads isn’t rocket science, but it does require patience and observation. You’re not going to get it perfect the first time, and that’s fine. This is a process of small adjustments and testing. Spend an afternoon getting familiar with your system, and you’ll save money on water bills for years to come.
The key is understanding what each adjustment does, making small changes, and actually testing the results. Don’t guess—observe. Don’t assume—verify. Your lawn will thank you with even, healthy growth, and your water bill will thank you even more.
Most sprinkler issues come down to simple misalignment. You’ve got the knowledge now to fix them yourself. Grab your screwdriver, turn on the system, and start fine-tuning. Your future self will appreciate the effort.


