

Learning how to adjust headlights is one of those essential DIY skills that’ll save you a trip to the mechanic and keep you safer on the road. Whether your beams are pointing too high, too low, or drifting sideways, getting them dialed in takes about 30 minutes and some basic tools you probably already have in your garage.
Table of Contents
Why Adjust Your Headlights
Misaligned headlights aren’t just annoying—they’re a safety hazard. When your beams aim too high, you’ll blind oncoming drivers and cause accidents. Point them too low and you’re basically driving blind on dark roads. Proper headlight adjustment improves your visibility, reduces glare for other drivers, and might even help you pass a vehicle inspection.
Most people don’t realize their headlights drift out of alignment until they get flashed by frustrated drivers or notice they can’t see the road clearly at night. After hitting a pothole, a collision, or even just normal wear and tear, your headlights gradually shift. The good news? You can fix this yourself in your driveway.
Tools You’ll Need
Keep it simple—you don’t need fancy equipment for this job. Grab a Phillips head screwdriver, a flat head screwdriver, and maybe an adjustable wrench if your vehicle uses bolt-style adjusters. Some cars have plastic knobs instead of screws, so check your manual first. You’ll also want a tape measure and a flat, level surface like your driveway or garage floor.
One pro tip: consult your owner’s manual before starting. Different manufacturers hide their adjustment mechanisms in different spots, and knowing exactly where to look saves frustration. If you can’t find your manual, most dealerships will print one for free or you can download it online.
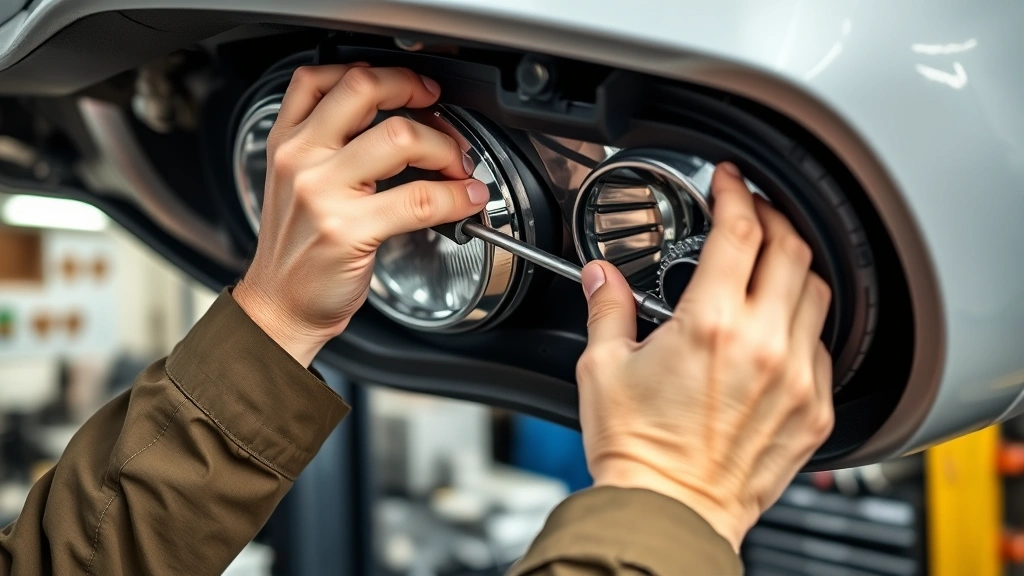
Find the Adjustment Screws
Pop open your hood and look behind each headlight assembly. You’ll find either two screws or two plastic adjustment knobs—one controls vertical aim, the other controls horizontal aim. On some vehicles, they’re labeled with arrows showing which direction turns which way. On others, you’ll need to experiment slightly.
The vertical adjuster is usually on top of or above the headlight housing. The horizontal adjuster sits to the side. If you’re having trouble locating them, shine a flashlight into the engine bay and look for anything that looks like it could rotate or twist. Don’t confuse them with mounting bolts—those stay put.
Prepare Your Vehicle
Find a flat, level surface at least 25 feet long—your driveway works perfectly. Make sure your vehicle is parked on level ground and is fully fueled or at normal weight. An empty tank or trunk full of supplies will throw off your alignment.
Turn on your headlights and let your eyes adjust to the darkness for a minute. You need to see where the beam pattern actually lands on a wall or garage door. If you’re working alone, this is where a smartphone on a tripod or a helper becomes invaluable. Take a photo of the current beam pattern so you can compare before and after.
Adjust Vertical Beam Height
This is the critical adjustment. Your low-beam headlights should aim slightly downward so the hottest part of the beam hits the road about 25 feet ahead of your vehicle, roughly at the height of an oncoming car’s headlights.
Start with the driver’s side headlight. Slowly turn the vertical adjustment screw counterclockwise (or clockwise—check your manual) while watching the beam pattern on the wall. Move it in small quarter-turn increments. After each adjustment, step back and observe where the beam hits. You’re aiming for the bright spot to sit just below the horizontal centerline of your target area.
Once the driver’s side looks right, repeat the process on the passenger side. Both headlights should create a symmetrical pattern. If one beam is significantly brighter than the other, you might have a bulb issue rather than an alignment problem.
Adjust Horizontal Beam Alignment
The horizontal adjustment keeps your beams from drifting left or right. You want each beam centered on its side of the road, not crossing the centerline and blinding oncoming traffic.
Using the same small-turn method, adjust the horizontal screws until each beam is roughly centered on its side. The driver’s side beam should aim slightly to the right of center (toward the shoulder), and the passenger side should aim slightly left. This prevents blinding oncoming drivers while maximizing your road visibility.
Work slowly and deliberately here—these adjustments are sensitive. A quarter-turn can make a noticeable difference. If you overshoot, just turn it back slightly. There’s no penalty for taking your time getting this perfect.
Test Your Work
Once you’ve made your adjustments, take your vehicle for a test drive on a dark road without heavy traffic. Pay attention to how well you can see the pavement ahead, whether the beam feels centered, and if you’re getting flashed by oncoming drivers. If everything feels right, you’re done.
If you’re still having visibility issues, park on a level surface again and make micro-adjustments. Sometimes it takes two or three rounds of tweaking to get it perfect, especially if your headlights were significantly misaligned to begin with. Don’t get discouraged—this is normal.
Common Mistakes to Avoid
The biggest mistake people make is adjusting on an unlevel surface. If your driveway slopes, your measurements will be off. Always use level ground. Another common error is confusing mounting bolts with adjustment screws and accidentally loosening the entire headlight housing—don’t do that.
Some folks also forget to account for vehicle load. If you adjust with an empty trunk and then load up for a road trip, your headlights will shift slightly. Adjust with your vehicle at normal operating weight. Finally, resist the urge to aim your headlights too high thinking it’ll help you see better. It won’t—it’ll just blind other drivers and you’ll fail inspection.

When to Call a Pro
If your headlight housing is cracked, if the adjustment screws are stripped or missing, or if you can’t locate the adjusters after checking your manual, it’s time to visit a mechanic. Some newer vehicles have electronic headlight leveling systems that require diagnostic equipment to adjust properly. Don’t force anything that doesn’t feel right.
Also, if you’ve been in a collision and your headlights are still misaligned after adjustment, the housing might be bent. A pro can assess whether it’s worth replacing or if the damage is cosmetic. For most DIYers though, this is a straightforward 30-minute job that costs nothing but your time.
Frequently Asked Questions
How often should I adjust my headlights?
Check your headlight alignment annually or anytime after a collision, pothole impact, or if you notice visibility issues. Most vehicles need adjustment once every 1-2 years with normal driving.
Can I adjust headlights in daylight?
Technically yes, but it’s much harder to see the beam pattern. You’ll get better results in darkness. If you must work during the day, use a dark garage or wait until evening.
What if my headlights keep drifting out of alignment?
Frequent misalignment usually means your adjustment screws are loose or the housing is damaged. Have a mechanic inspect for cracks or loose mounting bolts. You might also have a suspension issue causing the vehicle to sit unevenly.
Do LED and HID headlights adjust differently?
The adjustment mechanism is the same—you’re still turning the same screws. The only difference is that LED and HID bulbs produce different beam patterns, so the final alignment point might look slightly different. Follow the same procedure regardless of bulb type.
Will adjusting headlights affect my vehicle’s warranty?
No. Headlight adjustment is routine maintenance and won’t void your warranty. It’s actually something manufacturers expect owners to do periodically.
Getting your headlights properly adjusted is one of those satisfying DIY wins that makes you feel like a real mechanic. You’re improving your safety, helping other drivers, and saving money in the process. Grab your screwdriver, give yourself 30 minutes, and get it done. Your night drives will feel infinitely safer once those beams are dialed in perfectly. If you’re tackling other vehicle maintenance, check out our guides on how to program RCA universal remote for in-car entertainment systems or explore other home improvement skills like how to install metal roofing to expand your DIY toolkit. For additional automotive insight, the Family Handyman headlight guide offers complementary perspectives on this essential maintenance task.


