

Learning how to adjust door hinges is one of those skills that’ll save you hundreds in contractor calls and take maybe 15 minutes of your time. Whether your door’s sagging, rubbing against the frame, or won’t close properly, the fix is almost always hiding right there in those three little hinges. I’ve fixed countless doors in my workshop, and I’m going to walk you through exactly what I do.
Table of Contents
Identify Your Door Problem
Before you touch a single screw, figure out what’s actually wrong. Is the door hanging lower on one side? That’s a vertical alignment issue. Does it rub against the top or bottom of the frame? Horizontal problem. Won’t close flush against the frame? You’ve got a depth issue. Spend two minutes observing how your door sits in the frame—this tells you exactly which hinges need adjusting and in which direction.
Most doors have three hinges: top, middle, and bottom. The top and bottom hinges handle most of the adjustment work. If you’re dealing with a heavy exterior door, you might need to adjust all three. Open and close the door slowly while watching the gaps between the door and frame. Uneven gaps are your visual clue that something’s out of alignment.
Gather Your Tools
You don’t need much here, which is one reason this job is so satisfying. Grab a Phillips head screwdriver (or whatever matches your hinges), a 2-inch level, and maybe a shim or two if you’re feeling fancy. Some folks like a drill-driver for speed, but honestly, hand tools work just fine and give you better control.
That’s it. No special equipment needed. I keep a magnetic screwdriver handy because it stops screws from dropping into the hinge cavity, which saves frustration. If your hinges are painted over, you might need a utility knife to carefully cut away paint from the screw heads first.
Vertical Adjustment Basics
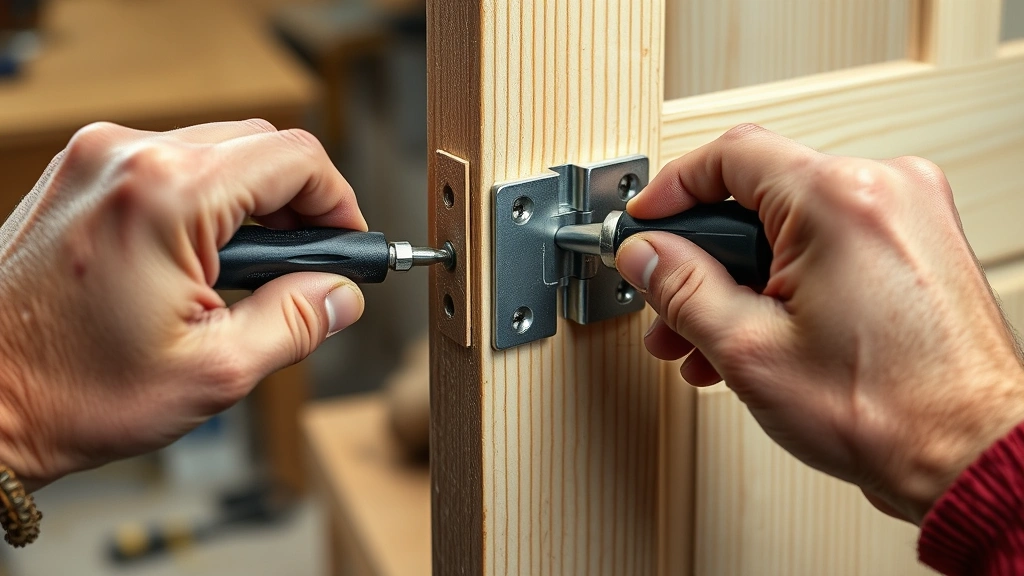
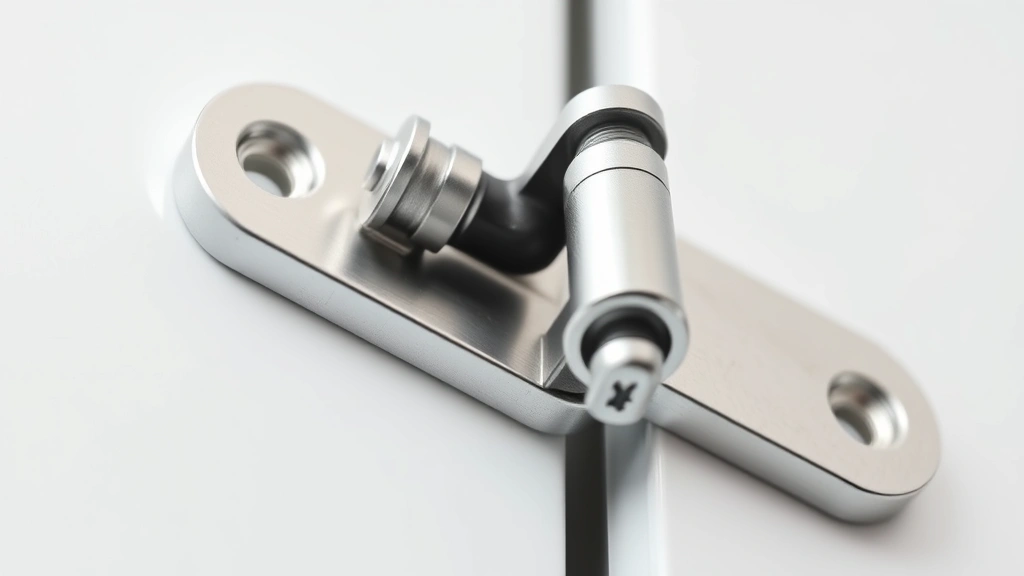
This is the most common fix. Your door’s sagging, and you need to lift it up. Here’s the deal: each hinge has adjustment screws. The screw closest to the door frame (the one that looks like it’s holding the hinge leaf to the frame) is your vertical adjustment screw.
Start with the bottom hinge. Loosen that screw about a quarter turn—don’t remove it completely. Now here’s the trick: slip a shim or a thin piece of cardboard behind the hinge. This pushes the hinge outward slightly, which lifts the door. Check your gap with the level. If it’s still sagging, add another shim. Once the gap looks even, tighten that screw back down.
If the door’s still not sitting right, move to the top hinge and repeat. Usually, adjusting just the bottom hinge fixes the sag. The middle hinge rarely needs touching unless you’ve got a really heavy door or serious structural issues.
Horizontal Alignment Technique
Now your door’s sitting at the right height, but it’s rubbing against the frame on one side. This is a horizontal alignment problem, and it’s fixed with the other adjustment screw on each hinge—the one that points toward the door edge.
Loosen this screw slightly on the hinge where the door’s rubbing. If the door’s rubbing on the latch side (the side that closes), loosen the top hinge screw. If it’s rubbing on the hinge side, loosen the bottom one. This screw controls how far the hinge extends, which pulls or pushes the door left or right.
Turn the screw counterclockwise about a quarter turn, close the door, and check the gap. You’re looking for even spacing—about the thickness of a credit card—all the way down the latch side. This takes patience. Make small adjustments and test frequently. Going too far and you’ll have a gap on the other side.
Depth Adjustment Method
Your door closes but doesn’t sit flush against the frame—there’s a gap between the door face and the frame. This means the door’s leaning out or in, and it’s a depth problem. You’ll fix this by adjusting how the hinge mounts to the frame itself.
Some hinges have a screw that lets you adjust the depth directly. Look for a screw that’s perpendicular to the door edge. If your hinges don’t have this feature, you’re working with the shim method again. Loosen the frame-mounting screws slightly and slip shims behind the hinge leaf. This pulls the hinge (and door) closer to the frame or pushes it away, depending on where you place the shim.
The depth adjustment is trickier because you’re working blind a bit. Make tiny adjustments, close the door, and feel along the frame to see if the door’s sitting flush. When it does, tighten everything back down.
Test Door Function
After each adjustment, actually use the door. Open it fully, close it slowly, listen for rubbing or squeaking, and check that it latches smoothly. A properly adjusted door should swing open and closed with barely a whisper and latch without binding.
Check the gap all the way around—top, bottom, latch side, and hinge side. It should be consistent, about the thickness of a credit card everywhere. If you’ve got tight spots or large gaps, you need more adjustment. This is also a good time to check out how to clean quartz countertops if your entryway has that material, since you’re already in maintenance mode.
Troubleshoot Common Issues
Door still sagging after adjustments? You might have a bent hinge or a frame that’s twisted. Replace the hinge if it’s obviously bent. If the frame’s twisted, that’s a bigger job—you might need to shim the entire frame or call a professional.
Door won’t close at all after you adjusted it? You’ve probably pushed it too far out. Loosen the adjustment screws and back off your shims slightly. Sometimes less is more with hinge adjustments. According to Family Handyman’s comprehensive guide, most door problems are fixed with quarter-turn adjustments, not major overhauls.
Squeaking hinges? That’s not an alignment problem—that’s a lubrication issue. A tiny drop of 3-in-1 oil on each hinge pin stops the noise instantly. Don’t use WD-40; it’s a cleaner, not a lubricant. You want something that stays put.
Maintenance Tips
Check your door hinges twice a year. Seasonal temperature changes cause wood to expand and contract, which can throw your alignment off. A quick visual inspection takes 30 seconds and saves you from a binding door in the middle of winter.
Keep hinges clean and lightly oiled. Dust and debris can prevent smooth operation. Wipe them down with a dry cloth occasionally. If you notice a door starting to sag, address it immediately—a small adjustment now prevents a bigger problem later. This Old House recommends treating hinge maintenance like any other preventive home care.
If you’ve got exterior doors, pay extra attention. Weather and temperature swings hit them harder than interior doors. A door that’s perfectly adjusted in summer might need tweaking in winter when wood shrinks.
Frequently Asked Questions
How often should I adjust door hinges?
Most doors need adjustment once or twice a year, especially if you live somewhere with significant seasonal changes. If your door’s working smoothly, leave it alone. Only adjust when you notice sagging, rubbing, or gaps.
Can I adjust hinges without removing the door?
Absolutely. That’s the beauty of this job. You don’t need to take the door off its hinges. All adjustments happen with the door hanging normally. This saves time and prevents damage to the door or frame.
What if my hinges don’t have adjustment screws?
Older homes sometimes have simple butt hinges without adjustment features. In that case, you’re working with the shim method exclusively. Loosen the frame screws and slip shims behind the hinge leaf to move the door where you need it.
Is it normal for doors to need adjustment?
Completely normal. Wood moves, hinges settle, and gravity does its thing. Every door I’ve worked on needed some adjustment at some point. It’s not a sign of poor installation—it’s just part of owning a home.
Should I call a professional?
If your door’s only slightly out of alignment, you can handle this yourself in 15 minutes. If the frame’s twisted, the door’s severely warped, or hinges are broken, that’s when you call someone. But 90% of door problems are simple hinge adjustments.
Can I adjust hinges on a glass door?
Yes, same process. Be extra careful with the screws—you don’t want to crack the glass with a slip of the screwdriver. Take your time and use a steady hand. Glass doors are heavier, so they might need all three hinges adjusted.
What’s the right gap between door and frame?
About 1/8 inch—roughly the thickness of a credit card. This gives enough clearance for the door to swing freely without binding, but not so much that you see light around the edges. Consistency matters more than exact measurements. Even gaps all around look professional and function smoothly.
Bottom line: How to adjust door hinges is a five-minute skill that makes a huge difference in how your home feels and functions. A door that swings smoothly and closes quietly is something you notice every single day. Start with the vertical adjustment, move to horizontal if needed, and only mess with depth if you’re dealing with a flush-mount problem. Test frequently, make small adjustments, and you’ll nail it. This is the kind of maintenance that keeps your house in good shape and your wallet fuller. If you’re already in a maintenance mindset, you might want to check out how to clean a washing machine or how to change brake pads while you’re at it—same philosophy applies to all of it.


