
Learning how long to cook chicken tenders in oven at 400 is one of those kitchen skills that saves you time, money, and the stress of undercooked or rubbery poultry. Whether you’re feeding a family of picky eaters or meal-prepping for the week, nailing the timing and technique makes all the difference between mediocre and genuinely delicious chicken tenders.
Table of Contents
Basic Timing at 400°F
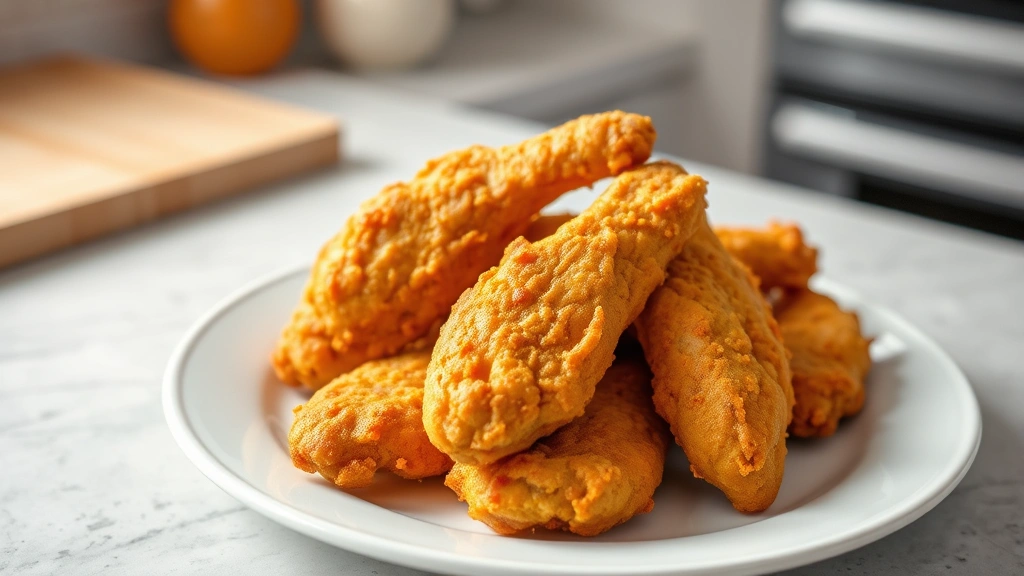
The straightforward answer: chicken tenders take 12-15 minutes at 400°F, depending on thickness and whether they’re breaded or plain. Most store-bought tenders fall in the 12-minute sweet spot. Homemade tenders, especially thicker cuts, might need the full 15 minutes. The key is that internal temperature hits 165°F—that’s your real target, not just the clock.
Here’s the practical breakdown: preheat your oven for 5 minutes, arrange tenders on a lined baking sheet in a single layer (don’t crowd them), and set your timer for 12 minutes. At the 10-minute mark, take a peek. If they’re golden and firm, you’re on track. If they still look pale, give them the full 15.
The 400°F temperature is the Goldilocks zone—hot enough to crisp the exterior without drying out the inside. Lower temps (like 350°F) take 18-20 minutes and won’t brown as well. Higher temps (425°F+) risk burnt coatings before the chicken cooks through.
Prep Work Matters Most
Your success starts before the oven door closes. Pat your chicken tenders completely dry with paper towels—moisture is the enemy of crispiness. If you’re using frozen tenders straight from the bag, don’t thaw them; frozen tenders actually cook more evenly and stay juicier. Just add 2-3 minutes to your cook time (so 14-18 minutes total).
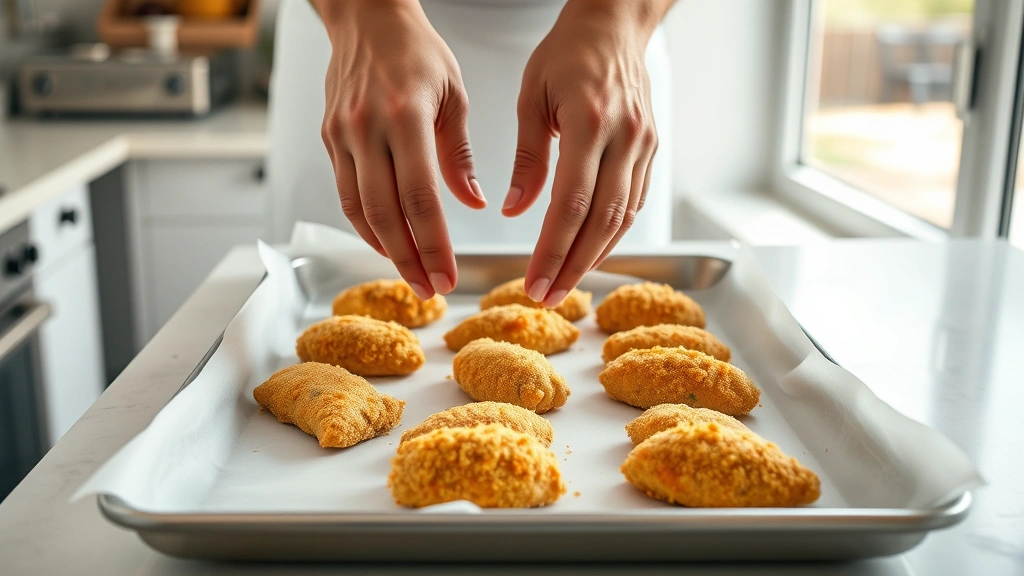
Arrange tenders on a baking sheet lined with parchment paper or aluminum foil. This prevents sticking and makes cleanup trivial. Don’t use a bare sheet—it’ll create hot spots and uneven cooking. Space them about an inch apart; they need air circulation to crisp properly.
If you’re working with fresh, raw tenders that you’ve cut yourself, pound them gently to an even thickness. Uniform thickness means uniform cooking—no more dried-out edges and raw centers. A meat mallet or even the bottom of a heavy skillet works perfectly.
Breading and Coating Options
Breading transforms chicken tenders from bland to genuinely craveable. The classic three-step breading station works beautifully: flour, beaten egg, then breadcrumbs. Dredge the tender in flour (shaking off excess), dip in egg, then coat with breadcrumbs. Press gently so the coating adheres.
For extra crunch, use panko breadcrumbs instead of regular. Panko is coarser and stays crispier in the oven. You can also mix in grated Parmesan cheese, garlic powder, paprika, or Italian seasoning into your breadcrumb mixture for flavor without extra calories.
No-breading options work too: simply season the tenders with salt, pepper, and your favorite spices, then lightly spray or brush with oil before baking. This method is faster and lighter, though you won’t get that satisfying crunch. The timing stays the same—12-15 minutes at 400°F.
Pro tip: let breaded tenders sit in the fridge for 15-30 minutes before baking. This helps the coating set and adhere better, reducing flaking and improving texture.
Checking for True Doneness
A meat thermometer is your best friend here. Insert it into the thickest part of a tender without touching bone (if any), and you’re looking for 165°F. That’s the USDA safe temperature for poultry. At 165°F, any harmful bacteria are dead, and the chicken is cooked through but still juicy.
If you don’t have a thermometer, cut into the thickest tender. The juices should run clear, not pink, and the meat should be white or light tan throughout. If you see any pink, it needs more time. Give it another 2-3 minutes and check again.
Don’t rely on color alone—especially with breaded tenders. The coating can look golden while the inside is still undercooked. Use the thermometer, the clear-juice test, or the cut-and-check method every time until you develop an intuition for thickness and doneness.
Common Mistakes and Fixes
Dry, rubbery chicken: You’ve overcooked it. This usually happens at higher temps or with longer cook times. Stick to 400°F and pull tenders at 165°F internal temp, not 170°F or higher. Thinner tenders cook faster—watch them closely.
Pale, soggy coating: Your oven wasn’t fully preheated, or the tenders were too crowded. Preheat for at least 5 minutes. Space tenders with air gaps between them. If you’re baking a huge batch, use two racks and rotate them halfway through.
Raw or undercooked centers: The tenders were too thick, or your oven runs cool. Pound them to even thickness (about ½-inch is ideal). If your oven runs cool, increase temp to 410-415°F or add 2-3 minutes to cook time. Use an oven thermometer to check your actual oven temp—many are off by 25°F or more.
Coating falls off: You skipped the flour step or didn’t let the breading set. Always use flour as a base—it helps the egg adhere. Let breaded tenders rest in the fridge before baking. Make sure your egg wash is actually coating the chicken, not just pooling.
Seasoning and Sauce Pairings
Plain salt and pepper are fine, but you can elevate chicken tenders with minimal effort. Mix your seasonings into the breadcrumb coating: garlic powder, onion powder, paprika, cayenne, dried oregano, or thyme all work great. You can also brush the raw tenders with a thin layer of honey mustard, barbecue sauce, or ranch dressing before breading for extra flavor.
For dipping sauces, consider making a quick homemade BBQ sauce or Cajun Alfredo sauce to pair with your tenders. Honey mustard, sriracha mayo, or even a simple lemon-herb yogurt sauce elevate the meal without much fuss.
If you’re making tenders for meal prep, keep seasoning mild on the tenders themselves and let people customize with sauces. This keeps them versatile throughout the week.
Batch Cooking and Storage
Chicken tenders freeze beautifully, both raw and cooked. If you’re breading them, freeze them on a baking sheet for 2 hours before bagging—this prevents them from clumping together. Frozen raw tenders stay good for 3-4 months; cooked tenders last about 2 months.
To reheat cooked tenders, pop them back in a 375°F oven for 5-8 minutes until they’re warm and the coating re-crisps slightly. Don’t use the microwave unless you enjoy rubbery texture. A toaster oven also works great for small batches.

Cooked tenders last 3-4 days in an airtight container in the fridge. They’re perfect for quick lunches, salads, or snacks. Store them separately from sauces to prevent sogginess.
Variations and Dietary Tweaks
For a lighter version, skip the breading entirely and simply season the tenders with salt, pepper, and spices. Spray lightly with cooking oil and bake at 400°F for 10-12 minutes. You’ll lose the crunch but save calories and time.
Gluten-free? Use gluten-free breadcrumbs or crushed gluten-free cereal (like Rice Krispies) as your coating. The timing and technique stay exactly the same. Almond flour mixed with Parmesan also creates a great crust if you’re going low-carb.
If you’re comparing cook times with other proteins, how long to bake tilapia is similar (12-15 minutes at 400°F), though tilapia is more delicate. Chicken tenders are more forgiving because they’re thicker and denser.
Frequently Asked Questions
Can I use frozen chicken tenders without thawing?
Absolutely. Frozen tenders cook evenly and stay juicier than thawed ones. Add 2-3 minutes to your cook time (14-18 minutes total at 400°F). Make sure they’re in a single layer with space between them.
What’s the difference between chicken tenders and chicken strips?
Tenders are the natural muscle that runs along the underside of the chicken breast. Strips are sliced from the breast itself. Tenders are typically more tender and cook slightly faster. Use the same timing and method for both.
Why are my tenders coming out dry?
You’re likely cooking them past 165°F. Pull them out as soon as they hit that temperature. Thinner tenders dry out faster, so pound them to even thickness. Also, don’t skip the oil or butter—fat keeps meat moist.
Can I bake chicken tenders at 350°F instead?
Yes, but they’ll take 18-22 minutes and won’t brown as nicely. The 400°F temperature is ideal because it crisps the exterior while keeping the inside juicy. If your oven runs hot, 375°F works fine (add 2-3 minutes).
How do I make the coating extra crispy?
Use panko breadcrumbs instead of regular. Spray or brush the tenders lightly with oil before baking (oil promotes browning). Let breaded tenders rest in the fridge for 15-30 minutes before baking. You can also increase oven temp to 425°F, but watch them closely to avoid burning.
Is there a difference between baking and air frying?
Air fryers cook faster (8-10 minutes at 400°F) because of intense circulating heat. The timing and temperature are different, but the concept is the same. If you’re using an air fryer, reduce time by about 3-4 minutes and check doneness early.
The Bottom Line
Cooking chicken tenders in the oven at 400°F for 12-15 minutes is simple, reliable, and produces consistently delicious results. The real secret isn’t fancy technique—it’s even prep (dry, uniform thickness), proper spacing, and using a meat thermometer to hit 165°F internal temp. Skip the guesswork, trust the process, and you’ll have golden, juicy tenders every time. Whether you’re feeding kids, prepping meals, or just craving comfort food, this method works. Now get in the kitchen and make it happen.


