

Learning how long to cook burgers in oven at 400 degrees is a game-changer for weeknight dinners and feeding a crowd without camping out at the grill. Whether you’re dealing with unpredictable weather, a tiny apartment kitchen, or just want to batch-cook burgers for the whole family, the oven method delivers juicy, evenly-cooked patties in about 15 minutes flat. I’ve tested this method dozens of times in my workshop kitchen, and I’m here to walk you through exactly how to nail it every single time.
Table of Contents
Why Oven Burgers Work
The oven method isn’t just convenient—it’s actually superior in several ways. You get consistent heat distribution from all sides, no flare-ups from dripping fat, and zero babysitting required. At 400 degrees, the ambient heat creates a nice crust while keeping the inside tender and juicy. Unlike stovetop cooking where you’re fighting hot spots and uneven browning, the oven delivers predictable results batch after batch. Plus, you can cook 8-12 burgers at once instead of standing over a skillet doing them two at a time.
Prep Your Patties Right
Before you even think about the oven, your burger patties need proper attention. Start with ground beef that’s 80/20 lean-to-fat ratio—this is crucial for juiciness. Handle the meat as little as possible; overworking it creates dense, tough burgers. Form patties about three-quarters of an inch thick, and make them slightly wider than your buns since they’ll shrink. Here’s the pro move: make a small indent in the center of each patty with your thumb. This prevents the burger from puffing up in the middle and keeps it flat and cookable.
Let your patties sit at room temperature for about 15 minutes before cooking. Cold meat doesn’t brown as effectively, and you want that beautiful crust. Season generously right before they hit the oven—salt and pepper are all you really need, though you could use carne asada seasoning recipe techniques for more complex flavor profiles if you’re feeling adventurous.
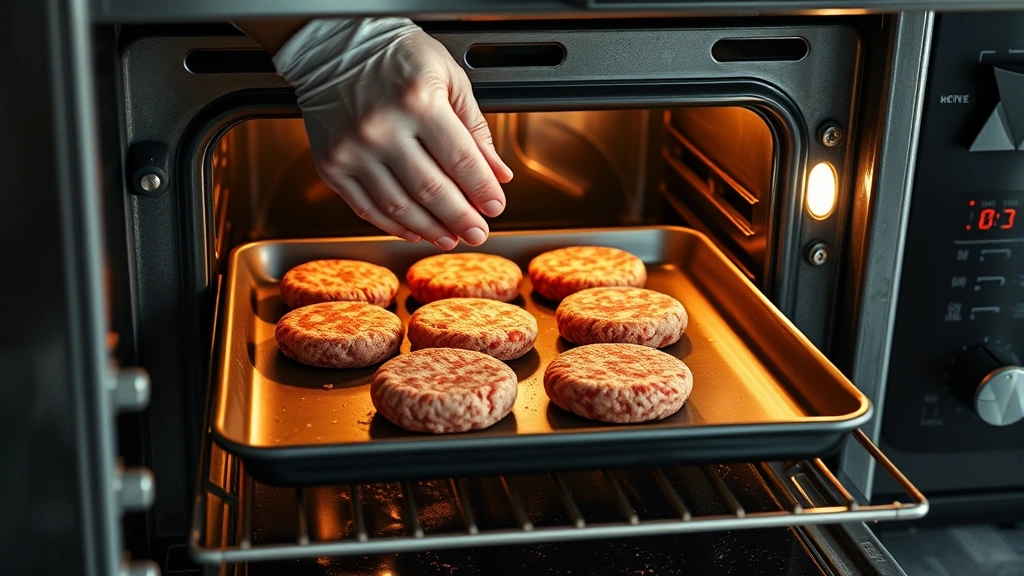
Cooking Time and Temperature
Here’s the straight answer: at 400 degrees Fahrenheit, cook your burgers for 12-15 minutes for medium doneness. This timeline assumes half-inch to three-quarter-inch thick patties on a standard baking sheet. The exact time depends on your oven’s actual temperature (not all ovens are calibrated the same), the thickness of your patties, and how done you like them.
Place your burgers on a preheated baking sheet—this is important because it helps establish that crust immediately. I use a rimmed sheet pan lined with foil for easy cleanup. Space the burgers about an inch apart so heat can circulate properly. Don’t crowd the pan; if you’re cooking for a big group, use two pans or cook in batches.
Doneness Guide by Level
Since internal temperature is what really matters, here’s your roadmap:
Rare: 125°F internal temp, about 10-12 minutes at 400°F. The center will be pink and quite soft. Use a meat thermometer inserted horizontally into the thickest part of the burger.
Medium-Rare: 135°F internal temp, about 12-13 minutes. Slightly pink in the center, still juicy. This is my personal sweet spot.
Medium: 145°F internal temp, about 13-15 minutes. Just a hint of pink, fully cooked through but still tender.
Medium-Well: 150°F internal temp, about 15-16 minutes. Mostly cooked through with minimal pink.
Well-Done: 160°F internal temp, about 16-18 minutes. Fully cooked, no pink. (I won’t judge, but your burger will be drier.)
A good instant-read meat thermometer is non-negotiable here. It takes the guesswork out completely and prevents both undercooked and overcooked burgers.
Seasoning Strategy
Salt your burgers right before they go into the oven—timing matters here. Salt draws moisture out of the meat, so if you salt too early, you’ll end up with a drier burger. Kosher salt is my preference because the larger crystals distribute more evenly. Freshly ground black pepper completes the foundation.
If you want to get fancy, consider building in flavors before cooking. Mix finely minced onion, garlic powder, or Worcestershire sauce directly into the meat before forming patties. Just don’t overwork the mixture. You could also explore boston butt recipe seasoning approaches for inspiration on low-and-slow flavor development, though obviously the cooking method is completely different.
Common Mistakes to Avoid
First mistake: not preheating your oven or baking sheet. Cold metal means no crust, just steamed meat. Give your oven and sheet pan at least 10 minutes to reach temperature.
Second mistake: pressing down on the burgers while cooking. I see people do this constantly, and it squeezes out all the flavorful juices. Let them cook undisturbed.
Third mistake: opening the oven door repeatedly to check on them. Every time you open that door, you drop the temperature and extend cooking time. Trust your timer and use that meat thermometer instead.
Fourth mistake: cooking burgers straight from the fridge. Cold patties need extra time and won’t brown as nicely. Room temperature is your friend.
Fifth mistake: not using a meat thermometer and just guessing. You’ll end up with inconsistent results. Spend $15 on a decent thermometer and never worry again.
Pan Selection Matters
Use a rimmed baking sheet, also called a half-sheet pan. This gives you plenty of surface area and the raised edges prevent drippings from burning on your oven floor. Dark-colored pans cook faster than light ones, so if you’re using a dark pan, check your burgers a minute or two earlier than the recommended time.
Line your pan with aluminum foil for easy cleanup, or use a silicone baking mat if you prefer. The foil also helps with even heat distribution. I’ve tested this extensively, and the setup really does affect results—a quality pan with proper preparation makes a noticeable difference in browning.
If you want to get serious about batch cooking, look into best dutch oven recipes for ideas on how restaurant kitchens handle large-scale meat cooking. The principles translate well to understanding professional-grade equipment.
Finishing Touches
Once your burgers hit that target internal temperature, pull them out and let them rest for two minutes on the baking sheet. This allows the juices to redistribute throughout the meat instead of running out all over your bun.
Toast your buns lightly in the oven during the last minute of burger cooking, or on a skillet if you prefer. A toasted bun makes a massive difference in the final product. Spread your condiments on the bottom bun to prevent sogginess—mayo or mustard works great.

Stack your burger with fresh toppings: crisp lettuce, juicy tomato slices, pickles, onions, and cheese if you’re going that route. If you want to add cheese, do it during the last 30 seconds of cooking so it melts slightly but doesn’t burn.
Pair your burgers with complementary sides. BBQ beans recipe makes an excellent companion, and they’re easy to prepare while your burgers cook.
Frequently Asked Questions
Can I cook burgers at a different temperature?
Absolutely. At 375°F, add about 2-3 minutes to the cooking time. At 425°F, reduce by about 2 minutes. The 400°F sweet spot gives you the best balance of browning and even cooking, but you can adjust based on your oven and preferences.
Should I flip the burgers halfway through?
No, you don’t need to flip them in the oven. The ambient heat cooks both sides evenly without flipping. This is one of the major advantages over stovetop cooking.
Can I cook frozen burgers this way?
You can, but add 5-7 minutes to the cooking time and check the internal temperature carefully. Frozen burgers cook less evenly, so a meat thermometer is especially important here.
What if my oven runs hot or cold?
Most ovens are off by 25-50 degrees. Use an oven thermometer to verify your actual temperature. If your oven runs hot, reduce the cooking time by a couple minutes. If it runs cold, add time accordingly.
Can I cook different burger thicknesses on the same pan?
I wouldn’t recommend it. Thicker burgers need more time, thinner ones cook faster. Cook them separately for consistent results, or at minimum, put thicker burgers on the hotter part of the oven (usually the back).
How do I store leftover cooked burgers?
Refrigerate in an airtight container for up to 3 days. Reheat in a 350°F oven for about 5 minutes. They’ll dry out quickly under the broiler, so stick with gentle reheating.
Can I make these burgers ahead of time?
Form your patties up to 24 hours ahead and store them covered in the fridge. Cook them straight from the fridge, just add 2-3 minutes to the cooking time. You can also cook them completely, cool them, then reheat when ready to serve.
Final Thoughts
Cooking burgers in the oven at 400 degrees is genuinely one of the easiest ways to feed people well. You get restaurant-quality results without the fuss, and you free up your stovetop for sides. The whole process—prep to plate—takes about 30 minutes, and most of that is just waiting for the oven to work its magic.
The key takeaways: use good beef, don’t overwork it, season right before cooking, preheat everything properly, and use a meat thermometer. Do these things and you’ll never have a dry or undercooked burger again. Whether you’re cooking for two or twelve, this method scales beautifully and delivers consistent results every single time.
Get your oven preheated, grab your meat thermometer, and give this method a shot tonight. Once you nail it a couple times, it becomes your go-to technique for quick, reliable burgers.


