
A gluten free dinner rolls recipe doesn’t have to mean dense, crumbly disappointment on your dinner table. I’ve spent years perfecting a method that delivers rolls so fluffy and tender, your guests won’t believe they’re gluten-free. The secret isn’t magic—it’s understanding how gluten-free flours behave and adjusting your technique accordingly.
Table of Contents
Why Gluten-Free Rolls Fail
Let’s be honest—most gluten-free dinner rolls taste like they belong in a sawdust bin. The problem isn’t the ingredients; it’s the approach. When you remove gluten, you lose the protein network that traps air and creates structure. Too many recipes just swap out wheat flour for a single gluten-free substitute and hope for the best. That’s why you end up with hockey pucks.
Gluten-free flours absorb moisture differently than wheat flour. They’re thirstier. They also lack elasticity, so the dough won’t stretch and hold bubbles the way traditional dough does. Your rolls need extra hydration, proper binding agents, and a technique that accounts for these differences. This recipe addresses all three.
The Flour Blend Matters
The foundation of any successful gluten free dinner rolls recipe is the flour blend. I use a combination of brown rice flour, tapioca starch, and potato starch. Brown rice flour provides structure and a slightly nutty flavor. Tapioca starch adds chewiness and helps trap moisture. Potato starch creates lift and keeps rolls tender.
Don’t use a pre-made gluten-free all-purpose flour blend unless it already contains xanthan gum. If it does, reduce the xanthan gum in this recipe to 1/2 teaspoon. The ratio matters: 1 cup brown rice flour, 1/2 cup tapioca starch, 1/2 cup potato starch. This blend mimics wheat flour’s behavior closely enough to produce rolls that actually feel like rolls.
Ingredients You’ll Need
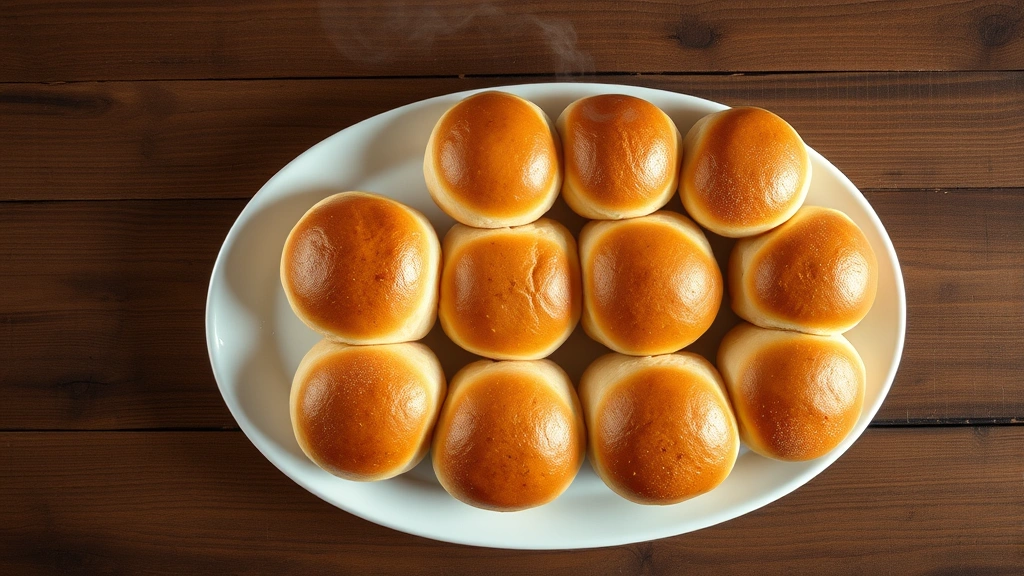
Here’s what goes into a batch of 12 beautiful dinner rolls:
- 1 cup warm milk (110°F)
- 2 1/4 teaspoons active dry yeast (one packet)
- 3 tablespoons honey or sugar
- 1 cup brown rice flour
- 1/2 cup tapioca starch
- 1/2 cup potato starch
- 1 teaspoon xanthan gum
- 1 1/2 teaspoons salt
- 2 large eggs
- 3 tablespoons melted butter
- 1 tablespoon apple cider vinegar
The vinegar is crucial—it strengthens the dough structure and improves rise. The eggs add richness and help bind everything together. Don’t skip either.
Step-by-Step Method
Start by combining warm milk, yeast, and honey in a large mixing bowl. Let it sit for five minutes until foamy. If it doesn’t foam, your yeast is dead—start over with fresh yeast.
While that’s happening, whisk together all your dry ingredients in a separate bowl. Brown rice flour, tapioca starch, potato starch, xanthan gum, and salt. Mix these thoroughly so the xanthan gum distributes evenly. Uneven distribution creates lumpy rolls.
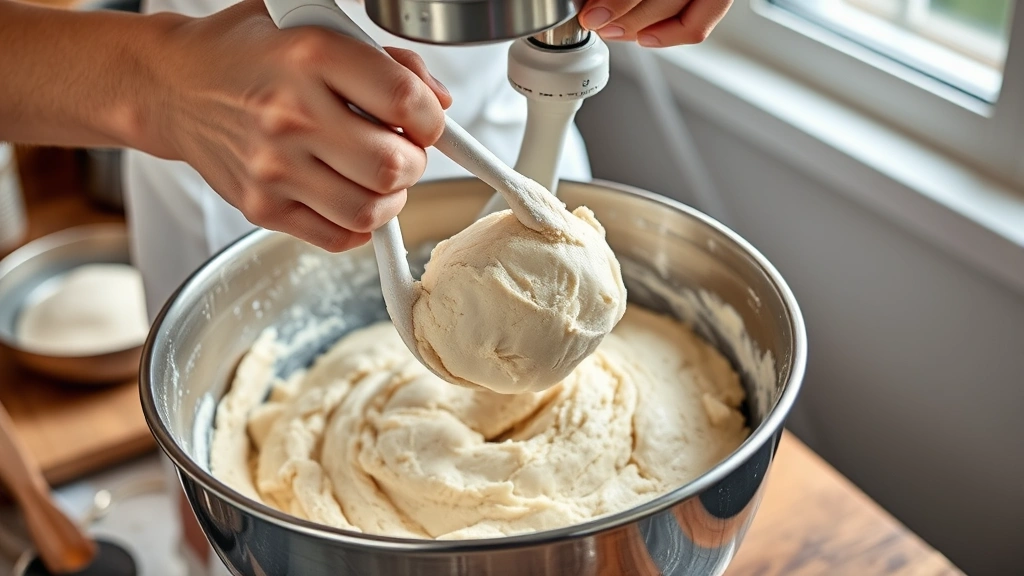
Pour the yeast mixture into your dry ingredients. Add eggs, melted butter, and apple cider vinegar. Using an electric mixer with a paddle attachment, beat on medium speed for three minutes. The dough will be thick and slightly sticky—more like thick cake batter than traditional bread dough. This is correct. If it seems too dry, add milk one tablespoon at a time until you reach this consistency.
The Rise Is Critical
Transfer your dough to a greased bowl, cover it with a damp towel, and let it rise in a warm place for 90 minutes. Gluten-free dough rises slower than wheat dough, so don’t rush this. The dough should roughly double in size. You’ll see bubbles forming on the surface.
After the first rise, gently stir the dough down with a wet spatula. Line a baking sheet with parchment paper and lightly grease it. Using a damp ice cream scoop or large spoon, portion the dough into 12 equal mounds. Space them about two inches apart.
Cover the rolls loosely with plastic wrap and let them rise again for 45 minutes. They won’t rise as dramatically as wheat rolls—that’s normal. You’re looking for them to become slightly puffy, not double in size. This second rise is where gluten-free rolls develop their tender crumb.
Baking for Perfection
Preheat your oven to 375°F about 15 minutes before the second rise finishes. While the oven heats, prepare an egg wash by whisking together one egg and one tablespoon of water.
When the rolls have finished their second rise, brush each one generously with egg wash. This creates a beautiful golden crust and helps them brown evenly. If you like, sprinkle with sesame seeds or poppy seeds at this point.
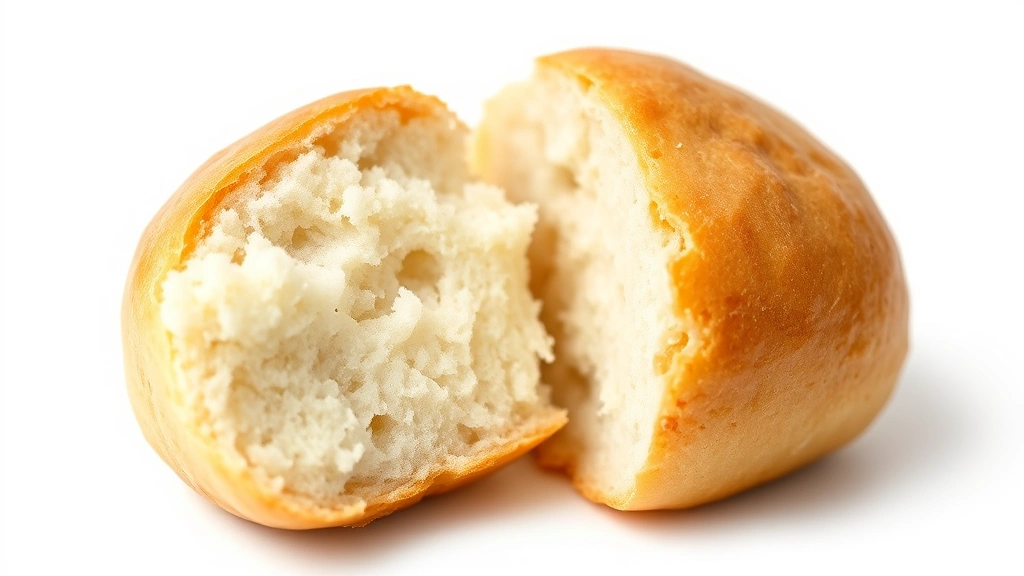
Bake for 18-22 minutes until the tops are deep golden brown. The rolls should feel firm but not hard when you press them gently. They’ll continue cooking slightly after you remove them from the oven.
Let them cool on the baking sheet for five minutes, then transfer to a wire rack. They’re best eaten warm, but they’ll stay soft for several hours if wrapped in a clean kitchen towel.
Troubleshooting Common Issues
If your rolls come out dense, you probably didn’t let them rise long enough. Gluten-free dough needs more time than wheat dough. Increase your rise times by 15-20 minutes next time. Also check that your yeast is fresh—old yeast won’t create enough rise.
If rolls are too dry, your flour blend needs more hydration. Add another tablespoon of milk to the wet ingredients. If they’re gummy inside, you baked them too long or at too high a temperature. Lower your oven to 350°F and bake for 22-25 minutes instead.
If rolls spread instead of rising, your dough is too warm or your xanthan gum didn’t distribute properly. Make sure your milk is exactly 110°F—use a thermometer. And whisk your dry ingredients very thoroughly before mixing.
Storage and Reheating
These rolls stay fresh in an airtight container for two days at room temperature. For longer storage, freeze them in a freezer bag for up to three months. To reheat, wrap frozen rolls in foil and warm them in a 325°F oven for 15 minutes. Fresh rolls need only five minutes.
You can also reheat individual rolls in the microwave for 20-30 seconds, though they’ll lose some texture. The oven method preserves that fresh-baked quality better. If rolls have dried out slightly, brush them with melted butter before reheating.
Variations to Try
Once you’ve mastered the basic recipe, experiment. Add one tablespoon of Italian seasoning and grated Parmesan cheese to the dry ingredients for savory herb rolls. Brush the baked rolls with mozzarella-topped variations for a fancy appetizer.
For sweet rolls, replace honey with brown sugar and add one teaspoon of vanilla extract to the wet ingredients. After baking, brush with melted butter and cinnamon sugar. These pair beautifully with homemade blueberry jelly for breakfast.
Make a complete gluten-free dinner by serving these rolls alongside easy red beans and rice or arroz con gandules. The soft rolls are perfect for soaking up those rich, savory sauces.
For a tropical twist, try popping boba mixed into a sweet butter glaze for these rolls—it creates an unexpected texture contrast that guests love.
Frequently Asked Questions
Can I use a different gluten-free flour blend?
You can, but results vary significantly. Pre-made blends often contain different ratios of starches and gums. If you use one, stick with brands like Bob’s Red Mill or King Arthur that are specifically designed for bread baking. Avoid blends heavy in almond flour or coconut flour—they won’t work for rolls.
Why does my dough smell yeasty?
That’s normal and actually a good sign. Gluten-free dough ferments differently than wheat dough. The yeasty aroma means your yeast is active and doing its job. It will mellow once the rolls bake.
Can I make this dough ahead?
Yes. After the first rise, divide the dough into rolls, place them on a parchment-lined baking sheet, cover tightly with plastic wrap, and refrigerate for up to 12 hours. The next day, let them come to room temperature (about 30 minutes) before the second rise. They may need slightly longer to rise since they’re starting cold.
Are these rolls safe for celiac disease?
Yes, this recipe contains no gluten. However, always verify that your flour blend, yeast, and other ingredients are certified gluten-free. Cross-contamination can happen during manufacturing. If you’re cooking for someone with celiac disease, use dedicated utensils and surfaces.
What’s the difference between this and bread machine recipes?
Gluten-free dough is too wet and sticky for most bread machines. The paddle doesn’t mix it properly, and the dough tends to climb the sides. Hand mixing with an electric mixer gives you better control and more consistent results.
Can I add seeds or nuts?
Absolutely. Add up to 1/2 cup of seeds or chopped nuts to the dry ingredients. Sunflower seeds, flax seeds, and chopped walnuts all work beautifully. They add texture and nutrition without affecting the rise.


