
An essiac tea recipe is your ticket to creating this legendary herbal blend right in your own kitchen, drawing from a tradition that dates back decades. Whether you’re a seasoned herbalist or just curious about natural wellness practices, brewing essiac at home gives you complete control over quality and freshness. Let’s walk through everything you need to know to get this done right.
Table of Contents
What Is Essiac Tea?
Essiac is a four-herb blend that’s been around since the 1920s, originally developed by a Canadian nurse named Rene Caisse. The name itself is “Caisse” spelled backward—a little tribute to its creator. This herbal infusion combines burdock root, slippery elm bark, sheep sorrel, and Turkish rhubarb root into a potent wellness drink that people have been making for nearly a century.
The beauty of this essiac tea recipe is its simplicity. You’re not dealing with complicated extraction methods or hard-to-find ingredients. Most health food stores carry these herbs, and they’re affordable. What makes it special is understanding how each herb contributes to the whole blend, and how to prepare them properly so you actually get the benefits folks have been talking about.
Before we dive deeper, it’s worth noting that while many people swear by essiac, you should always chat with your healthcare provider before adding any herbal regimen to your routine. This is especially true if you’re on medications or dealing with specific health conditions.
Gather Your Herbs First
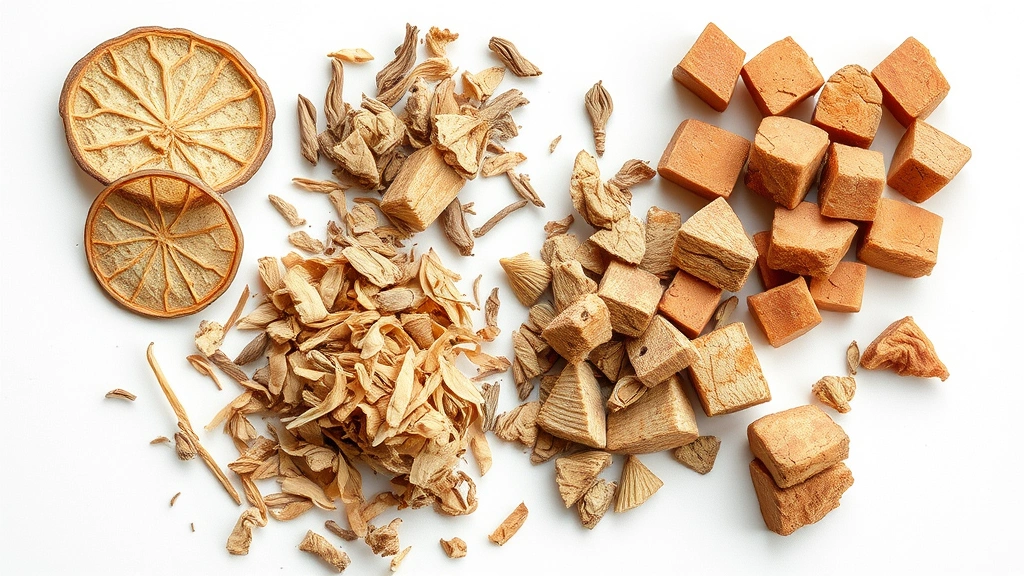
Getting quality ingredients is where everything starts. You’ll need four specific herbs, and sourcing them properly makes all the difference in your final product. Think of this like selecting lumber for a woodworking project—the material quality determines the outcome.
Burdock root is your foundation herb. It’s earthy, slightly sweet, and packed with minerals. Buy it dried and sliced, not powdered. The sliced version brews better and gives you more control over strength. Look for pieces that are tan to brown, not gray or black (which indicates age or poor storage).
Slippery elm bark is the soothing component. It has a mild, slightly sweet taste and creates a smooth texture in your brew. Always buy the inner bark, not the outer bark. It should smell pleasant and look like light tan powder or small flakes.
Sheep sorrel (also called garden sorrel) brings a tart, lemony note. This one’s trickier to find sometimes, but health food stores usually stock it. It should be dried and look greenish-brown. If it’s gray or has a musty smell, pass on it.
Turkish rhubarb root is the final piece. This is different from culinary rhubarb—you’re using the root, not the stalks. It’s bitter and acts as a digestive aid. Buy it dried and sliced or chunked, not powdered.
Pro tip: Buy from reputable suppliers who specialize in medicinal herbs. Places like Mountain Rose Herbs or local herbalists are solid choices. Avoid bulk bins where you can’t verify freshness or storage conditions. Store all your dried herbs in airtight containers away from light and heat until you’re ready to brew.
Measuring the Blend Correctly
The traditional essiac tea recipe uses specific proportions, and hitting these ratios is important. The classic formula breaks down like this: burdock root makes up 40% of your blend, slippery elm bark is 16%, sheep sorrel is 35%, and Turkish rhubarb root rounds out the remaining 9%.
If you’re making a batch to store, here’s an easy-to-scale formula: Start with 16 ounces of burdock root as your base. Then measure out 6.4 ounces of slippery elm bark, 14 ounces of sheep sorrel, and 3.6 ounces of Turkish rhubarb root. A kitchen scale is essential here—eyeballing these measurements will throw off your blend.
Mix all four herbs together thoroughly in a large bowl. Make sure they’re evenly distributed. Some people like to store this dry blend in mason jars and brew fresh batches as needed. Others prefer making the entire infusion at once and storing the liquid. We’ll cover both methods.
Label everything with the date. Dried herbs lose potency over time, so knowing when you made your blend helps you use it while it’s fresh. A blend stored properly in airtight containers will stay good for about six months.
Brewing Process Steps
Now for the actual brewing—this is where patience matters. The traditional method involves simmering, not boiling, which preserves the herb compounds better. Here’s the step-by-step process:
Step 1: Measure your herbs. For a single batch, use 1 ounce of your dried herb blend per quart of water. If you’re making a large batch, scale accordingly. A typical household batch uses 2-3 ounces of blend to make 2-3 quarts.
Step 2: Heat your water. Pour your water into a large stainless steel pot. Avoid aluminum or copper pots—they can react with the herbs. Bring the water to a boil first, then add your measured herbs.
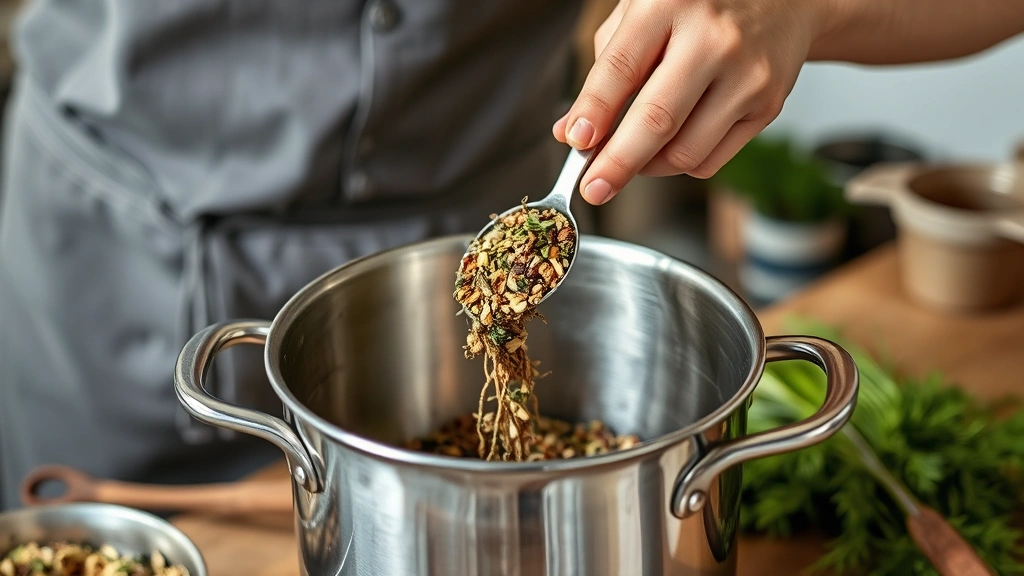
Step 3: Simmer low and slow. Once you add the herbs, reduce heat to low. You want a gentle simmer, not a rolling boil. Cover the pot partially and let it simmer for 10-15 minutes. Some traditional recipes call for longer simmering (up to 30 minutes), but 10-15 minutes is usually sufficient to extract the beneficial compounds.
Step 4: Strain thoroughly. This is crucial. Use a fine-mesh strainer or cheesecloth to remove all herb particles. You want a clear liquid, not cloudy. Pour slowly and don’t squeeze the herbs—let gravity do the work. If you get sediment in your final brew, strain it again through cheesecloth.
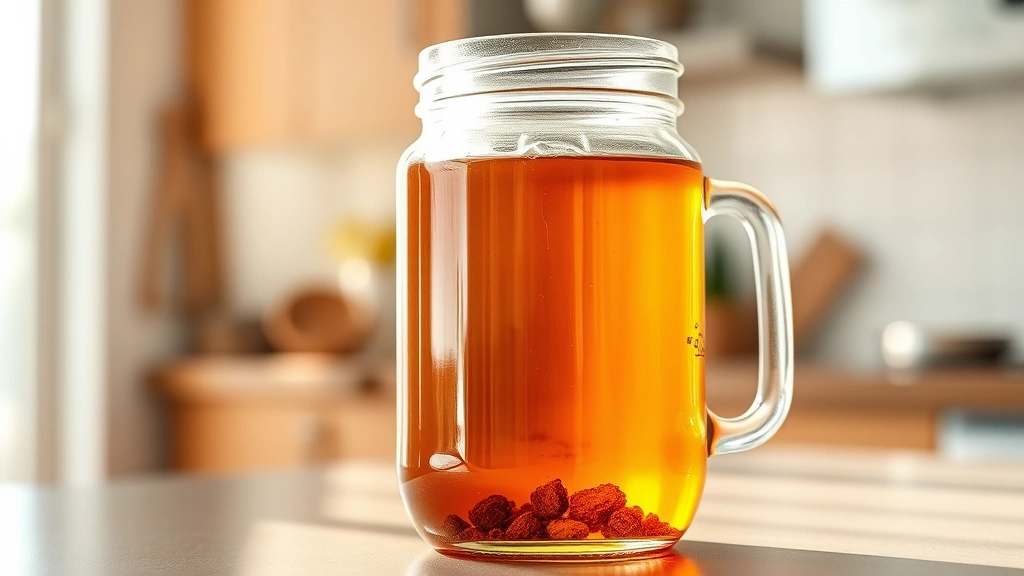
Step 5: Cool and store. Let your essiac cool to room temperature before storing. Pour it into clean glass bottles. Dark glass is best for protecting it from light degradation. Refrigerate immediately.
The entire process takes about 30-45 minutes from start to finish. It’s not complicated, but paying attention to temperature and straining quality makes a real difference in your final product.
Storage and Shelf Life
Proper storage determines how long your essiac stays fresh and potent. This is like storing homemade blackberry jelly recipe results—container choice and temperature matter.
Glass bottles are your best friend here. Dark amber or cobalt blue glass protects the brew from light damage. Fill bottles to the top to minimize air exposure, then cap tightly. Store in the refrigerator at 35-40°F. Properly stored essiac will keep for about 2-3 weeks in the fridge.
Some people prefer making smaller batches weekly rather than storing large quantities. This ensures maximum freshness and potency. If you want to keep larger batches on hand, you can freeze essiac in ice cube trays and thaw portions as needed. Frozen essiac keeps for several months.
Never leave essiac at room temperature for extended periods. Bacteria can develop, especially in the warmer months. If you notice any off smell, cloudiness, or mold, discard it immediately. Trust your nose—if something seems off, it probably is.
Dosage Guidelines Matter
How much essiac should you actually drink? This varies based on your health status and why you’re using it. The traditional dosage is 1-2 ounces, taken two to three times daily. Some people prefer starting smaller—half an ounce—to see how their body responds.
Essiac has a strong, earthy taste that some people love and others find challenging. Drinking it warm is easier than cold, though you can do either. Many people mix it with water or herbal tea to dilute the flavor. Think of it like taking how to make essential oils—concentration matters, and you adjust based on personal preference.
Timing matters too. Taking essiac on an empty stomach or with food affects absorption. Most people take it in the morning and evening. Consistency is more important than perfection—establishing a routine helps you stick with it.
Keep a simple log of when you drink it and how you feel. This personal tracking helps you identify patterns and adjust your routine if needed. If you experience any unusual symptoms, stop immediately and consult your healthcare provider.
Troubleshooting Common Issues
Even with careful preparation, things sometimes don’t go as planned. Here are common issues and how to fix them:
Cloudy or murky brew: You didn’t strain thoroughly enough. Pour it through cheesecloth again, slowly and carefully. This removes fine particles that make it look cloudy.
Weak taste or color: Your herbs might be old or you didn’t simmer long enough. Use fresher herbs and increase simmering time to 15-20 minutes next batch. Also verify you’re using the correct herb ratios.
Bitter or unpleasant taste: You might be over-simmering, which extracts too many tannins. Reduce simmering time to 10-12 minutes. The taste should be earthy and slightly bitter, not harsh.
Sediment at the bottom: This is normal and harmless. It’s just herb particles settling. Shake before drinking, or strain one more time if you prefer a perfectly clear liquid.
Mold or off smell: Your storage temperature was too warm or the bottle wasn’t sealed properly. Always refrigerate immediately and check seals before storing.
Variations and Tweaks
Once you’ve mastered the basic essiac tea recipe, you can experiment with variations. Some herbalists add small amounts of other supportive herbs like red clover or cat’s claw, though this deviates from the traditional formula.
Seasonal adjustments work well too. In winter, you might brew it stronger and drink it warm. In summer, like with best summer recipes, you could make it lighter and serve it chilled over ice. The core four herbs remain constant, but preparation flexibility lets you adapt to your preferences.
Some people create a concentrate by simmering longer (20-30 minutes) and using more herbs per quart of water. This concentrate keeps slightly longer and you dilute it with water when drinking. It’s a space-saving approach if you’re making large batches.
Experimenting with herb sourcing also matters. Different suppliers provide slightly different quality levels. Once you find a source you trust, stick with it. Consistency in ingredient quality translates to consistency in your final product.
Frequently Asked Questions
Can I use powdered herbs instead of dried sliced herbs?
Powdered herbs are more concentrated and harder to strain properly. Stick with dried sliced or chunked herbs for better results. If you only have powder available, use about 25% less by weight and strain extra carefully through cheesecloth.
How long does homemade essiac take to work?
This varies greatly between individuals. Some people report noticing effects within days, others take weeks or months. Consistency matters more than quick results. Think of it as a long-term wellness practice, not a quick fix.
Can I make essiac in a slow cooker or instant pot?
You can, though traditional stovetop simmering gives you better temperature control. If using a slow cooker, use low setting for 4-6 hours. Instant Pot works on low pressure for 10 minutes. Strain thoroughly regardless of method.
Is essiac safe during pregnancy?
Pregnant women should consult their healthcare provider before using essiac. Some herbs in the blend may not be appropriate during pregnancy. Never self-treat during pregnancy—always get professional medical guidance first.
Can I use fresh herbs instead of dried?
Fresh herbs contain more water, so you’d need much larger quantities. The traditional recipe uses dried herbs for consistency and shelf stability. If you want to experiment with fresh, use roughly three times the dried amount and adjust from there.
Where can I buy these herbs if my local store doesn’t carry them?
Online suppliers like Mountain Rose Herbs, Starwest Botanicals, and Vitacost stock all four essiac herbs. Local herbalists and naturopathic shops often carry them too. Check FDA resources for supplier safety information.
Does essiac interact with medications?
Some herbs can interact with certain medications, particularly blood thinners and diabetes medications. Always discuss essiac use with your doctor or pharmacist before starting, especially if you take regular medications.
Final Thoughts
Making your own essiac tea recipe at home puts you in control of quality, freshness, and cost. It’s straightforward enough for beginners but offers plenty of room for refinement as you gain experience. The entire process—from sourcing herbs to storing your finished brew—teaches you about herbal preparation and gives you confidence in what you’re consuming.
Start with small batches to dial in your preferences. Keep notes on herb sources, brewing times, and how you feel. Over time, you’ll develop an intuition for what works best for your body. Remember that consistency matters more than perfection, and always keep your healthcare provider in the loop.
This isn’t complicated chemistry—it’s thoughtful preparation of plant material that people have trusted for nearly a century. Approach it with respect for the herbs and patience with the process, and you’ll end up with a homemade wellness brew you can feel good about.


