
Learning elephant drawing how to doesn’t require years of art school—just a pencil, paper, and willingness to follow some straightforward steps. Whether you’re sketching for fun or teaching kids, drawing an elephant is totally achievable with the right approach. I’m going to walk you through my proven method that breaks down this majestic animal into manageable shapes and lines.
Table of Contents
Gather Your Materials
Before you start, grab what you’ll need. You don’t need fancy supplies—a regular #2 pencil works perfectly fine. Get yourself some decent sketching paper (nothing too thin or it’ll tear when you erase), a kneaded eraser, and a regular pencil eraser. A ruler helps with keeping proportions steady, and a blending stump or even a tissue can smooth out shading later. Some folks like having a pencil sharpener nearby too, since you’ll want a sharp point for detail work.
The beauty of elephant drawing how to guides is that they work with whatever you have on hand. If you want to get fancier down the road, grab some graphite pencils in different hardnesses (HB, 2B, 4B), but honestly, start simple. Keep your workspace clean and well-lit—natural window light beats overhead fluorescents every time.
Start with Basic Shapes
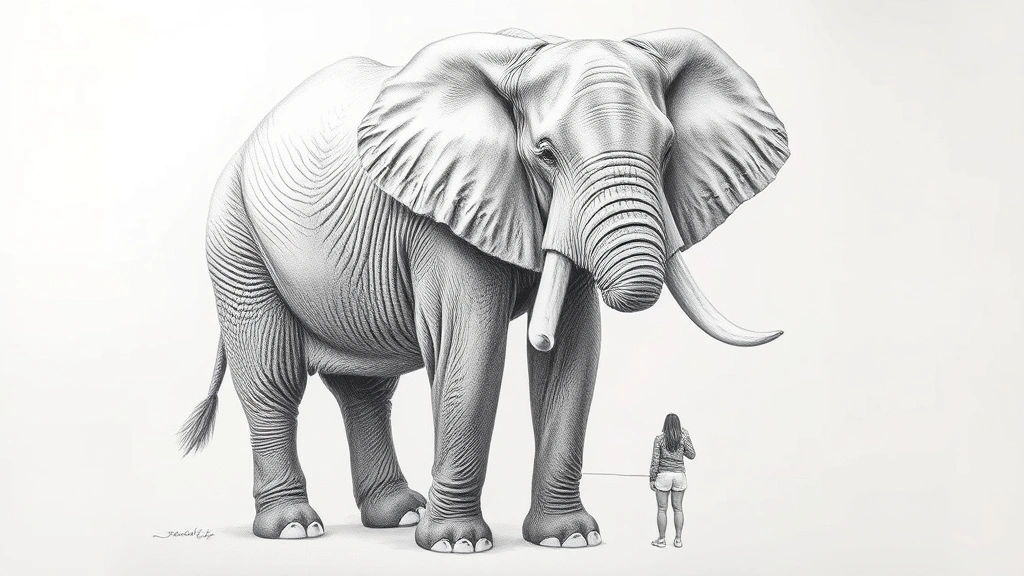
Here’s the secret that makes this whole process click: break the elephant into circles and ovals. Start by lightly sketching a large circle for the body—this is your foundation. Above that, add a smaller circle for the head. Don’t press hard with your pencil; these are guides you’ll refine later. Think of these shapes as a skeleton you’re building around.
Add a small oval below the body circle—this becomes the rear end. This basic framework takes maybe two minutes, but it saves you from proportion headaches later. Many beginners skip this step and regret it when their elephant ends up looking lopsided. Trust the process.
Sketch the Head and Trunk
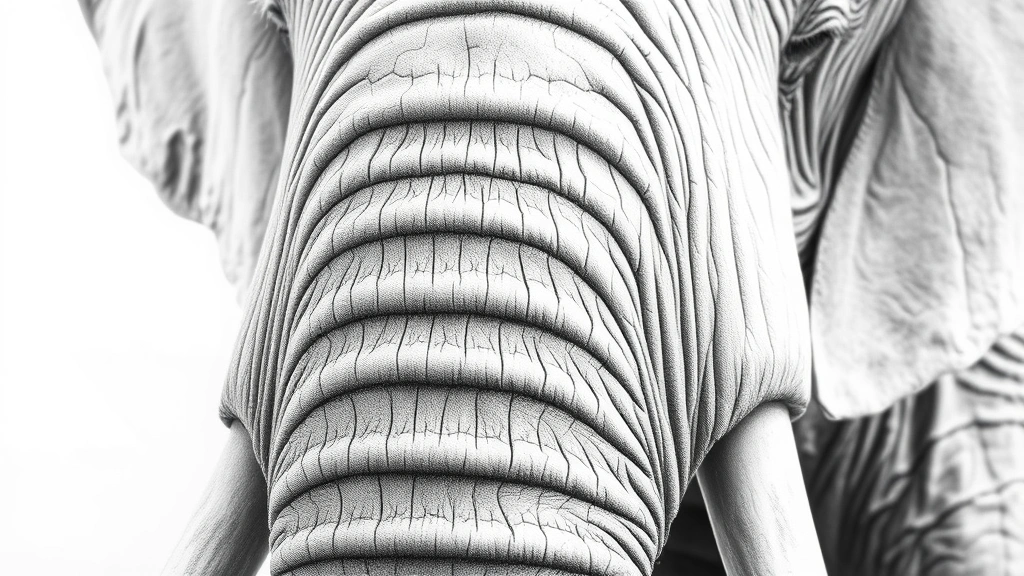
Now comes the iconic part—the trunk. Starting from the bottom of your head circle, draw a curved line that hangs down and slightly forward. The trunk should be thick at the base where it connects to the head, then taper slightly as it goes down. Elephants have wrinkly, textured trunks, so don’t make it perfectly smooth. Add a slight curve or S-shape to make it look natural and flexible.
For the head, use your circle as a guide but refine the edges. The forehead should be fairly rounded, and the back of the head slopes down toward the neck. Leave space between the head and body for the neck area. This is where many elephant drawing how to tutorials get tricky—proportions matter here. The head should be maybe 60% the size of the body circle.
Add the Body and Legs
Your body circle is already there, so now define its edges more carefully. Elephants have stocky, powerful bodies—not skinny. Round out the belly slightly and make the back fairly straight and strong-looking. The body should connect smoothly to the neck area you created.
For the legs, draw four thick, column-like shapes. Elephant legs are basically vertical pillars—they’re not thin or delicate. Each leg should be roughly the same thickness as the trunk. Space them so there’s one near each corner of your body oval. The legs should reach down with minimal bend; elephants have relatively straight legs that support their massive weight. Add small ovals at the bottom for feet.
Draw the Ears and Details
Here’s where your elephant really becomes recognizable—the ears. Elephants have huge, fan-shaped ears. Starting from the side of the head (roughly where you’d expect ears on any animal), draw a large oval shape that extends outward and slightly backward. Make it substantial; these ears should be nearly as tall as your entire body circle. Add some curved lines inside the ear to show the inner ear structure and folds.

Now add the eyes—place them on either side of the head, roughly in the upper-middle area. Small circles work fine. Add a tusk on each side of the trunk base; tusks curve slightly downward and outward. Don’t make them too long at first—you can always extend them. Add a small tail at the rear of the body with a tuft of hair at the end.
Refine Your Proportions
Step back and look at your sketch. Does the head sit right on the body? Are the ears proportional? This is your chance to make adjustments before you commit to details. Use your eraser to soften any lines that don’t look right, then redraw them. The trunk should connect smoothly to the head without looking awkward. The legs should be evenly spaced and roughly equal in size.
Check that your elephant looks balanced overall. If you’re following along with reference photos (which I recommend), compare proportions now. The ears should be the most distinctive feature, so make sure they’re prominent. This refinement stage is where good drawings become great ones.
Add Shading and Texture
Once your outline feels solid, start adding shading. Elephants have thick, wrinkled skin, so use curved lines to show texture. Light shading on one side of the trunk creates dimension. Shade under the body and legs to show where shadows would naturally fall. The ears should have some shading variation to show they’re three-dimensional.
Use your pencil at different angles—lighter pressure for subtle shading, firmer pressure for darker areas. Blend with your tissue or blending stump for smoother transitions. Don’t overdo it; subtle shading looks more professional than heavy, dark areas. Focus shading where light would naturally be blocked: under the belly, between the legs, and along the far side of the body.
Final Touches and Cleanup
Erase any remaining guide lines that are still visible. Use your kneaded eraser for this—it’s gentler than a regular eraser and won’t damage your paper. Darken the eyes, nostrils, and tusk edges to make them pop. Add a few extra wrinkle lines on the trunk and body for character. If you want, add some ground beneath the feet with a simple line or light shading.
Step back and admire your work. Your elephant drawing how to journey is complete! Sign it if you like. This whole process typically takes 20-45 minutes depending on how detailed you go. The more you practice, the faster and more confident you’ll become.
Frequently Asked Questions
What’s the easiest way to get elephant proportions right?
Use the basic shapes method—circle for body, smaller circle for head. This framework ensures your proportions stay balanced from the start. Compare your circles to reference photos to nail the size relationship.
Should I use a reference photo?
Absolutely. Even experienced artists use references. A good reference photo helps you understand ear shape, trunk curve, and leg positioning. You can find tons of elephant photos online for free.
How do I make the trunk look three-dimensional?
Add shading on one side and keep the other side lighter. Curved lines showing wrinkles also create dimension. The trunk should taper slightly from thick at the base to thinner at the tip.
Can I draw an elephant in profile instead of front view?
Definitely. Profile view is actually easier for beginners because you see the distinctive trunk curve clearly. The same basic shapes method works—just adjust your circles’ positions for a side view.
What if my first attempt doesn’t look right?
That’s completely normal. Keep a sketchbook and practice regularly. Each drawing teaches you something. After five or six attempts, you’ll notice huge improvement. Don’t get discouraged; every artist started exactly where you are.
How can I make my elephant look more realistic?
Focus on the wrinkles and skin texture. Real elephant skin has lots of character. Add more shading variation, darken the eyes and mouth, and include subtle details like toenails on the feet. Reference photos are your best teacher here.
Is it okay to trace an elephant drawing?
Tracing is fine for learning basic shapes and proportions, but eventually try drawing without it. Tracing doesn’t build the muscle memory and observation skills that freehand drawing develops. Use tracing as a stepping stone, not a permanent solution.
If you’re interested in learning other creative skills, you might enjoy exploring how to add music to Google Slides for presentations featuring your artwork, or check out how to search a page for a word when researching elephant anatomy online.
Final Thoughts
You’ve now got a complete roadmap for elephant drawing how to. The five-step process—basic shapes, head and trunk, body and legs, ears and details, and shading—works whether you’re a complete beginner or brushing up your skills. The key is not rushing through the foundational shapes stage. That’s where everything clicks into place.
Keep practicing, save your sketches to track progress, and don’t be afraid to try different styles once you master the basics. Draw elephants from different angles, in different poses, with different expressions. The more you draw, the more natural it becomes. Happy sketching!


