
Figuring out how to tell if contact lenses are inside out might seem like a frustrating guessing game, but it’s actually one of the easiest problems to solve once you know what to look for. I’ve been there—standing in front of the mirror, squinting at a tiny piece of plastic, wondering if it’s going to feel like a grain of sand or sit perfectly on my eye. The good news? There are three dead-simple tests that work every single time, and I’m going to walk you through all of them.
Table of Contents
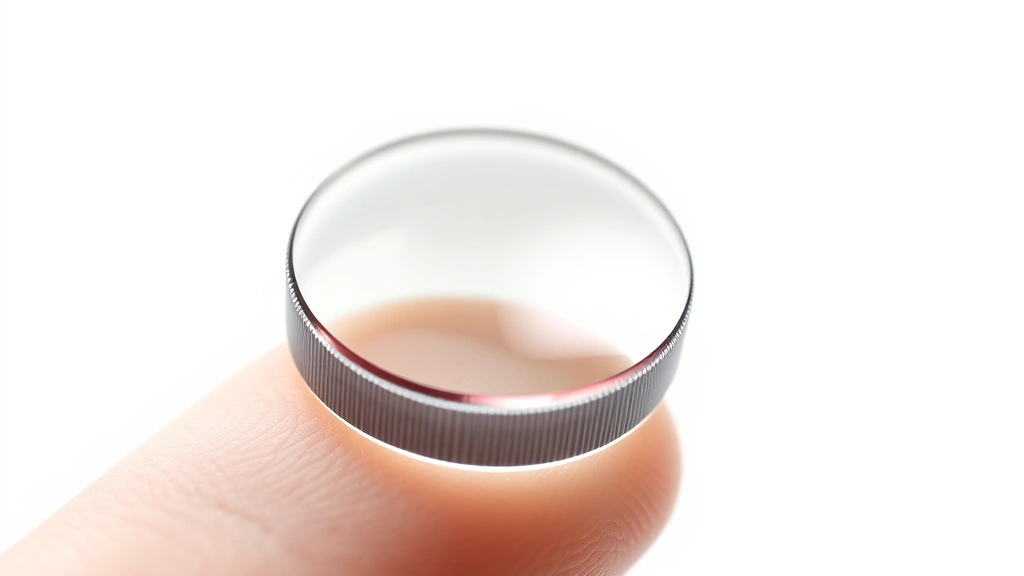
The Bowl Test Method
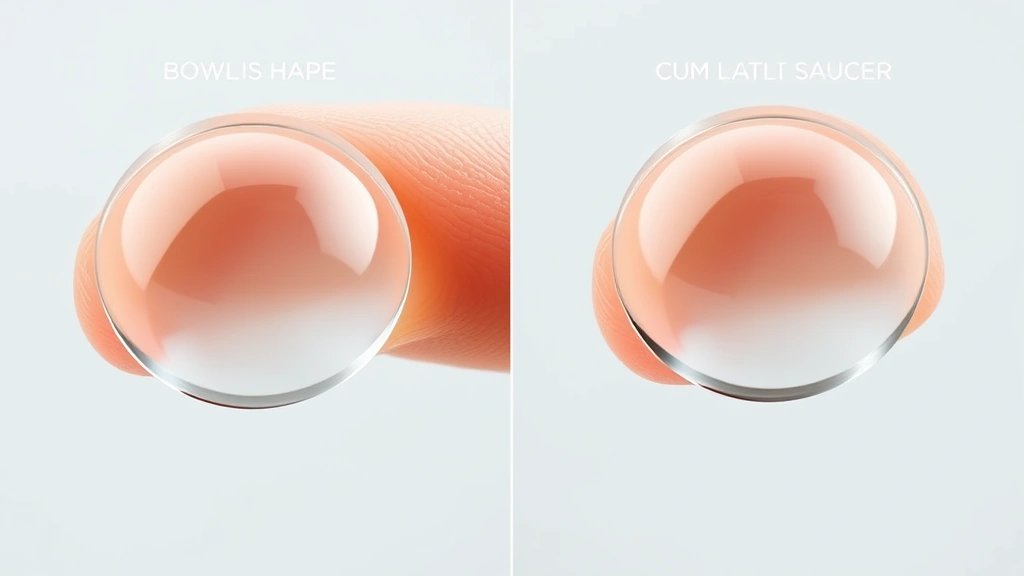
This is my go-to test, and honestly, it’s the most reliable way to check contact lens orientation. Here’s exactly how it works: place your lens on the tip of your index finger and hold it up to eye level. Now, gently shape it with your other index finger—push the edges together slightly to form a cup shape. If your contact lens is right-side out, it’ll look like a perfect little bowl, with the sides curving inward smoothly. The shape is symmetrical and looks like a tiny soup bowl.
If it’s inside out, the lens will look more like a saucer or a flat disc. The edges will flare outward instead of curving inward. This happens because when the lens is inverted, the curvature reverses completely. It’s a dramatic difference once you see it a few times. The bowl shape means you’re good to go; the saucer shape means you need to flip it.
I recommend doing this test under good lighting—natural light near a window works perfectly. Fluorescent bathroom lighting can sometimes make it harder to see the subtle curve differences. Take your time and don’t rush this step. Once you’ve done it a handful of times, you’ll be able to spot the difference in about two seconds flat.
The Pinch Test Technique
The pinch test is almost as fast as the bowl test, but it requires a bit more finesse. Place your contact lens on the tip of your index finger, then gently bring your thumb and index finger together around the lens—don’t squeeze hard, just barely touch it. A correctly-oriented lens will fold together naturally, creating a taco-like shape with the edges meeting smoothly. It feels stable and controlled.
An inside-out lens behaves completely differently. When you try the pinch, the edges will want to spring apart and flare outward. It feels unstable and won’t fold properly. The lens might even flip away from your finger because the shape is working against you. This tactile feedback is incredibly useful, especially if your eyesight isn’t perfect or you’re in a dim lighting situation.
The pinch test also gives you a feel for lens quality and hydration. A well-hydrated, healthy lens will respond consistently to the pinch, while a dried-out lens might feel brittle. This is valuable information for your overall contact lens care routine. If you’re noticing that your lenses feel increasingly fragile, it might be time to check your eye care maintenance habits.
The Mirror Test Approach
This is the fastest method if you’ve got decent eyesight. Simply hold the lens on your fingertip and look at it in a mirror under bright lighting. A right-side-out lens will have a defined, curved appearance with clear edges. You’ll see a subtle shadow or depth that indicates the bowl shape. An inside-out lens looks flatter and wider, almost like a disc. The edges appear to flare outward rather than curve inward.
The mirror test is perfect for when you’re already at the sink getting ready to insert the lens. You don’t need any special equipment—just your bathroom mirror and decent lighting. Many people find this the easiest method because it’s purely visual and doesn’t require the fine motor control of the bowl or pinch tests. If you wear glasses, this might be your preferred method since you can put them on to get a clearer view.
Pro tip: keep your nails trimmed short before attempting any of these tests. Long nails make it harder to control the lens and increase the risk of tearing it. This is especially important if you’re doing the pinch test, where nail length directly affects your ability to feel the lens properly.
What Inside Out Actually Looks Like
Understanding what an inside-out lens looks like is half the battle. The most obvious sign is the shape. A normal contact lens has a gentle, consistent curve that makes it look like a tiny contact lens case lid. When you flip it inside out, that curve inverts, making the lens look wider and flatter. The edges appear to spread outward instead of coming together.
Another telltale sign is how the lens behaves in your hand. An inside-out lens is less stable on your fingertip. It wants to slide around and doesn’t maintain its position as easily. It’s almost like the lens is fighting against the natural cup shape your finger creates. If you’re struggling to keep the lens centered on your fingertip, flip it and try again.

The most important thing to know: an inside-out lens will feel terrible in your eye. It won’t sit properly on your cornea, and you’ll immediately feel discomfort. Your eye will water, your vision will be blurry, and you’ll feel like something’s wrong—because something is. Never try to force an uncomfortable lens into your eye. Always check the orientation first using one of these three tests.
Why This Actually Matters
You might think it’s no big deal to just throw in a lens and see how it feels, but wearing an inside-out contact lens can actually damage your eye. When the lens is inverted, it doesn’t make proper contact with your cornea. Instead, it sits awkwardly on your eye, creating friction and irritation. Your eye produces excess tears to compensate, which can lead to redness, discomfort, and potential scratching of the corneal surface.
Beyond the physical discomfort, an inside-out lens won’t give you proper vision correction. The lens prescription won’t focus light correctly on your retina, so you’ll see blurrily. This can cause eye strain and headaches. Over time, repeated wearing of incorrectly-oriented lenses can contribute to more serious eye health issues. According to the American Academy of Ophthalmology, proper lens insertion technique is crucial for maintaining healthy eyes.
Taking thirty seconds to verify your lens orientation before insertion is a simple habit that protects your vision and prevents unnecessary discomfort. It’s one of those small steps that makes a huge difference in your overall contact lens experience. Think of it like checking that your car door is fully closed before driving—it’s a quick safety check that prevents bigger problems.
Prevention Tips for Next Time
The best way to handle inside-out lenses is to avoid the problem altogether. Start by developing a consistent routine when handling your lenses. Always place the lens on your fingertip before bringing it near your eye, and always perform one of the three tests before insertion. Make this a non-negotiable habit, like brushing your teeth.
Keep your lens case clean and dry. A contaminated or wet case can make lenses harder to handle and more prone to flipping during removal. Replace your lens case every three months, even if it looks fine. Old cases harbor bacteria and can degrade the lens material over time. Store your lenses in fresh solution every single night—never reuse old solution.
Pay attention to your hands. Wash them thoroughly with soap and water before handling lenses, and dry them completely with a lint-free towel. Wet fingers make it nearly impossible to control a lens properly. If your fingers are slippery, you’re more likely to accidentally invert the lens during handling. Keep your fingernails trimmed short to maintain better control and reduce the risk of tearing.
Consider using a lens insertion tool if you struggle with manual insertion. These small plastic devices help you position the lens on your eye without using your fingers directly. They’re especially helpful if you have long nails, sensitive eyes, or just prefer not to touch your eye directly. You can find them at any pharmacy that sells contact lens supplies.
The Comfort Check Method
Here’s a real-world truth: your eye is an excellent judge of whether a lens is oriented correctly. If you’ve inserted a lens and it feels uncomfortable within the first few seconds, remove it immediately and check the orientation. Don’t try to adjust it or wait for it to settle. An inside-out lens won’t suddenly feel better—it’ll only get more irritating.
Proper contact lens comfort should be immediate. Within a second or two of insertion, the lens should feel natural and invisible. Your vision should be clear and stable. If you’re experiencing blurriness, watering, or that scratchy feeling, something’s wrong. Nine times out of ten with new contact lens wearers, that something is orientation.
Interestingly, this comfort feedback is also useful for checking your overall lens care routine. If you’re noticing increasing discomfort with lenses that used to feel fine, it might indicate that your solution isn’t working well, your lenses are getting old, or your eyes need a different prescription. Pay attention to these signals. Your eyes are constantly communicating with you—you just need to listen.
Frequently Asked Questions
Can you wear an inside-out contact lens?
Technically yes, but you absolutely shouldn’t. An inside-out lens will cause discomfort, blurred vision, and potential eye irritation. It won’t provide proper vision correction because the curvature is inverted. Remove it immediately if you realize it’s inside out, and always check before insertion.
How long does it take to tell if a lens is inside out?
Once you’ve practiced these tests a few times, you can determine orientation in about 5-10 seconds. The bowl test is usually the fastest for experienced users. Speed comes with practice, so don’t get frustrated if it takes longer when you’re first learning.
Is there a difference between left and right contact lenses?
Yes, absolutely. Left and right lenses have different prescriptions tailored to each eye. They’re usually marked with an L or R on the lens case. Always keep them separated and insert the correct lens in the correct eye. Mixing them up won’t cause damage, but your vision will be incorrect.
What if I can’t see the difference with the bowl test?
Try the pinch test instead—it relies on tactile feedback rather than visual observation. If both tests are difficult, use a lens insertion tool or ask your eye care professional for guidance. Some people naturally find one method easier than others.
Can an inside-out lens damage my eye?
Wearing an inside-out lens for extended periods can cause corneal irritation and scratching. It’s not immediately dangerous if you remove it quickly, but it’s uncomfortable and ineffective. Always verify orientation before insertion to prevent this issue entirely.
Do all contact lenses feel the same when inside out?
Most do, but some lens materials are more forgiving than others. Softer lenses might be slightly harder to distinguish, while rigid gas-permeable lenses show the difference more dramatically. Regardless of lens type, always perform an orientation check before insertion.
Final Thoughts
Learning how to tell if contact lenses are inside out is genuinely one of the easiest skills to develop in your contact lens routine. The three methods I’ve shared—the bowl test, the pinch test, and the mirror test—work reliably every single time. Pick whichever one feels most natural to you, or rotate between them depending on your situation.
The real secret isn’t memorizing some complicated technique. It’s developing the habit of checking before you insert. Make it automatic, like checking your mirror before changing lanes. Spend thirty seconds verifying orientation, and you’ll never experience the frustration and discomfort of an inside-out lens again.
Your eyes deserve the best care possible. Proper contact lens handling is a fundamental part of that care routine. Combined with good hygiene practices, regular solution changes, and consistent lens case maintenance, these simple orientation checks keep your eyes healthy and comfortable. For more detailed information about contact lens care, check out resources from the American Academy of Ophthalmology or talk to your eye care professional.
If you’re new to contact lenses, don’t hesitate to ask your optometrist or ophthalmologist to watch you insert and remove lenses during your fitting appointment. They can verify that you’re handling them correctly and offer personalized tips based on your specific situation. And if you’re ever unsure about anything related to your eye health, always ask a professional rather than guessing. Your vision is too important to leave to chance.


