
Making a cloud slime recipe is one of the most satisfying DIY projects you can tackle at home, and honestly, it’s way easier than you’d think. This stretchy, fluffy stuff feels like touching a cloud (hence the name), and kids and adults alike go crazy for it. I’m going to walk you through exactly how to make cloud slime that’s actually fluffy, not gummy, with ingredients you probably already have lying around.
Table of Contents
What Is Cloud Slime?
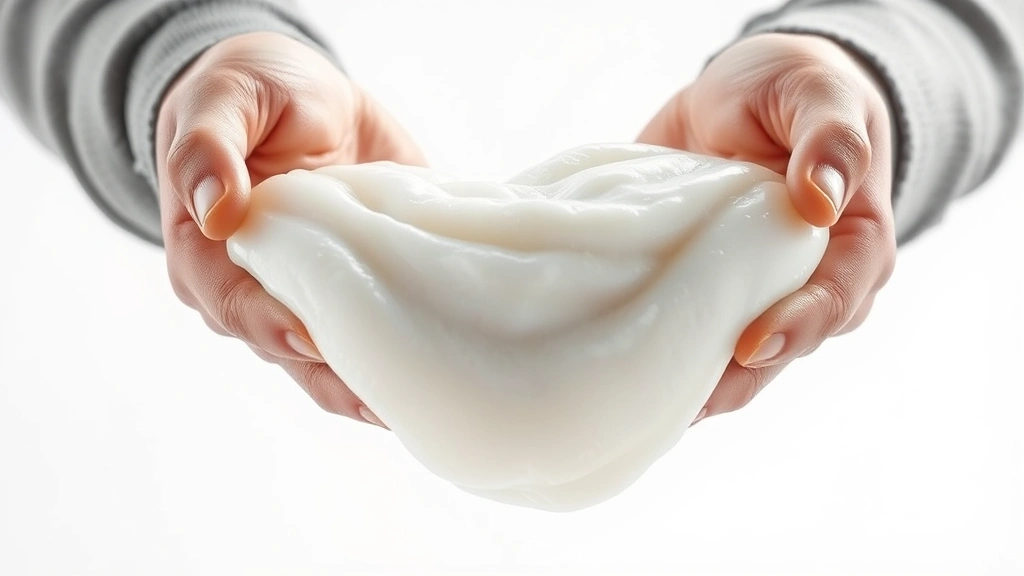
Cloud slime is basically slime that’s been pumped up with shaving cream, giving it that impossibly fluffy, cloud-like texture. Unlike regular slime recipes that are dense and stretchy, cloud slime has air pockets throughout, making it feel light and airy. It’s less about the stretch and more about the squish—you can compress it, pull it apart, and it bounces back. The appeal is universal: it’s tactilely satisfying, looks cool, and takes about 10 minutes to make.
Gather Your Ingredients
Before you start, round up these basics. You’ll need white school glue (the kind in a squeeze bottle works best), shaving cream (the foamier the better), borax powder, contact lens solution (must contain boric acid), food coloring (optional but recommended), and a mixing bowl. Don’t skip the contact solution—it’s the activator that makes the chemistry work. If you want to get fancy, you can add glitter, foam beads, or essential oils for scent. For reference, similar hands-on projects like how to make a heart out of a gum wrapper also rely on simple household items.
Step One: Create the Base
Pour about half a cup of white glue into your mixing bowl. If you want colored cloud slime, add a few drops of food coloring now and stir it in thoroughly until the color is even. Don’t be shy with the color—it dilutes as you mix in other ingredients. This is your foundation, so take a moment to get it smooth and uniform. The glue is what gives your slime its stretchy properties, so quality matters here.
Step Two: Activate with Borax
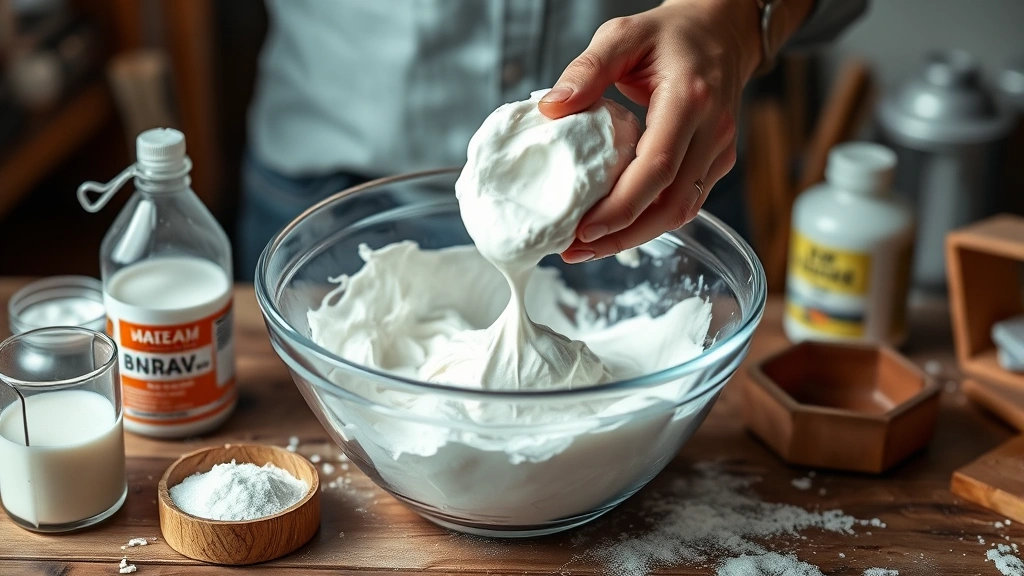
In a separate small bowl, mix one teaspoon of borax powder with one cup of warm water. Stir until it’s completely dissolved—any powder particles will cause lumps in your final product. Now, here’s where the magic starts: slowly pour the borax solution into your glue mixture while stirring continuously. You’ll see it start to thicken immediately. Don’t dump it all in at once; add it gradually and keep stirring. This is the chemical reaction that transforms liquid glue into slime, and it happens right before your eyes.
Step Three: Add the Fluff
Once your slime has formed and you’ve stirred out most of the excess liquid, this is where cloud slime differs from regular recipes. Grab a can of shaving cream and add a generous handful—we’re talking about a quarter to a third of a cup—directly into your slime mixture. This is the secret ingredient that creates that fluffy cloud texture. Fold it in gently at first, then more vigorously as it incorporates. You’ll watch it transform from dense slime into airy, fluffy cloud slime. The more shaving cream you add, the fluffier it becomes, but too much makes it fragile.
Step Four: Knead It Down
Once everything is incorporated, pull the slime out of the bowl and knead it with your hands for about two to three minutes. This is satisfying work—your hands will warm the mixture and help it reach the perfect consistency. If it’s still too sticky, add a pinch more borax mixed with a tiny bit of water. If it’s too stiff, a drop or two of lotion can help. You’re looking for something that stretches without tearing, compresses without falling apart, and feels cloud-like when you squeeze it. This tactile feedback is crucial—you’ll know when it’s right.
Step Five: Storage and Play
Store your cloud slime in an airtight container or ziplock bag. Properly stored, it’ll last several weeks, though it does tend to get denser over time as the air escapes. Before you seal it up, play with it for a bit. Stretch it, squish it, poke it. This is the reward for your five minutes of work. Kids love this stuff, and honestly, so do adults. It’s the kind of sensory toy that’s endlessly entertaining.
Troubleshooting Tips
If your slime turns out too sticky, you need more activator. Mix a teaspoon of borax with a tablespoon of water and add it drop by drop, kneading between additions. If it’s too stiff and won’t stretch, add a tiny bit of lotion or even a drop of vegetable oil. If it’s not fluffy enough, you didn’t use enough shaving cream—fold in more and knead again. If it smells weird, that’s usually the borax; it fades quickly. If it’s breaking apart when you stretch it, the shaving cream ratio is off; add more glue to the mix.
Color Variations
Once you’ve nailed the basic cloud slime recipe, experiment with colors and combinations. Swirl two colors together for a marbled effect. Add glow-in-the-dark paint for a version that glows at night. Mix in fine glitter before the shaving cream for sparkly clouds. Some people add a drop or two of essential oil for scent—lavender is popular. The base recipe stays the same; you’re just customizing the experience. It’s similar to how you’d approach layered recipes like the adrenal cocktail recipe, where the foundation is solid but variations are endless.
Safety First
Borax is generally safe for craft projects, but it’s not something you want to ingest. Keep it away from very small children who still put everything in their mouths. Wash hands after playing, and avoid touching your face while your hands are covered in slime. If anyone has sensitive skin, test a small batch first. The contact solution must contain boric acid to work—check the label. Some people are sensitive to borax; if anyone develops a rash, stop using it and switch to an alternative activator like liquid starch or a borax-free slime activator from a craft store.
Frequently Asked Questions
Can I make cloud slime without borax?
Yes, but you need an alternative activator. Liquid starch works well, as does a commercial slime activator. The chemistry is slightly different, but you’ll still get good results. Some people use a mixture of contact solution and baking soda as a borax-free option.
How long does cloud slime last?
Properly stored in an airtight container, cloud slime lasts two to four weeks. Over time, it loses its fluffiness and becomes denser as the air escapes and the glue settles. Once it starts getting gummy or sticky, it’s time to make a fresh batch.
Why is my cloud slime not fluffy?
You didn’t use enough shaving cream. The fluffiness comes directly from the air in the shaving cream, so be generous. You can always add more shaving cream and knead it in further.
Is cloud slime safe for kids?
Yes, when made with proper ingredients and supervision. Avoid borax if you have very young children, and always supervise play. Make sure kids wash their hands after playing.
Can I add scent to cloud slime?
Absolutely. Add a drop or two of essential oil or fragrance oil during the mixing stage. Lavender, vanilla, and citrus are popular choices. Don’t overdo it—the scent is strong and can linger on hands.
What if my slime is too stretchy?
You used too much glue relative to activator. Add more borax solution (a teaspoon of borax mixed with a tablespoon of water) and knead it in. Add sparingly until you reach the right consistency.
Final Thoughts
Making a cloud slime recipe is genuinely fun, quick, and requires minimal investment. It’s one of those projects that delivers immediate gratification—you go from raw ingredients to a satisfying tactile toy in under fifteen minutes. Whether you’re making it for kids, as a stress relief, or just to see if you can, it’s worth trying. The science is straightforward, the results are impressive, and the play value is surprisingly high. Once you’ve got the basic recipe down, you can experiment endlessly with colors, textures, and add-ins. Start simple, nail the fundamentals, then get creative. And if you’re into hands-on projects, you might also enjoy trying how to make candy apples or other creative kitchen projects.


