
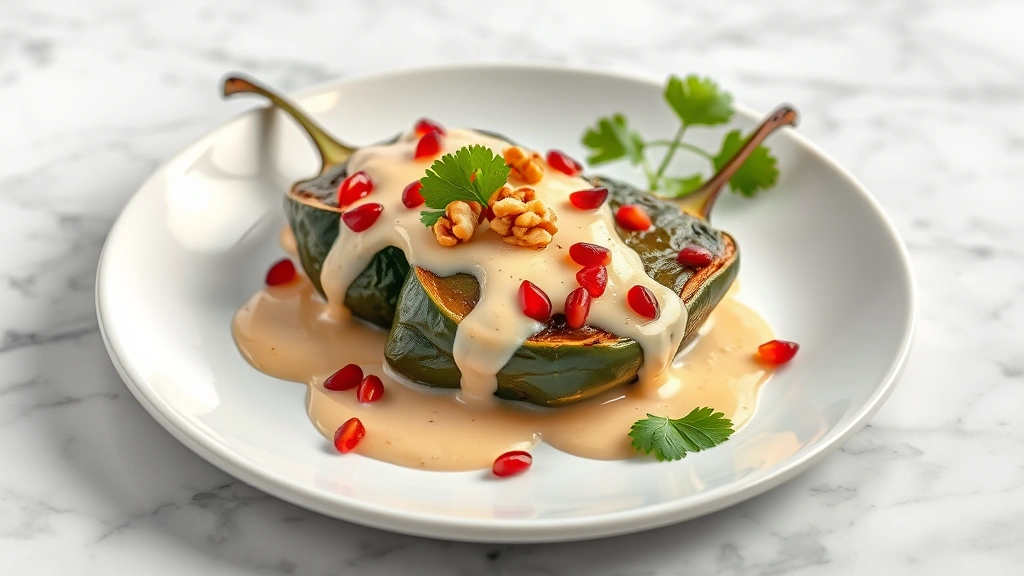
A chiles en nogada recipe is one of those dishes that looks intimidating but tastes like you spent all day in the kitchen. This iconic Mexican classic features roasted poblano peppers stuffed with a savory-sweet filling, topped with a creamy walnut sauce, and garnished with pomegranate seeds and cilantro. The colors—green pepper, white sauce, red seeds—represent the Mexican flag, making it perfect for celebrations. Here’s the thing: once you break it down into steps, it’s totally doable at home.
Table of Contents
Choosing and Preparing Poblanos
Start with quality poblano peppers—they’re the foundation of your dish. Look for peppers that are dark green, firm, and about 4-5 inches long. You want them thick-walled so they don’t tear when you stuff them. Count on one pepper per person, so grab 4-6 depending on your crowd.
Before roasting, rinse them under cold water and pat dry. This removes any dirt and helps the skin char evenly. Don’t skip this step—it makes a real difference in how smoothly the skin peels off afterward.
The Roasting Process
Roasting is where the magic starts. You’ve got options here: use your oven broiler, a gas stove flame, or even a grill. The goal is to char the skin until it’s blackened and blistered all over—this loosens the skin so it peels off cleanly.
Broiler method: Place peppers on a foil-lined baking sheet about 4 inches from the heat. Broil for 8-10 minutes, turning every 2-3 minutes, until the skin is completely charred. Gas stove method: Hold peppers with tongs directly over a flame, rotating slowly until charred all over (about 5 minutes per pepper).
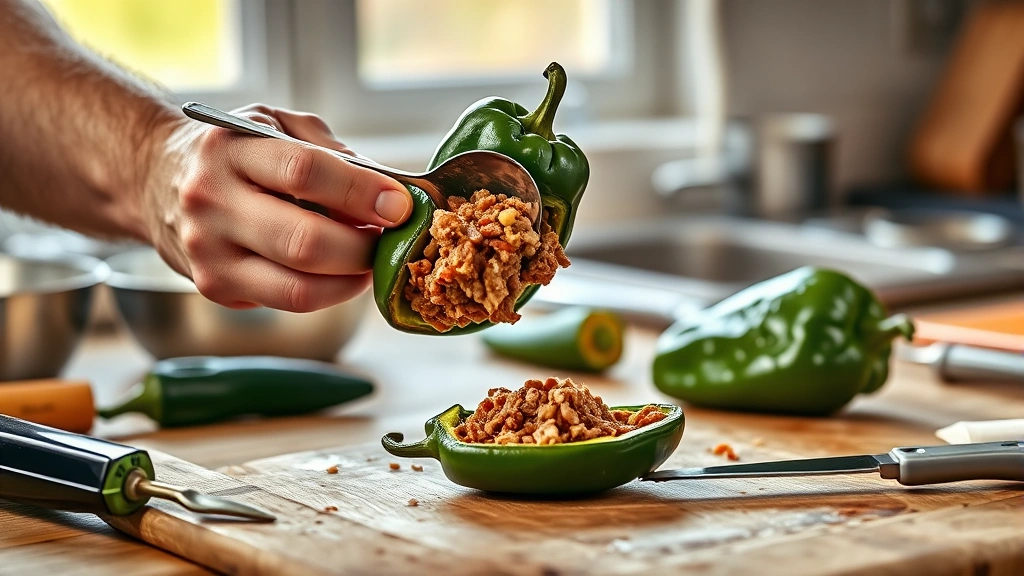
Once charred, immediately place peppers in a plastic bag or covered bowl for 10 minutes. The steam loosens the skin dramatically. Then, under cool running water, gently rub the skin away with your thumbs. It should slip off easily. Make a small slit near the stem and carefully remove the seeds and veins, keeping the pepper intact.
Building Your Filling
The filling is where you can get creative. Traditional versions use ground meat, but you can go vegetarian too. Here’s a solid base: brown 1 pound of ground beef or pork in a large skillet over medium-high heat. Break it up as it cooks—you want it crumbly, not chunky.
Once browned, add diced onion and minced garlic. Cook until softened, about 3 minutes. Then fold in diced apple, dried fruit (raisins or dried apricots work great), sliced almonds, and a pinch of cinnamon. This sweet-savory combo is classic. Season with salt, pepper, and cumin. If you want to add depth, a spoonful of adobo sauce brings serious flavor without overpowering the dish.
Cook everything together for 5-7 minutes so the flavors meld. The filling should be moist but not wet. Taste and adjust seasoning—this is your moment to dial in the flavor profile you want. Let it cool slightly before stuffing.
Making the Nogada Sauce
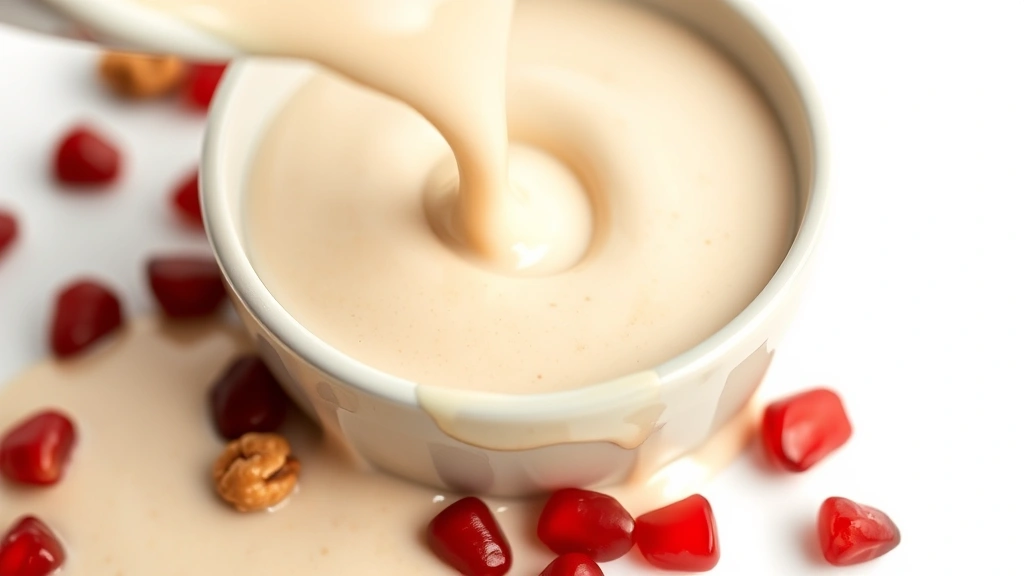
The nogada sauce is the creamy, dreamy topping that ties everything together. You’ll need 2 cups of shelled walnuts (or 1.5 cups if using walnut butter), 1 cup Mexican crema or sour cream, 1/2 cup whole milk, 2 tablespoons sugar, 1/4 teaspoon ground cinnamon, and salt to taste.
Soak the walnuts in hot water for 15 minutes if they’re raw—this softens them and makes blending easier. Drain well. Add walnuts to a blender with crema, milk, sugar, and cinnamon. Blend until completely smooth and creamy. You want the consistency of thick heavy cream—if it’s too thick, add milk a tablespoon at a time.
Taste and adjust sweetness and cinnamon to your preference. Some versions are slightly sweeter, others more savory. This is your call. The sauce can be made up to 2 days ahead and stored in the fridge, which makes prep easier for entertaining.
Assembly and Plating
Now for the fun part. Spoon a thin layer of nogada sauce onto your serving plate. Gently stuff each roasted pepper with the filling using a small spoon—don’t overstuff or it’ll burst. Place the stuffed pepper on the sauce.
Generously drizzle more nogada sauce over the top and sides of each pepper. The sauce should pool slightly on the plate. Scatter fresh pomegranate seeds on top (they add tartness and that patriotic pop of color), then sprinkle with fresh cilantro leaves.
If you’re making this ahead, assemble everything except the pomegranate seeds and cilantro. Cover with plastic wrap and refrigerate for up to 4 hours. Add the garnishes right before serving so they stay fresh and vibrant.
Different Cooking Methods
Most traditional recipes serve chiles en nogada at room temperature or chilled, which is perfect because you can prep ahead. However, some regional variations warm them gently. If you want to serve warm, place stuffed peppers in a buttered baking dish, cover loosely with foil, and warm in a 325°F oven for 15-20 minutes until heated through. Add the sauce and garnishes after warming.
Another approach: make the filling in advance, roast and peel the peppers the day before, and assemble everything just before serving. This method keeps the peppers fresh and the sauce creamy.
Flavor Variations
While the classic recipe is perfect as-is, you can absolutely make it your own. Vegetarian version? Skip the meat and bulk up the filling with roasted chickpeas, diced zucchini, and extra nuts. The texture stays hearty and satisfying.
Want more heat? Add diced jalapeños or a splash of hot sauce to the filling. Prefer a lighter sauce? Use Greek yogurt instead of crema for a tangier, less-rich version. Some cooks add a touch of orange zest to the filling for brightness, or swap the walnuts for pecans in the nogada sauce if that’s what you have on hand.
If you’re serving alongside other dishes, consider pairing with caldo de pollo as a starter, or seasoning blends for other components of your meal.
Storage and Serving
Chiles en nogada are best served the day they’re made, but you can store components separately. Keep roasted, peeled peppers in an airtight container for up to 2 days. Store filling in the fridge for 3 days. The nogada sauce keeps for 2 days as well.
Don’t freeze the assembled dish—the pepper texture suffers and the sauce separates. However, you can freeze the filling for up to a month, which is a huge time-saver if you’re planning ahead for a party.
Serve at room temperature or chilled, never piping hot. The flavors shine when the dish isn’t steaming. Plan on one pepper per person as a main course, or serve two as part of a larger spread.
Frequently Asked Questions
Can I make chiles en nogada ahead of time?
Yes, but assemble them no more than 4 hours before serving. You can roast and peel the peppers and make the filling and sauce up to 2 days in advance. Keep everything in separate containers in the fridge, then assemble just before serving. This keeps the peppers from getting soggy and the sauce from separating.
What if I can’t find poblano peppers?
Poblanos are pretty standard in most grocery stores, especially in areas with Hispanic communities. If you can’t find them, Anaheim peppers work as a substitute, though they’re slightly spicier. Avoid using bell peppers—they’re too thin-walled and won’t roast the same way. If substituting, you may need to adjust roasting time slightly.
Is the nogada sauce supposed to be sweet?
Yes, but not overly so. The sauce balances sweet and savory with the cinnamon and sugar. If you find traditional recipes too sweet, reduce the sugar to 1 tablespoon and add a pinch of salt to bring out the walnut flavor. Taste as you go and adjust to your preference.
Can I use store-bought walnut butter instead of whole walnuts?
Absolutely. Use about 1 cup of walnut butter (or almond butter if you prefer) and blend it with crema, milk, sugar, and cinnamon. The texture will be slightly different but equally delicious and saves blending time.
What’s the best way to remove poblano skin without it tearing?
The steam bath is key. Don’t skip that 10-minute rest in a covered bowl after charring—it makes the skin slip off like magic. Use cool water and gentle pressure with your thumbs. If the skin is stubborn, let the pepper steam longer. Patience here prevents tears that let filling escape.
Can I make this dish vegetarian or vegan?
Yes to vegetarian—just skip the meat and use extra vegetables, beans, or nuts in the filling. For vegan, use cashew cream or coconut cream instead of the walnut nogada sauce, and obviously skip the meat. The dish works beautifully either way.
Final Thoughts
Making a chiles en nogada recipe at home is easier than you think once you understand the process. Start by mastering the roasting and peeling technique—that’s honestly the trickiest part. The filling and sauce come together quickly, and assembly is straightforward. This dish impresses guests without requiring restaurant-level skill, and the fact that you can prep components ahead makes it perfect for entertaining.
The beauty of this classic Mexican dish is that it celebrates fresh ingredients and balanced flavors. Whether you’re making it for Independence Day, a special dinner, or just because, you’ve got a recipe that tastes authentic and feels homemade in the best way. Give it a shot, tweak it to your taste, and enjoy the process.


