

Making an apple butter recipe crockpot is one of those kitchen projects that feels fancy but honestly requires almost zero skill—just patience and a slow cooker doing the heavy lifting. I’ve made this dozens of times, and every batch turns out rich, spreadable, and absolutely delicious. No complicated canning process, no standing over a hot stove for hours. Just toss ingredients in, set it, and let the heat work its magic.
Table of Contents
Why Crockpot Wins
Traditional apple butter requires constant stirring and careful heat management. A crockpot eliminates that stress entirely. The low, steady heat breaks down the apples slowly, concentrating flavors without scorching anything. You get that deep caramel-brown color and rich taste without babysitting a pot. Plus, your kitchen stays cool—no blast furnace from the oven or stovetop.
The slow-cooking method also lets the natural sugars in apples develop into something almost candy-like. This is why homemade versions taste so much better than store-bought. You’re not rushing the process; you’re letting chemistry happen.
Five Ingredients Needed
Here’s the beautiful part: you don’t need much. This straightforward approach keeps things simple and lets apple flavor shine through.
- 5-6 pounds of apples (any mix works—Honeycrisp, Gala, Granny Smith)
- 1 cup brown sugar (packed)
- 2 teaspoons ground cinnamon
- 1/4 teaspoon ground cloves
- 1/4 teaspoon salt
That’s it. Some recipes add vanilla extract at the end, and honestly, a teaspoon of that doesn’t hurt. But these five core ingredients create something restaurant-quality.
Prep Work Matters
Don’t skip this part—it’s where you actually earn your stripes. Wash your apples thoroughly. You’re not peeling them (that’s the magic of the crockpot—the skins break down completely), but you want them clean.
Cut apples into quarters and remove the cores. A sharp knife and a cutting board are your only tools here. Chunk size doesn’t need to be perfect—aim for roughly equal pieces so they cook at the same rate. Smaller chunks cook faster, which matters if you’re on a schedule.
As you prep, toss apples directly into your crockpot. If you’re worried about browning, a squeeze of lemon juice helps, but it’s not critical since you’re cooking them right away.
Cooking the Butter
Once apples are in the crockpot, add brown sugar, cinnamon, cloves, and salt. Stir everything together until the sugar starts coating the apples. Don’t add water—the apples release their own liquid as they cook.
Set your crockpot to low and let it run for 8-10 hours. Yes, this is a long time, but most of it happens while you sleep or work. You want the apples completely broken down and the mixture dark brown and thick. After about 6 hours, give it a stir if you remember, but it’s not essential.
The mixture should look almost jam-like by hour 8, with no recognizable apple chunks. If it’s still chunky at 8 hours, keep it going. Every crockpot runs slightly different, and apple variety affects cook time.
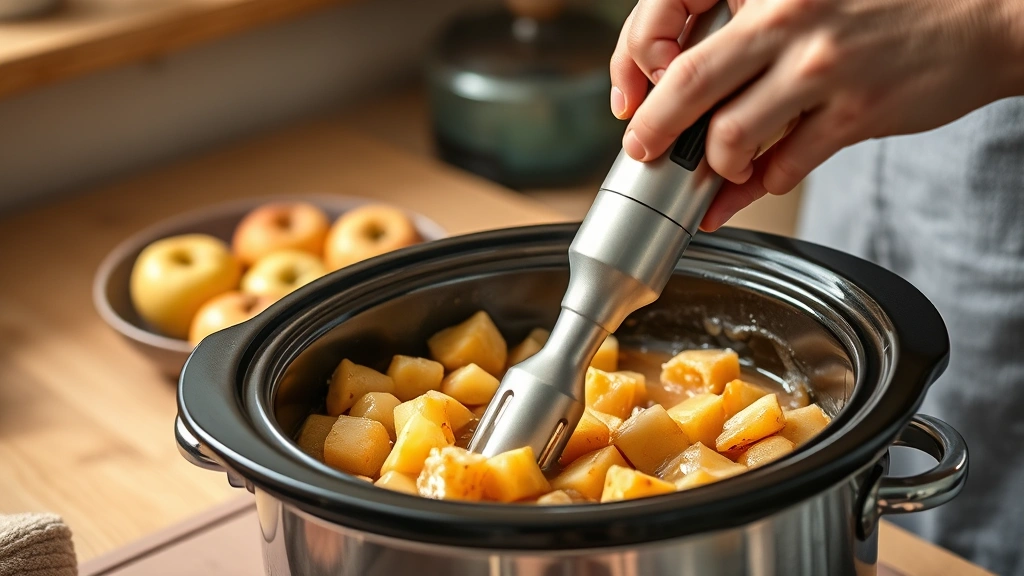
Blending It Smooth
This is where you decide texture. Some people like their apple butter slightly chunky; most prefer it silky smooth. An immersion blender works perfectly—just stick it right in the crockpot and blend until you reach your desired consistency. A regular blender works too, but you’ll need to work in batches and be careful with hot liquid.
If you don’t have a blender, a food mill or fine-mesh strainer does the job, though it’s more work. The goal is breaking down any remaining apple skin pieces and creating an even texture throughout.
Blend for about 2-3 minutes. You’re not making a smoothie—just breaking things down enough that it spreads easily on toast without chunks.
Storage Tips
Let your apple butter cool completely before storing. This takes 1-2 hours at room temperature. Once cooled, transfer it to clean glass jars.
In the refrigerator, it keeps for about 3 weeks in an airtight container. For longer storage, freeze it in ice cube trays for portion control, then pop cubes into freezer bags. Frozen apple butter lasts 6-8 months.
If you want shelf-stable jars for gifts or pantry storage, follow basic water-bath canning procedures. Fill hot sterilized jars, leaving 1/4-inch headspace, and process in boiling water for 10 minutes. This requires proper equipment and careful technique—check reliable canning resources if you go this route.
Flavor Variations
Once you master the basic recipe, variations become obvious. Add a teaspoon of vanilla extract during the last hour of cooking for depth. A pinch of nutmeg works beautifully alongside cinnamon. Some people add a tablespoon of apple cider vinegar for tang.
For spiced versions, try adding fresh ginger (grated) or a star anise pod. Bourbon or brandy (1/4 cup) added at the end creates an adult version that’s fantastic with cheese boards. A tablespoon of honey stirred in after blending adds floral notes.
The key is adding extra flavors conservatively. You want to enhance apple flavor, not bury it. Taste as you go, especially with spices.
Troubleshooting Guide
If your apple butter is too thin after cooking, you have options. Leave the crockpot on high for another hour or two with the lid off—evaporation will thicken it. Alternatively, strain some liquid through a fine-mesh strainer and discard it. If it’s too thick, stir in a tablespoon of water at a time until you reach the right consistency.

Brown spots on the surface don’t mean anything’s wrong—that’s caramelization, which tastes great. If you see mold after storage, that batch is done; discard it.
If your apple butter tastes too sweet, you over-added sugar or chose very sweet apples. Next time, use more tart varieties like Granny Smith. A pinch of salt (added during cooking) balances sweetness. If you’ve already made it, stir in a teaspoon of lemon juice or apple cider vinegar.
For a detailed guide to kitchen equipment maintenance, check your crockpot manual to ensure it’s running at proper temperature. A crockpot that runs too cool will take longer; one running hot might finish early.
Frequently Asked Questions
Can I use a different sweetener instead of brown sugar?
Absolutely. White sugar works identically. Honey, maple syrup, or coconut sugar also work, though they’ll change flavor slightly. Use slightly less honey since it’s sweeter than sugar. Reduce the amount by about 20% if substituting.
Do I really need to peel the apples?
No—that’s the whole point of slow cooking. The skins break down completely and blend in seamlessly. This saves prep time and keeps nutrients. If you’re squeamish about it, you can peel them first, but it’s unnecessary work.
Can I make this on high instead of low?
Yes, but reduce cooking time to 4-5 hours. High heat works, though low heat develops deeper flavor. If you’re in a hurry, high is fine—just check it around the 4-hour mark.
How do I know when it’s done?
It should be dark brown (almost mahogany-colored), thick enough that a spoon dragged through it leaves a trail, and completely smooth when blended. No apple chunks should remain.
Can I double this recipe?
Yes, as long as your crockpot can hold 10+ pounds of apples. Fill it no more than three-quarters full. Cooking time might extend by 1-2 hours since there’s more volume. Stir occasionally to ensure even cooking.
Is homemade apple butter better than store-bought?
Objectively, yes. Store versions contain added thickeners, preservatives, and often corn syrup. Homemade is pure apple and spice. The flavor difference is noticeable—deeper, more complex, and genuinely apple-forward.
Final Thoughts
An apple butter recipe crockpot is genuinely one of the easiest kitchen projects you can tackle. It requires minimal skill, basic ingredients, and mostly hands-off time. The payoff is a pantry staple that tastes infinitely better than anything store-bought. Spread it on toast, swirl it into yogurt, use it as a pie filling, or gift jars to friends. Once you make it once, you’ll understand why this method has become standard for serious home cooks.


