
An amish cinnamon bread recipe is one of those kitchen projects that feels like genuine craftsmanship—the kind of thing that makes your whole house smell like you’ve been working all day, even though the actual hands-on time is minimal. This no-knead method strips away the fussiness and gives you that authentic, dense crumb and swirled cinnamon-sugar interior that makes Amish baking legendary. Whether you’re a seasoned baker or someone who’s intimidated by yeast, this approach works because it lets time do the heavy lifting instead of your forearms.
Table of Contents
What Makes Amish Cinnamon Bread Special
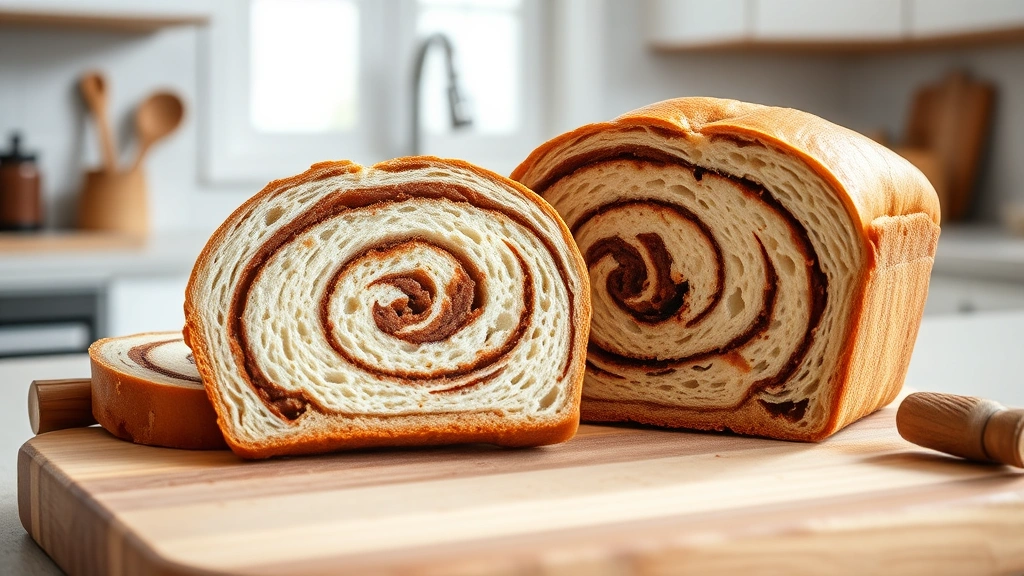
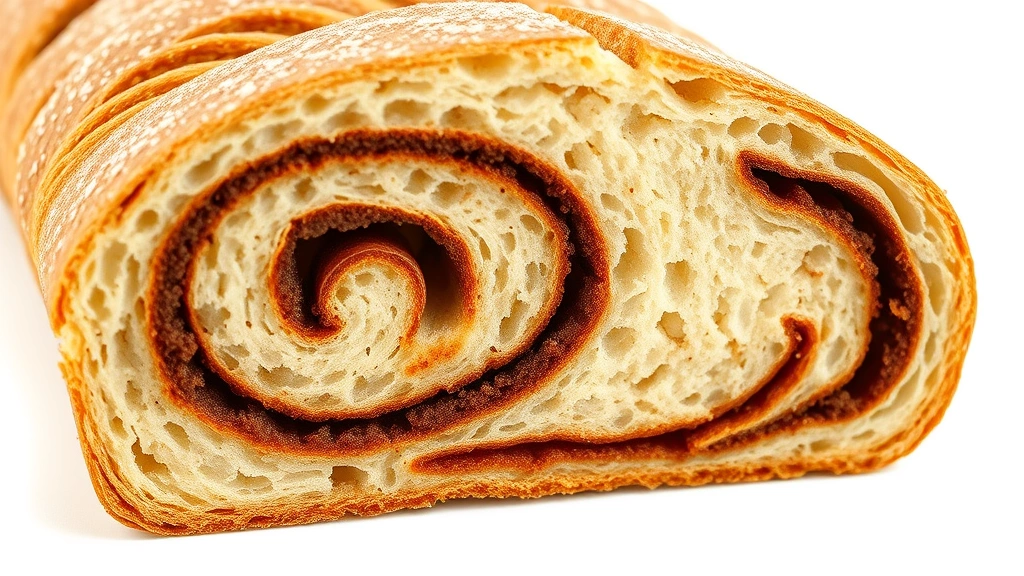
The Amish approach to bread-making is rooted in simplicity and patience. There’s no commercial yeast in the traditional sense—well, there is in this modern version, but the philosophy remains: let the dough develop flavor through time rather than aggressive kneading. The result is a tender, slightly sweet bread with a tight, even crumb structure that holds together beautifully for slicing. The cinnamon-sugar swirl isn’t just a topping; it’s baked throughout, creating pockets of spiced sweetness in every bite.
What separates this from your standard cinnamon swirl bread is the moisture content and the way the dough is handled. Amish bakers traditionally use softer doughs that require less manipulation. This reduces gluten development through physical work and relies instead on autolyse—the process where flour and water bond naturally over time. Your job becomes less about technique and more about patience.
Ingredients You Need
Keep your ingredient list straightforward. You’ll need:
- 3 cups all-purpose flour (or bread flour for chewier texture)
- 1½ teaspoons salt
- ½ teaspoon instant yeast (yes, just half a teaspoon)
- 1½ cups lukewarm water
- 3 tablespoons butter, softened
- ¼ cup granulated sugar
- 2 tablespoons ground cinnamon
- 2 tablespoons brown sugar
- Pinch of nutmeg (optional but recommended)
The beauty here is that you’re not buying specialty ingredients. Everything in your pantry probably already covers this. The half teaspoon of yeast is intentional—it’s the no-knead secret. With minimal yeast and a long fermentation, you get complex flavor development that commercial yeast working overtime can’t match.
The No-Knead Method Explained
The no-knead method works because of chemistry, not elbow grease. When you combine flour, water, salt, and a tiny amount of yeast, then let it sit for 12-18 hours at room temperature, several things happen simultaneously. The flour hydrates fully, gluten develops on its own through the moisture interaction, and the yeast slowly ferments, creating organic acids that build flavor and improve texture.
This isn’t laziness—it’s actually more sophisticated than traditional kneading. You’re leveraging time and biology instead of mechanical force. The long fermentation also makes the dough easier to digest and enhances the bread’s keeping qualities. Loaves made this way stay fresh longer and develop better flavor as they age.
Think of it like the difference between rushing a project and letting it cure properly. You wouldn’t force-dry finish on fine woodwork; you’d let it set. Same principle applies here.
Mixing and First Rise
Start by combining your dry ingredients in a large bowl—flour, salt, and yeast. Don’t skip the salt; it regulates fermentation speed and strengthens gluten structure. Pour in your lukewarm water. Use a wooden spoon or your hand to mix until everything is hydrated. You’re aiming for a shaggy, wet dough that looks almost like thick pancake batter. It should be sticky enough that you wouldn’t want to knead it traditionally.
Cover the bowl with plastic wrap or a damp kitchen towel. Leave it on your counter at room temperature for 12-18 hours. During this time, you’ll see the dough gradually develop structure and rise slightly. You’re not looking for it to double—that’s not the goal with this method. You want to see some rise and a bubbly surface, which indicates fermentation is happening.
Temperature matters. If your kitchen runs cool (under 65°F), extend the time to 18-24 hours. If it’s warm (above 75°F), check it at 12 hours and proceed when it looks bubbly and slightly risen. This is where patience becomes your primary tool.
Creating the Cinnamon Swirl
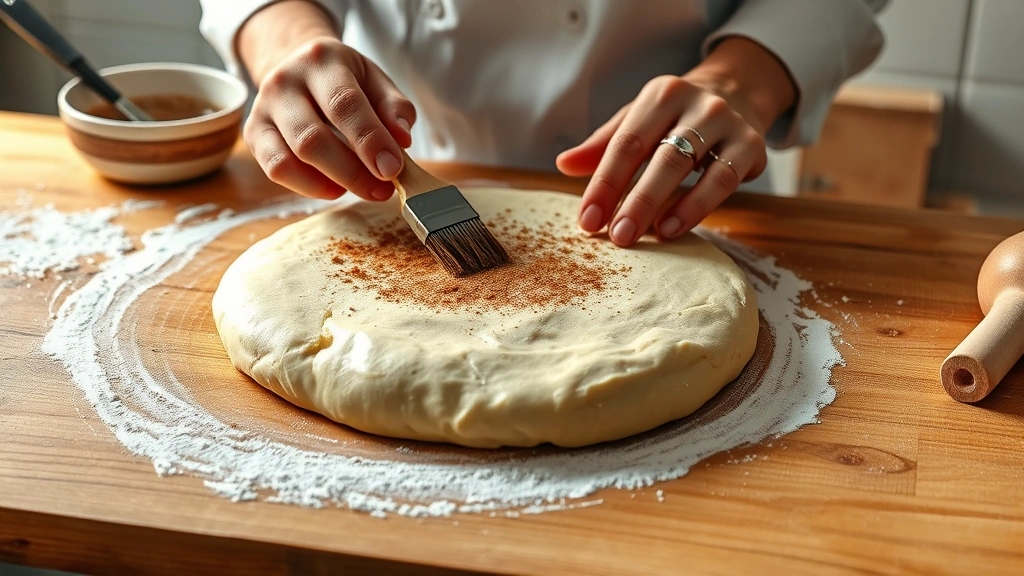
Once your first rise is complete, turn your dough out onto a lightly floured surface. It’ll be sticky and somewhat loose—that’s correct. Don’t try to make it into a neat ball. Instead, gently stretch it into a rough rectangle, about 8 inches by 10 inches.
Brush the entire surface with softened butter. Mix your cinnamon, granulated sugar, brown sugar, and nutmeg in a small bowl. Sprinkle this mixture evenly across the buttered dough, leaving about half an inch around the edges clear. This prevents the filling from squeezing out during rolling.
Starting from one of the long sides, roll the dough toward you, keeping tension consistent. You’re not making a tight spiral like a cinnamon roll; you’re creating a gentle spiral that will distribute the cinnamon throughout the bread rather than concentrating it in one area. Pinch the seam closed and place your loaf seam-side up in a banneton basket or a bowl lined with a floured kitchen towel.
Shaping and Second Rise
Your shaped loaf now enters the second rise, which is shorter than the first—usually 2-4 hours at room temperature, or overnight in the refrigerator (which is my preference). The cold fermentation actually improves flavor and makes the dough easier to score before baking.
If you’re doing the overnight refrigerator route, cover your banneton with plastic wrap and place it on a shelf. When you’re ready to bake the next day, remove it from the fridge and let it come to room temperature for about 30 minutes while your oven preheats. This prevents shocking the dough with extreme temperature changes.
You’ll know the second rise is complete when the loaf has increased in size by about 50% and gently springs back slowly when you poke it. If it springs back immediately, it needs more time. If your finger leaves a dent that doesn’t spring back at all, you’ve gone too far and the dough is over-proofed.
Baking to Perfection
Preheat your oven to 450°F with a Dutch oven inside for at least 30 minutes. The Dutch oven traps steam, which is crucial for developing that crispy crust that contrasts beautifully with the tender interior. This is non-negotiable for no-knead bread.
Carefully remove the hot Dutch oven and turn your loaf out of the banneton onto parchment paper. Score the top with a sharp knife or bread lame—a single slash about ¼-inch deep down the center. This controls where the bread expands and creates that signature ear.
Transfer your loaf (still on parchment) into the hot Dutch oven. Cover with the lid and bake for 30 minutes. The steam trapped inside will create that artisanal crust. Remove the lid and bake for another 15-20 minutes until the loaf is deep golden brown. The internal temperature should reach 205-210°F when measured with an instant-read thermometer inserted into the center.
If you’re making apple cider donuts or other fall treats alongside this bread, you’ll appreciate how the cinnamon aroma from the oven complements your whole kitchen project lineup.
Cooling and Storage Tips
Remove your bread from the Dutch oven and place it on a wire rack. This is the hardest part—waiting. The bread continues to cook internally as it cools, and the crumb structure sets during this time. Resist slicing for at least one hour. Ideally, wait 2-3 hours. If you cut too early, the interior will be gummy and the slices will compress.
Once cooled completely, store your bread in a paper bag at room temperature for up to three days. Paper allows the crust to breathe; plastic will soften it. For longer storage, wrap cooled bread in plastic and freeze for up to one month. Thaw at room temperature, still wrapped, for 2-3 hours before serving.
The beauty of this bread is that it actually improves on day two as the crumb continues to set and flavors meld. Many bakers prefer their no-knead bread the next day.
Common Issues and Fixes
If your bread is dense and gummy inside, you either under-baked it or sliced too early. Dense loaves also result from over-proofing during the second rise. Check that your poke test is working correctly—the dough should spring back slowly, not immediately or not at all.
If the crust is too thick or hard, your oven temperature might be running hot, or you’re baking too long with the Dutch oven uncovered. Try reducing uncovered baking time by 5 minutes. If the crumb is too open and irregular, your first fermentation went too long. Reduce time by 2-3 hours next batch.
Cinnamon not distributed evenly? You rolled too loosely or didn’t apply the filling thoroughly enough. Next time, use a bench scraper to really press the cinnamon mixture into the dough during rolling. If the filling leaked out during baking, you left too little border space around the edges when applying it.
Like any craft, this bread improves with repetition. Keep notes on timing and temperature in your kitchen, and you’ll dial this in perfectly within 2-3 batches.
Frequently Asked Questions
Can I use whole wheat flour instead of all-purpose?
Yes, but substitute no more than 25-30% whole wheat for all-purpose. Whole wheat absorbs more water and ferments differently, so you may need to adjust hydration slightly. Start with 1¾ cups water instead of 1½ cups and adjust from there.
What if I don’t have a Dutch oven?
You can create steam another way: place a cast iron skillet in the bottom of your oven while preheating, then carefully pour boiling water into it when you place your bread in the oven. Cover loosely with foil for the first 20 minutes. It’s not quite as effective as a Dutch oven, but it works.
Can I make this recipe in a bread machine?
Not really. The whole point is the long, slow fermentation at room temperature. A bread machine would rush the process and defeat the purpose. Stick with the manual method—it’s genuinely hands-off once you mix.
How do I know if my yeast is still active?
Before committing to a full batch, do a quick test: mix ½ teaspoon yeast with ¼ cup warm water and a pinch of sugar. If it’s foamy within 5 minutes, you’re good. If nothing happens, your yeast is dead and you need a fresh package.
Can I add nuts or other mix-ins?
Absolutely. Chopped walnuts or pecans work great. Apply them after the butter and cinnamon mixture but before rolling. Use about ½ cup chopped nuts. Dried cranberries or raisins also work—soak them briefly in warm water first to plump them up.
Why does my bread have a gummy layer just under the crust?
This happens when steam condenses into the crumb as the bread cools. It’s usually a sign your Dutch oven lid stayed on too long. Try removing it 5 minutes earlier next time. Also ensure the bread fully cools before wrapping or storing.
Final Thoughts
Making an amish cinnamon bread recipe using the no-knead method transforms bread-making from an intimidating technical skill into a genuinely accessible project. You’re not competing with commercial bakeries or trying to develop perfect technique—you’re leveraging time and chemistry to create something that tastes like it came from a professional kitchen.
The real skill here is patience and observation. Learning to read your dough, understanding how temperature affects fermentation, and knowing when to move to the next step—that’s where the craftsmanship lives. Once you nail this recipe, you’ll find yourself making it regularly, experimenting with timing and tweaks, and genuinely understanding bread in a way that no amount of reading can teach.
Start with the basic recipe exactly as written. Make notes. Observe what happens at each stage. By your third or fourth loaf, you’ll have internalized the rhythm, and it becomes second nature. That’s when bread-making stops being a recipe and becomes a skill you own.
For complementary projects, you might enjoy making candy apples for fall gatherings, or perfecting gravy from turkey drippings for holiday meals. And if you’re exploring edible projects, edible cookie dough is another hands-on kitchen craft worth mastering. Even butterflying chicken breast represents the same principle—simple technique, big results.


