
Learning how to cook chicken thighs in a pan is one of those skills that’ll change your weeknight dinners forever. Chicken thighs are forgiving, flavorful, and honestly way more interesting than chicken breast—they stay moist, crisp up beautifully, and take about 20 minutes from stovetop to plate. Whether you’re a kitchen novice or just looking to nail the technique, this guide walks you through everything you need to know to get restaurant-quality results at home.
Table of Contents
Why Chicken Thighs Win
Chicken thighs have more fat and connective tissue than breast meat, which means they’re nearly impossible to dry out. That fat renders during cooking, keeping the meat tender and juicy while the skin gets crispy and golden. The dark meat also has deeper flavor—it’s what makes chicken taste like chicken, not like bland protein filler. If you’ve been stuck in chicken-breast rut, switching to thighs is a game-changer. They’re also cheaper per pound, which doesn’t hurt your grocery budget.
Pick Quality Thighs
Start at the store. Look for bone-in, skin-on chicken thighs—this is the non-negotiable part. Boneless, skinless thighs are a downgrade; you lose the structural integrity and that crispy skin payoff. Grab thighs that feel firm, with skin that’s pale pink or white (not gray or discolored). If you can, buy from a butcher counter where the meat is fresher and the staff can answer questions. Plan for about 2 thighs per person—one thigh is roughly 150-200 grams and serves as a decent portion alongside vegetables or rice.
Prep Matters Most
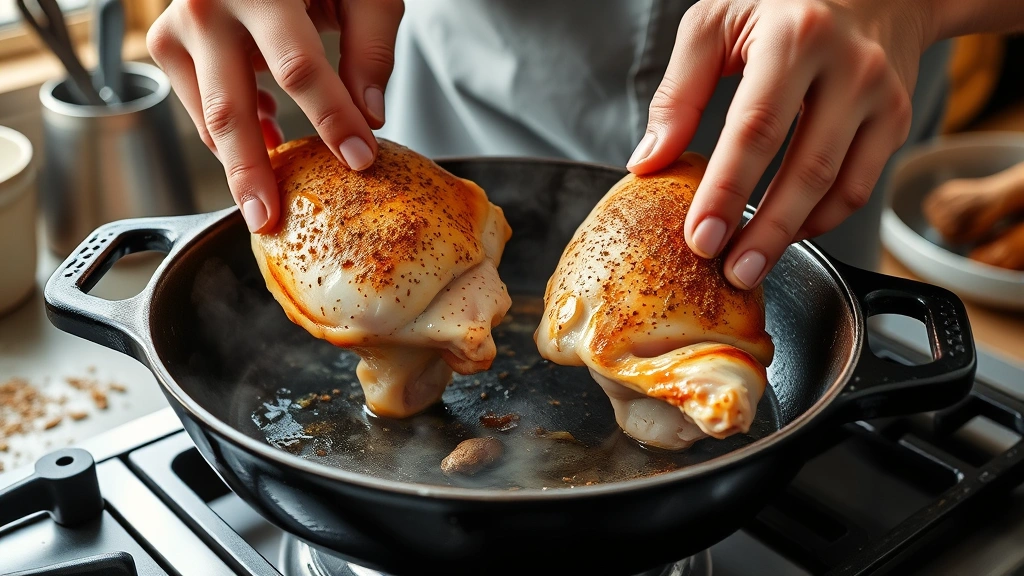
Pat your thighs completely dry with paper towels. This is the single biggest factor in getting crispy skin. Moisture is the enemy of crispness, so don’t skip this step. Season generously with salt and black pepper on both sides at least 10 minutes before cooking—salt draws moisture to the surface initially, but then reabsorbs, seasoning the meat throughout. If you have time, season 30 minutes or even a few hours ahead and refrigerate uncovered. This dry-brining effect deepens flavor and helps the skin crisp even more. You can add garlic powder, paprika, or dried herbs now if you want, but honestly, salt and pepper are all you need.
Pan Searing Technique
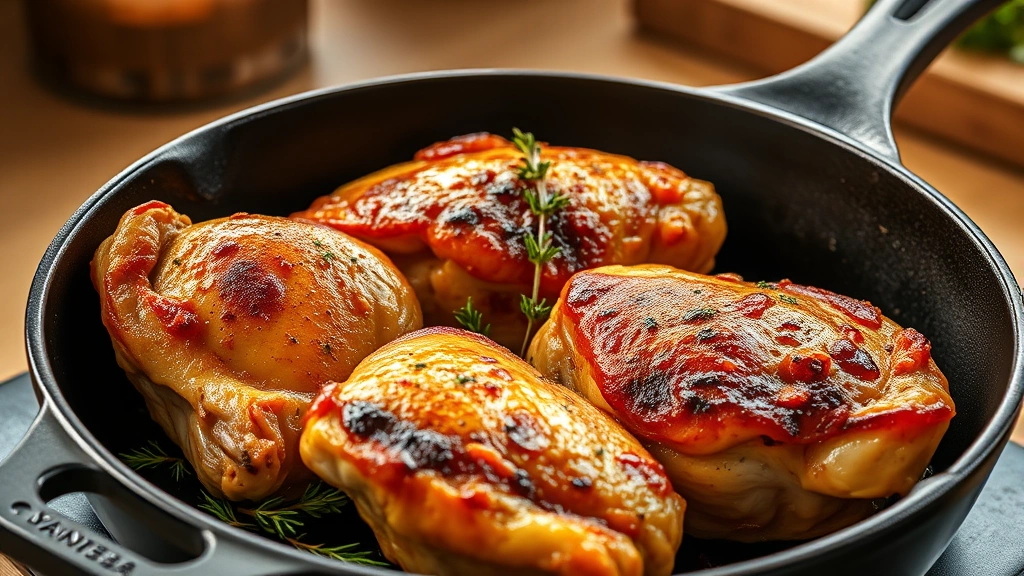
Use a large skillet—cast iron or stainless steel both work great. Heat it over medium-high heat for 2-3 minutes until it’s properly hot. You want the pan hot enough that water droplets dance and evaporate instantly. Don’t use oil yet. Place thighs skin-side down directly on the dry pan. Yes, really. The fat under the skin will render out and create its own cooking medium. Let them sit undisturbed for 6-8 minutes. Resist the urge to move them around or flip early. This is when the magic happens—the skin renders, crisps, and turns golden brown. You’ll hear a gentle sizzle and smell something incredible.
After 6-8 minutes, check the skin. It should be deep golden brown and crispy, not pale or rubbery. If it needs more time, give it another minute or two. Once the skin is right, flip the thighs and add a knob of butter or a drizzle of oil to the pan if it looks dry. Cook the other side for 4-5 minutes until the meat side gets some color. The internal temperature should reach 165°F (74°C) at the thickest part without touching bone. Most thighs hit this target in 12-15 minutes total cooking time.
Temperature & Doneness
Don’t guess on doneness—use a meat thermometer. Insert it horizontally into the thickest part of the thigh without touching bone. Chicken thighs are forgiving; they can actually go up to 175°F (79°C) without drying out, thanks to that fat content. If you don’t have a thermometer, cut into the thickest part and check that the juices run clear and there’s no pink near the bone. The meat will continue cooking slightly after you pull it from heat, so pull at 160-162°F and let it rest for 5 minutes. This resting period lets juices redistribute, keeping everything moist.
Flavor Upgrades
Once you nail the basic technique, play with flavor. Add fresh thyme, rosemary, or sage to the pan during the final minutes of cooking—the herbs infuse into the fat and smell amazing. Squeeze lemon juice over the finished thighs. Make a simple pan sauce by pouring off excess fat, adding chicken broth and a splash of white wine, then scraping up the browned bits (called fond) with a wooden spoon. Let it reduce for 2 minutes and drizzle over the cooked thighs. For Asian-inspired flavor, brush thighs with soy sauce and honey mixed together before or after cooking. Try garlic and ginger for brightness, or smoked paprika and cumin for depth.
Common Mistakes to Skip
Don’t skip the dry-patting step—wet skin won’t crisp. Don’t flip too early; let that skin develop properly. Don’t crowd the pan; if you’re cooking more than 4 thighs, work in batches so each one gets direct contact with the hot surface. Don’t use high heat the entire time; medium-high is right. Too hot and the skin burns before the meat cooks through. Don’t skip the resting period; it seems small, but it matters. Don’t cook from cold straight out of the fridge; let thighs sit at room temperature for 15-20 minutes so they cook evenly. And don’t use boneless, skinless thighs—you’re missing the whole point.
Serving Ideas
Pan-seared thighs pair with almost anything. Serve them over rice with steamed broccoli. Slice them and toss with pasta and garlic oil. Make a grain bowl with quinoa, roasted vegetables, and a tahini dressing. Pair with roasted potatoes and a simple green salad. They’re also excellent cold the next day on a salad or in a sandwich. If you’re cooking for a crowd, this method scales easily—just work in batches and keep finished thighs warm on a plate in a 200°F oven while you cook the rest. Check out our guide on how long to cook chicken drumsticks in the oven for other poultry options, or explore how long to cook chicken tenders in the oven at 400 if you’re looking for quicker-cooking cuts.
Frequently Asked Questions
Can you cook chicken thighs skin-side up first?
Technically yes, but you’ll get better results starting skin-side down. The skin needs direct contact with the hot pan to render and crisp properly. If you start skin-side up, the rendered fat pools away from the skin, and you end up with flabby, rubbery skin instead of crispy. Always start skin-side down.
How long do pan-seared chicken thighs last in the fridge?
Cooked chicken thighs keep for 3-4 days in an airtight container. Reheat gently in a 325°F oven for 10-15 minutes to warm through without drying out. They’re also excellent cold straight from the fridge.
Can you freeze raw chicken thighs after seasoning?
Yes, absolutely. Season them, wrap individually in plastic wrap or parchment, then place in a freezer bag. They’ll keep for 2-3 months. Thaw in the fridge overnight before cooking. The seasoning actually helps during freezing by preventing oxidation.

What’s the best pan material for crispy skin?
Cast iron is ideal because it retains and distributes heat evenly, but stainless steel works great too. Nonstick pans can work, but they don’t get as hot, so you might not get the same crispy results. Avoid aluminum, which doesn’t hold heat well.
Should you cover the pan while cooking?
No. Covering traps steam, which softens the skin instead of crisping it. Keep the pan uncovered the entire time. If thighs are browning too fast on the skin side but the meat isn’t cooking through, just lower the heat slightly and give them more time.
Can you cook thighs from frozen?
Not recommended. Frozen thighs cook unevenly—the outside burns while the inside stays cold. Always thaw in the fridge first, which takes 12-24 hours depending on size. If you’re in a rush, use the cold-water method: seal thighs in a bag and submerge in cold water for 1-2 hours, changing the water every 30 minutes.
For more protein-cooking inspiration, check out how long to bake chicken wings or how long to cook country-style ribs in the oven for other meat options. If you want to round out your meal, our guide on how long to boil asparagus pairs perfectly with pan-seared thighs.
Final Thoughts
Mastering how to cook chicken thighs in a pan is genuinely one of the most practical kitchen skills you can have. It’s fast, reliable, and produces restaurant-quality results every single time you do it. The technique is simple: dry them, season them, start skin-side down, don’t fidget with them, and pull at temperature. Once you’ve done it a few times, it becomes muscle memory. You’ll find yourself cooking thighs multiple times a week because they’re so good and so easy. Start with the basic salt-and-pepper version to learn the technique, then branch out into flavor variations once you’re confident. Your weeknight dinners are about to get a whole lot better.


