
Learning how to cook corn on the cob in the oven is one of those kitchen skills that’ll change your weeknight dinners forever. Forget boiling water and dealing with steam—oven-roasting gives you sweet, tender corn with caramelized edges that taste restaurant-quality. I’m going to walk you through the entire process, from selecting your ears to pulling them out golden and delicious.
Table of Contents
Why Oven Roasting Works Best
Here’s the thing about roasting corn in the oven—it’s pure magic. When you roast corn, the natural sugars caramelize at high heat, creating this incredible nutty flavor you simply can’t get from boiling. The kernels stay plump and juicy while the edges get slightly charred and crispy. Unlike boiling, which leaches flavor into water, roasting concentrates everything right there in the corn itself.
The dry heat also means you’re not dealing with soggy kernels or that waterlogged texture. You get texture contrast—tender inside, slightly caramelized outside. Plus, your kitchen doesn’t steam up like a sauna. It’s a win across the board.
Selecting the Right Corn
Not all corn is created equal, and picking the right ears makes a huge difference. Look for corn with bright green husks that feel snug against the cob—loose husks mean the corn’s been sitting around too long. The silk should be golden or light brown, not dark or dried out. Give each ear a gentle squeeze; it should feel firm and heavy for its size.
Fresh corn is always your best bet. If you’re buying from a farmers market in peak season (late summer), you’re golden. Supermarket corn works fine too, but try to use it within a day or two of purchase. The longer corn sits, the more its sugars convert to starch, and you lose that sweet flavor.
Prep Your Corn Properly
This is where technique matters. You’ve got two main approaches: roasting with husks on or husks off.
Husks On Method: Pull back the husks without removing them completely, strip away the silk, then fold the husks back up. This creates a natural steamer packet that keeps the corn moist inside while the exposed kernels get some char. It’s foolproof for beginners.
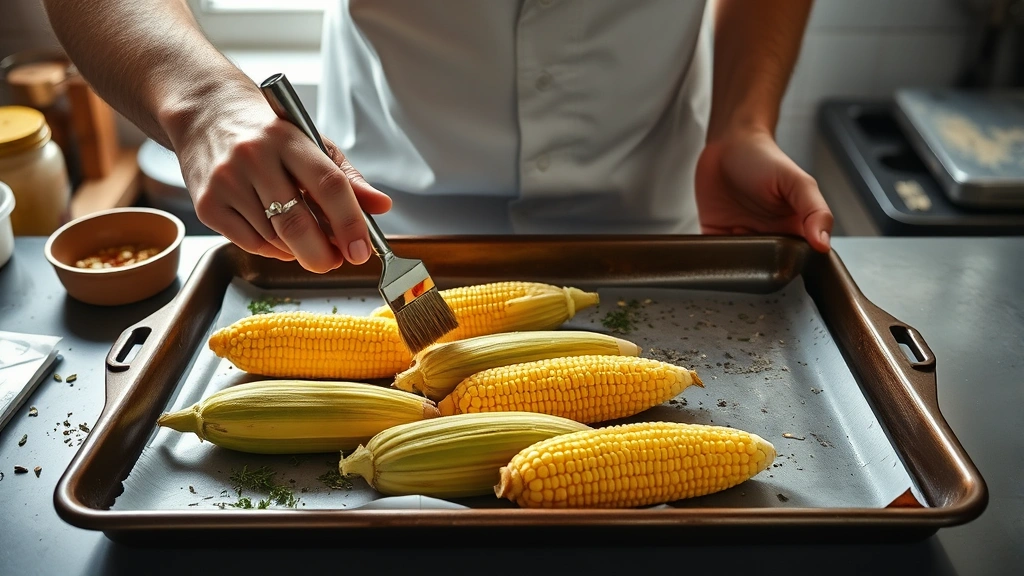
Husks Off Method: Remove all husks and silk completely, then place naked corn directly on the baking sheet. Brush with butter or oil. This gives you more caramelization and crispier edges, but requires a bit more attention so nothing burns.
Whichever method you choose, rinse your corn under cold water first to remove any lingering silk strands. They’re annoying to deal with later.
Seasoning & Flavor Combos
Plain butter and salt is classic for a reason, but don’t stop there. Here are my go-to combinations:
Garlic Herb Butter: Mix softened butter with minced garlic, fresh parsley, and a pinch of thyme. Brush it on before roasting and you’ve got something special.
Spicy Lime: Combine butter with lime zest, chili powder, and a touch of cumin. Finish with fresh cilantro after roasting. It’s incredible.
Parmesan & Rosemary: Brush with olive oil, sprinkle grated Parmesan and fresh rosemary before roasting. Finish with black pepper.
Simple Cajun: Mix paprika, garlic powder, cayenne, and black pepper into softened butter. Apply generously and roast.
The beauty of oven roasting is that seasonings stick better than they do with boiling. Apply them before roasting so they caramelize right onto the kernels.
The Roasting Process
Preheat your oven to 400°F (200°C). While it’s heating, prepare your corn using whichever method you’ve chosen. If you’re going husks-off, line your baking sheet with foil or parchment paper for easy cleanup.
Arrange your corn in a single layer on the baking sheet. If using husks-on, they can touch. If husks-off, leave a little space between ears so hot air circulates. Brush with your chosen butter or oil mixture, making sure every exposed kernel gets coated.
This is where most people get nervous, but don’t overthink it. You’re simply roasting vegetables like you would air fryer vegetable recipes—high heat, short time, maximum flavor.
Temperature & Timing Guide
At 400°F, expect roasting to take 20-30 minutes depending on the size of your ears and whether you’re using husks. Start checking around the 20-minute mark.
For Husks-On: 25-30 minutes. The husks will char slightly and the kernels will be tender when pierced with a fork.
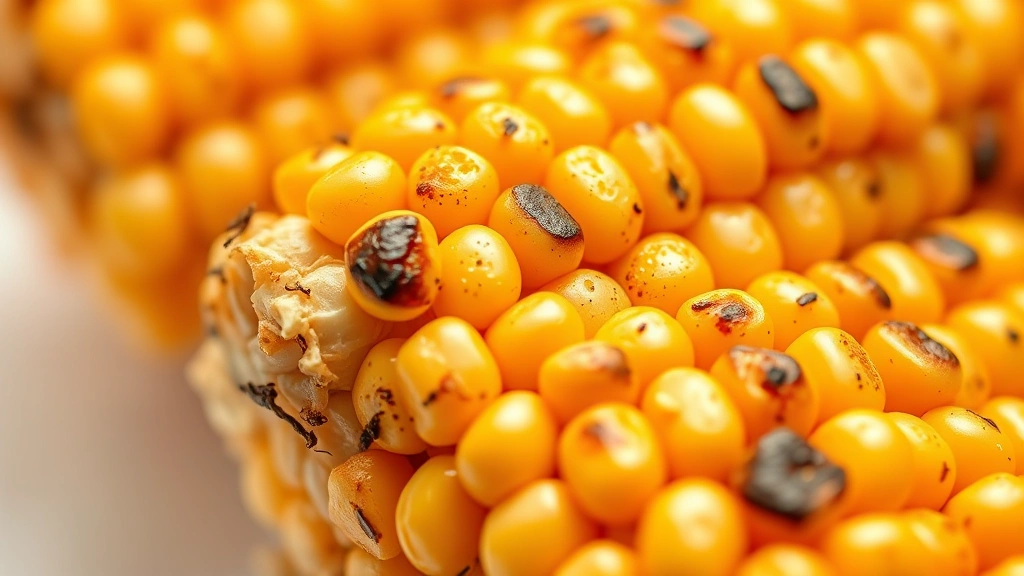
For Husks-Off: 20-25 minutes. You’ll see more browning on the kernels themselves. Some light charring on the tips is actually desirable—it means caramelization is happening.
If you want more char and deeper flavor, crank it to 425°F and reduce time to 18-22 minutes. Just watch them—higher heat means things can go from golden to burnt faster.
Checking for Doneness
The kernels should be tender when you pierce them with a fork or toothpick. A kernel should almost pop between your teeth, not be hard or starchy. The husks (if using) will be slightly charred and papery. The corn should smell sweet and nutty, not raw or grassy.
If you’re unsure, pull one ear out early and test it. Better to catch it than overbake. The corn continues cooking slightly after you pull it from the oven, so don’t wait until it’s falling off the cob.
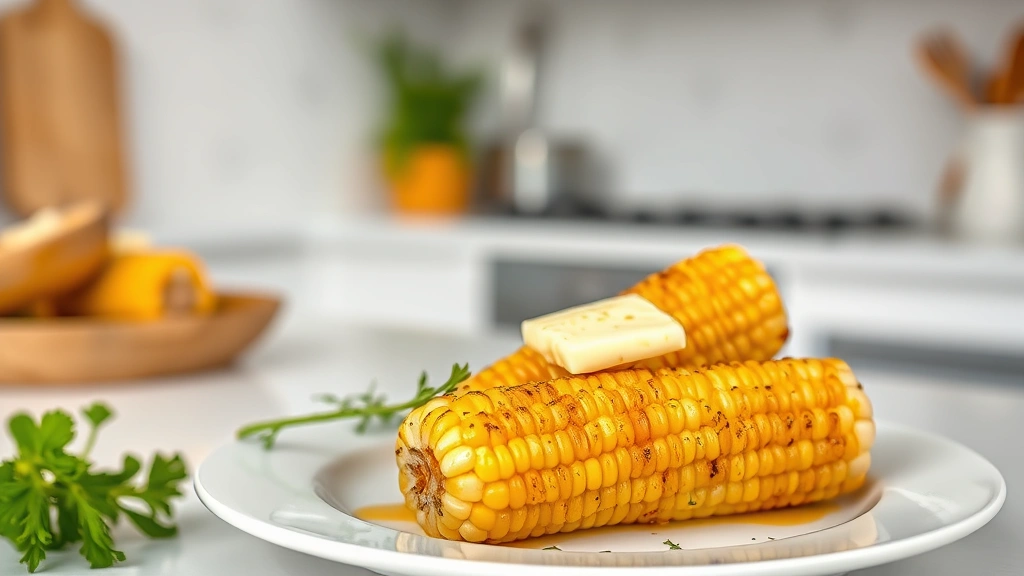
Serving & Storage Tips
Serve immediately while still warm. Have butter, salt, and pepper at the table so people can customize. Corn holders or skewers make eating easier, though hands work fine too.
Leftover roasted corn keeps in an airtight container in the fridge for 3-4 days. You can eat it cold straight from the fridge, or reheat it wrapped in foil at 325°F for about 10 minutes. Corn also freezes beautifully—just cut the kernels off the cob, store in freezer bags, and use within 3 months.
Roasted corn pairs perfectly with how to bake chicken legs for a complete meal, or serve alongside charro beans recipe for a southwestern vibe. You can also cut kernels off and toss them into salads, grain bowls, or cornish game hen recipe side dishes.
Common Problems Solved
Kernels are tough or starchy: You’re undercooking them. Add 5 more minutes next time. Corn needs adequate heat to break down the starches and tenderize.
Corn is drying out: You’re either cooking too long or at too high a temperature. Reduce heat to 375°F and check earlier. Husks-on method helps prevent this entirely.
Uneven cooking: Make sure ears are similar size and arranged in a single layer. Rotate the baking sheet halfway through if your oven has hot spots.
Seasonings sliding off: Apply them to damp corn (right after rinsing) or use butter instead of oil—it adheres better. Don’t add salt directly to dry corn; it draws moisture out.
Corn tastes bland: You’re probably undercooking it. Roasting concentrates sweetness, but only if you cook long enough for caramelization. Also taste-test your salt—you might need more than you think.
Frequently Asked Questions
Can I roast corn without removing the husks?
Absolutely. In fact, it’s the easiest method for beginners. Just pull back the husks, remove the silk, fold them back up, and roast. The husks protect the kernels and keep them moist while still allowing some caramelization on the exposed tips.
What temperature should I use?
400°F is the sweet spot for most ovens. It’s hot enough to caramelize the sugars in 20-30 minutes without drying things out. If you prefer more char, go to 425°F but watch carefully. Never go below 375°F or you’ll end up steaming instead of roasting.
How do I know when corn is done?
Pierce a kernel with a fork—it should be tender and almost pop. The kernels should look slightly translucent and feel soft to the bite. Some light browning on the kernels is normal and delicious. If kernels still feel hard or starchy, cook 5 more minutes.
Can I use frozen corn on the cob?
Yes, but thaw it completely first. Frozen corn has more water content, so you might need to reduce roasting time by 5 minutes. Pat it dry before roasting to minimize moisture.
What’s the best way to season roasted corn?
Brush with butter mixed with seasonings before roasting. This lets the flavors caramelize right onto the kernels instead of just sitting on top. Garlic, herbs, chili powder, and lime are all fantastic choices.
How long can I store roasted corn?
Keep it in an airtight container in the fridge for 3-4 days. You can eat it cold or reheat it wrapped in foil at 325°F for 10 minutes. Corn also freezes well—cut kernels off the cob and freeze in bags for up to 3 months.
Can I roast corn ahead of time?
Yes. Roast it earlier in the day and reheat before serving. It won’t be quite as good as fresh from the oven, but it’s still delicious. Reheat wrapped in foil at 325°F for 10-15 minutes depending on how many ears you’re warming.
What’s the difference between roasting and boiling?
Roasting caramelizes the natural sugars, creating deeper flavor and better texture. Boiling leaches flavor into the water and creates a softer, sometimes waterlogged texture. Roasting is superior in almost every way except speed—boiling is faster.
Final Thoughts
Once you master how to cook corn on the cob in the oven, you’ll never go back to boiling. It’s genuinely foolproof once you understand the basic technique: high heat, 20-30 minutes, and you’re done. The caramelized sweetness is unbeatable, and your kitchen stays cool and dry.
Start with the husks-on method if you’re nervous—it’s nearly impossible to mess up. Season generously, roast at 400°F until the kernels are tender, and serve immediately. Your family will be asking why corn tastes so good all of a sudden. That’s the power of proper technique.
For more vegetable cooking inspiration, check out how long to steam asparagus for other side dish ideas. And if you’re planning a full dinner spread, these roasted ears pair beautifully with the recipes mentioned throughout. Happy roasting.


