
Learning how to cook chicken wings in the oven is one of those kitchen skills that transforms game day, parties, and weeknight dinners. Forget the deep fryer mess—oven-baked wings deliver that golden, crispy exterior with juicy meat inside, and you’ll spend way less time cleaning up afterward. This isn’t rocket science, but there are some legit techniques that separate mediocre wings from the ones people actually remember eating.
Table of Contents
Prep Work Matters
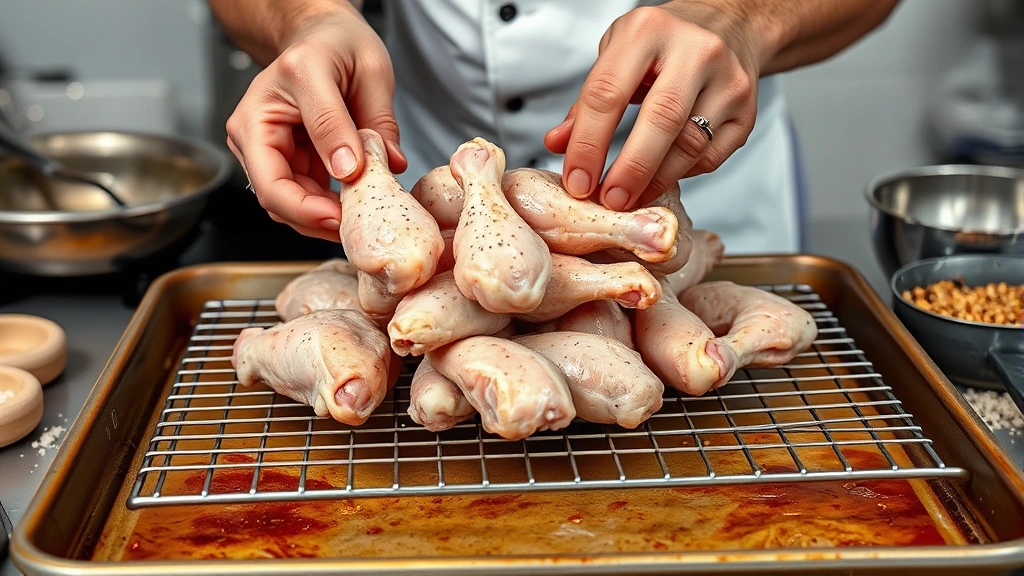
Most people skip this step and wonder why their wings turn out soggy. Start by patting your chicken wings completely dry with paper towels—and I mean really dry. Moisture is the enemy of crispiness. If your wings are wet, they’ll steam instead of bake. Spend an extra minute here; it makes a real difference.
Separate your wings into flats and drumettes if they’re still whole. Some people leave them connected, which is fine, but separated pieces cook more evenly. Trim any excess skin or loose bits hanging off the edges. This prevents burnt edges and gives you cleaner-looking wings on the plate.
The Dry Brine Trick
Here’s where most home cooks go wrong: they season right before baking. Instead, salt your wings 8-24 hours ahead of time. This isn’t just seasoning—it’s a dry brine that breaks down proteins and helps them retain moisture while the exterior crisps up beautifully. Coat your wings with kosher salt and let them sit uncovered in the fridge on a wire rack set over a baking sheet.
The salt draws out moisture initially, then the wings reabsorb it along with the salt, seasoning them from the inside out. When you bake them, that exterior dries out faster and browns better. If you’re short on time, even 2-3 hours helps. No time at all? Season right before cooking, but understand your results won’t be quite as good.
Rack Placement & Temperature
Position your oven rack in the upper-middle section—not the very top, but definitely not the bottom. You want heat coming from below to crisp the skin while the top doesn’t char. Preheat your oven to 250°F for the initial low-and-slow phase, then you’ll blast them at 425°F for the finish.
This two-stage approach renders the fat and cooks the meat through at the lower temperature, then the high heat creates that crackling, golden exterior everyone wants. Some people do it all at 425°F, which works, but you risk dry meat or burnt skin. The two-stage method is more forgiving and consistently better.
Timing Your Wings Right
At 250°F, your wings need 30-40 minutes. They’ll look pale and underwhelming—that’s normal. Arrange them on a wire rack set over a baking sheet (the rack prevents them from sitting in rendered fat and getting greasy on the bottom). Don’t crowd the pan; wings need space for air to circulate.
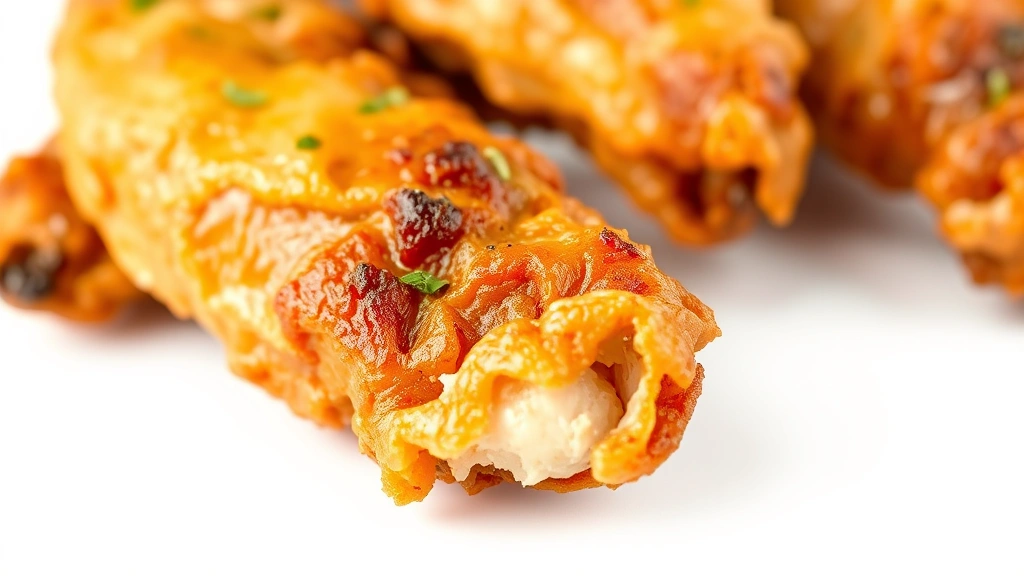
After the low-temp phase, crank your oven to 425°F and bake for another 15-20 minutes until they’re golden brown and crispy. Check them around the 12-minute mark because ovens vary. You’re looking for deep golden color, not burnt. Total time is roughly 45-60 minutes depending on wing size and your oven’s personality.
Getting That Crispy Skin
The wire rack is non-negotiable here. Wings sitting directly on a baking sheet steam from underneath. A rack elevates them, letting hot air circulate completely around each piece. If you don’t have a proper wire rack, you can create one by crumpling aluminum foil into a base, but a real rack works better.
Pat wings dry before baking—I know I mentioned this, but it’s critical. A light coating of oil or cooking spray helps browning, but don’t soak them. Just a thin mist. Some people toss wings in a tiny bit of baking powder (aluminum-free) mixed with salt and seasonings; the baking powder accelerates browning and crispness. Use about 1 teaspoon per pound of wings.
Avoid flipping wings during cooking. They’ll brown more evenly if left alone. The rack does the work for you by allowing heat underneath.
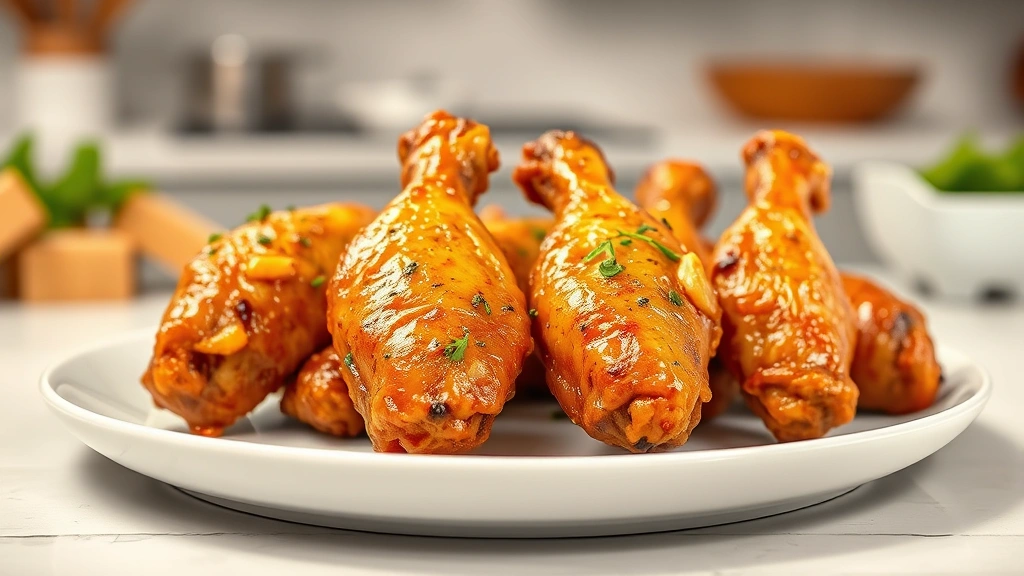
Sauce Application Techniques
If you’re making sauced wings, apply sauce after cooking, not before. Sauce on raw wings prevents browning and can burn. Toss your finished wings in a bowl with warm sauce, coating evenly. If you want buffalo sauce recipe ideas, that’s a classic choice, but game day recipes include everything from Asian ginger-soy to honey mustard.
For sticky sauces, add wings to the sauce and toss gently for 30-60 seconds. Don’t over-toss or you’ll damage the crispy skin. If you want sauced wings that stay crispy, brush sauce lightly instead of dunking them. A pastry brush gives you control and maintains that texture everyone paid for.
Seasoning & Flavor Ideas
Beyond salt, think about what flavors you actually want. A simple dry rub of garlic powder, paprika, black pepper, and cayenne works great. Mix these with your salt during the dry brine phase. Lemon zest added at the end brightens everything up.
For Asian-style wings, add five-spice powder and white pepper to your dry brine. Finish with a glaze of soy sauce, honey, and ginger brushed on after cooking. Barbecue wings? Combine paprika, brown sugar, and chili powder in your rub, then toss with your favorite BBQ sauce after baking.
The beauty of oven-baking is you can make multiple batches with different seasonings and sauces for variety. Unlike deep frying where flavors linger in the oil, each batch stays distinct.
Storage & Reheating
Cooked wings keep in an airtight container in the fridge for 3-4 days. Reheat them in a 350°F oven for 8-10 minutes to restore crispness. Don’t use the microwave unless you enjoy rubbery wings. The oven brings them back to life better than any other method.
You can also freeze cooked wings for up to 3 months. Freeze them on a baking sheet first, then transfer to freezer bags to prevent sticking. Thaw in the fridge overnight before reheating, or add a few extra minutes to your oven time if reheating from frozen.
Common Wing Problems Solved
Wings turning out rubbery? You’re either cooking too hot for too long, or not using the two-stage method. Stick to 250°F then 425°F and check for doneness at the thickest part—meat should reach 165°F internally. Soggy skin means your wings weren’t dry enough before cooking, or you’re not using a wire rack. Fix both issues and you’re golden.
Burnt edges with undercooked meat? Your oven’s running hot. Lower the temperature by 25°F and add time. Every oven has quirks. Wings browning unevenly? Rotate your pan halfway through the high-heat phase. Some ovens have hot spots.
If you’re comparing results to how to broil steak, remember wings need gentler heat overall. Broiling works for finishing wings if you’re short on time, but the two-stage bake method is more reliable for beginners.
Frequently Asked Questions
Can I cook wings at one temperature the whole time?
Yes, you can bake at 425°F for 35-45 minutes straight. You’ll get decent results, but the two-stage method (250°F then 425°F) gives you more control and more consistent crispiness. The low-temp phase renders fat without drying meat out, then the high heat browns everything perfectly.
What’s the difference between drumettes and flats?
Drumettes are the meaty part that looks like a tiny drumstick. Flats are the two-bone pieces. They cook at slightly different rates—drumettes take a few minutes longer. Separating them lets you time each type perfectly. If you leave them whole, drumettes will finish slightly before flats.
Do I need to marinate wings before baking?
Not necessary. The dry brine method (salt ahead of time) works better than wet marinades for oven-baked wings. Marinades add moisture, which fights crispiness. If you want flavor depth, dry brining with aromatics like garlic powder and herbs does the job without the moisture problem.
How do I know when wings are done?
Use a meat thermometer. The thickest part of the meat should reach 165°F. Visually, skin should be deep golden brown and crispy-looking. If you don’t have a thermometer, cut into the thickest drumette—meat should be white throughout with no pink.
Can I cook frozen wings?
Thaw them first for best results. Frozen wings take significantly longer and cook unevenly. If you’re in a pinch, thaw under cold running water (30-45 minutes) or in the microwave. Pat completely dry before cooking—frozen wings release extra moisture as they thaw.
What’s the best wire rack for wings?
Any standard wire cooling rack works. Some people prefer half-sheet-sized racks that fit standard baking sheets. Look for sturdy construction that won’t wobble. Nonstick coating is nice but not essential—just give it a light spray before use.


