
Learning how to clean whiteboard surfaces properly can save you hours of frustration and keep your writing space looking fresh and functional. Whether you’re dealing with stubborn permanent marker stains, ghosting from dried-out markers, or just everyday buildup, I’ve got you covered with battle-tested methods that actually work.
Table of Contents
Why Whiteboards Get Dirty
Before diving into solutions, let’s understand what’s actually happening to your whiteboard. When you write with dry erase markers, the pigment sits on the surface rather than absorbing into it. Over time, marker residue builds up, and if you use permanent markers by accident (we’ve all been there), you’re looking at a real problem. The glossy surface of whiteboards can also attract dust and fingerprints, making them look dingy even when they’re relatively clean.
The key difference between a whiteboard that looks brand new and one that looks tired is regular maintenance. Think of it like how to remove battery corrosion—prevention is always easier than cure. Small cleaning habits now prevent major headaches later.
Method 1: Isopropyl Alcohol Solution
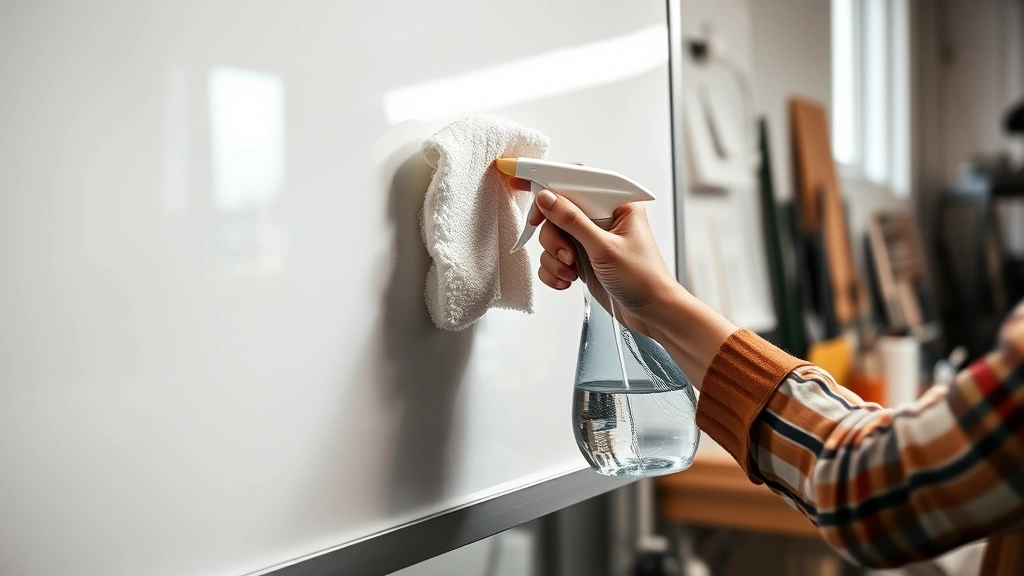
This is my go-to method, and honestly, it’s the most reliable for tackling stubborn marks. Grab a bottle of 70% or 90% isopropyl alcohol from any pharmacy or hardware store. The higher concentration works faster, but it also evaporates quicker, so work with purpose.
Here’s the process: Pour a small amount of isopropyl alcohol onto a soft cloth or coffee filter (coffee filters are surprisingly effective). Wipe the entire whiteboard surface in circular motions, focusing on heavily marked areas. You’ll see the residue dissolve right before your eyes. For permanent marker stains, let the alcohol sit for 30 seconds before wiping. Finish with a dry cloth to prevent streaking.
The reason this works so well is that alcohol breaks down the polymer binders in marker pigments. It’s the same principle used in professional cleaning services. One important note: make sure your room is well-ventilated, and keep the solution away from electronics or sensitive surfaces nearby.
Method 2: Commercial Whiteboard Cleaner
If you want the easiest route, commercial whiteboard cleaners like Clorox Whiteboard Cleaner or Expo Dry Erase Board Cleaner are specifically formulated for this job. These products combine solvents with lubricants that protect the board’s finish while cleaning.
Spray the cleaner directly onto the board or onto a cloth, then wipe in broad strokes. Most commercial cleaners dry streak-free and leave a protective coating that makes future cleaning easier. The convenience factor is real here—no mixing, no measuring, just spray and wipe. They’re also safer for people sensitive to alcohol fumes.
The downside? Cost adds up if you clean frequently. A bottle typically runs $5-10 and lasts a few months depending on usage. For home offices or classrooms with heavy use, this might be worth budgeting for.
Method 3: Dry Erase Marker Trick
This one sounds counterintuitive, but it works beautifully. Use a fresh dry erase marker to write over the ghosted or stubborn marks, then immediately erase everything together with a standard eraser. The fresh marker’s solvents reactivate the old pigments, making them easier to lift off.
This method works best for ghosting—those faint marks that remain after erasing. It’s also perfect if you don’t have cleaning supplies on hand. Just grab any dry erase marker and go to town. The technique is especially useful in office settings where you might not have access to alcohol or commercial cleaners.
One caveat: this won’t work on permanent marker stains. For those, you’ll need one of the other methods. But for regular maintenance and light buildup, this trick saves time and money.
Method 4: Vinegar & Water Solution
If you prefer natural cleaning solutions, white vinegar is your answer. Mix equal parts white vinegar and water in a spray bottle. The acidity in vinegar cuts through residue without the harshness of alcohol or commercial chemicals.
Application: Spray the solution onto your whiteboard and let it sit for a minute. Wipe with a soft cloth, using circular motions on stubborn spots. The vinegar smell dissipates quickly, and your board will be clean and streak-free. This method is particularly good if you have kids or pets around and want to minimize chemical exposure.
Vinegar also has natural antimicrobial properties, so you’re actually sanitizing as you clean. It’s similar in principle to how people tackle tough household cleaning jobs—the acidity does the heavy lifting. Just like maintaining your home’s cleanliness, consistent whiteboard care prevents the need for aggressive cleaning later.
Method 5: Baking Soda Paste
For the most stubborn, set-in stains, baking soda paste is your heavyweight. Mix three parts baking soda with one part water to create a thick paste. The mild abrasive nature of baking soda removes marks without scratching the whiteboard surface.
Apply the paste to problem areas and gently rub with a soft cloth in circular motions. Let it sit for 2-3 minutes on really tough marks. Wipe clean with a damp cloth, then dry thoroughly. This method is slower than the others but incredibly effective on permanent marker stains that have been sitting for weeks.
The key is using a soft cloth—never use steel wool or harsh scrubbers that can damage the board’s finish. Baking soda is gentle enough for regular use but abrasive enough to actually remove ingrained marks. It’s also incredibly cheap and safe for everyone around you.
Preventing Permanent Damage
The best cleaning method is prevention. Establish a strict “dry erase markers only” policy around your whiteboard. Mark permanent markers with tape or store them separately so they never accidentally get used on the board.
Invest in quality dry erase markers—cheap ones leave more residue and are harder to erase completely. Store markers cap-up in a cup rather than in a drawer where caps might get lost. A marker with a dried-out or missing cap will start to clog and perform poorly.
Keep your whiteboard away from direct sunlight and extreme temperature changes. UV exposure can fade the surface and make it more susceptible to staining. If your board is in a high-traffic area, consider protecting it with a clear acrylic cover when not in use.
Think of whiteboard maintenance like caring for any tool—a little preventive effort saves major headaches. It’s the same mindset you’d apply to how to adjust door hinges before they start squeaking, rather than waiting until they’re damaged.
Weekly Maintenance Schedule
Establish a routine to keep your board in top condition. Daily: After your last use, do a quick wipe with a dry eraser to remove all marks completely. Don’t leave marks sitting overnight—they set in and become harder to remove.
Weekly: Use the dry erase marker trick or a quick alcohol wipe to address any ghosting or light buildup. This takes five minutes and prevents major cleaning sessions.
Monthly: Do a thorough cleaning using your preferred method from the five above. This removes accumulated dust and keeps the surface looking fresh.
Quarterly: Deep clean with isopropyl alcohol or commercial cleaner, paying special attention to edges and corners where dust collects.
This schedule prevents the situation where your whiteboard becomes so dirty you dread using it. Consistency is everything—a few minutes of regular maintenance beats hours of frustrated scrubbing later.
Frequently Asked Questions
Can I use regular markers on a whiteboard?
No. Only dry erase markers should be used on whiteboards. Permanent markers, Sharpies, and regular markers will stain the surface and are extremely difficult to remove. If you accidentally use a permanent marker, act quickly—the longer it sits, the more it sets into the surface. Use isopropyl alcohol immediately for best results.
Will cleaning damage my whiteboard?
Not if you use the right methods. Avoid harsh scrubbers, steel wool, or abrasive sponges. Soft cloths, coffee filters, and microfiber cloths are your friends. All five methods mentioned above are safe for whiteboard surfaces when applied correctly. The surface is tougher than you think.
What’s the fastest way to clean a whiteboard?
The dry erase marker trick is fastest for light cleaning. For more stubborn marks, commercial whiteboard cleaner is your quickest option—just spray and wipe. Isopropyl alcohol is slightly slower but more effective on permanent stains. Choose based on what you’re dealing with.
Can I use Lysol or disinfectant wipes?
While they might remove some marks, they’re not ideal. Disinfectant wipes often leave residue and can dull the whiteboard surface over time. Isopropyl alcohol or vinegar solutions are better choices that clean and dry cleanly. If you need disinfection, use alcohol-based solutions instead.
Why does my whiteboard still have marks after erasing?
That’s ghosting—residual pigment left on the surface. It happens with lower-quality markers or when marks sit for extended periods. The dry erase marker trick works well here, or a quick wipe with isopropyl alcohol. Regular weekly cleaning prevents ghosting from becoming a chronic problem.
Is it normal for whiteboards to yellow over time?
Yes, especially if exposed to sunlight or stored in humid conditions. This isn’t dirt—it’s surface degradation. You can’t reverse yellowing, but you can slow it with UV protection and proper storage. This is why placement matters as much as cleaning.


