
Learning how to clean fuel injectors is one of those maintenance tasks that’ll save you hundreds at the mechanic shop and keep your engine running like it just rolled off the lot. Over time, fuel injectors get gunked up with carbon deposits, varnish, and all sorts of nasty buildup that messes with your fuel spray pattern and efficiency. The good news? You don’t need a fancy diagnostic computer or a degree in automotive engineering to tackle this yourself.
In this guide, I’m walking you through five proven steps that actually work, whether you’re dealing with a stubborn old sedan or a newer fuel-injected engine. We’ll cover everything from the tools you’ll need to the exact process that’ll have your injectors firing clean again.
Table of Contents
Why Injectors Get Clogged
Your fuel injectors spray a fine mist of gasoline into the combustion chamber with precision timing. But that fuel isn’t always pure—it picks up water, sediment, and deposits from the tank. Over thousands of miles, these contaminants build up on the injector nozzle, creating carbon deposits that restrict fuel flow. The result? Rough idle, poor fuel economy, hesitation during acceleration, and that check engine light staring at you from the dashboard.
The problem gets worse in older vehicles or if you’re running cheap gas. Quality fuel additives help, but they’re not a magic cure-all. Eventually, most injectors need actual cleaning to restore their spray pattern and atomization.
Tools and Materials You’ll Need
Before you crack open your engine bay, gather these essentials:
- Fuel injector cleaning kit (ultrasonic or pressurized system)
- Socket set and wrenches (various sizes)
- Screwdrivers (Phillips and flathead)
- Fuel line disconnect tool (prevents spills)
- Gasket scraper (plastic, to avoid damage)
- New fuel injector O-rings (replacement set)
- Shop towels and rags
- Safety glasses and gloves
- Fuel-safe container (for catching residual fuel)
- Torque wrench (for proper reassembly)
The cleaning kit is your MVP here. You can rent ultrasonic cleaners from most auto parts stores, or buy a pressurized cleaning system that attaches to your fuel rail. Both work great—the ultrasonic method is more thorough, but the pressurized system is faster and less invasive.
Step 1: Preparation and Safety
Start by parking on level ground and letting the engine cool completely. Working on a hot engine is asking for burns and fuel vapor issues. Disconnect the negative terminal of your battery—this kills power to the fuel pump and prevents accidental starting.
Pop the hood and locate your fuel rail. This is the metal tube that supplies fuel to all your injectors. Take a photo with your phone of the fuel line connections and electrical connectors before you touch anything. Trust me, you’ll thank yourself when reassembly time comes.
Relieve the fuel system pressure by locating the fuel pressure relief valve (usually on the fuel rail) and pressing it gently with a wrench while holding a rag underneath to catch any spray. Some vehicles have a Schrader valve similar to a tire valve stem. A little residual fuel will drip—that’s normal.
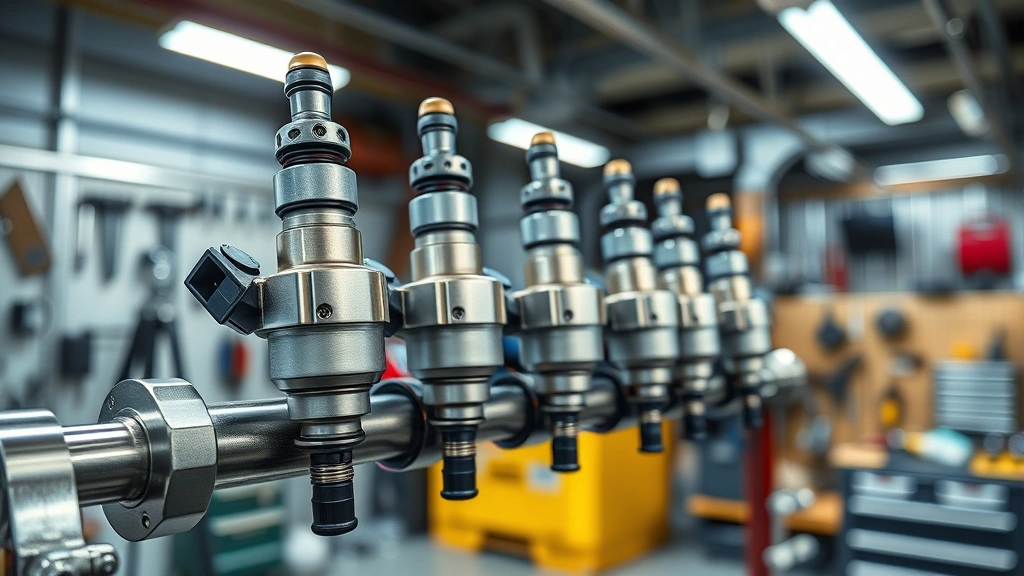
Step 2: Access Your Injectors
Now you need clear access to your fuel rail and injectors. Depending on your vehicle, this might mean removing the intake manifold cover, air filter box, or various hoses. Take your time here and document everything with photos.
Unbolt the fuel rail from the engine block. You’ll typically find three to six bolts holding it in place. Remove these carefully and set them aside in a labeled container. Don’t yank the rail—wiggle it gently side to side until the injectors slide free from their ports. If they’re stuck, a light tap with a plastic mallet helps without damaging anything.
This is also a good time to inspect the fuel filter while you’ve got the system open. If it looks clogged or hasn’t been changed recently, swap it out now. A clean filter prevents future injector problems, similar to how regular maintenance keeps other systems running smoothly—much like the preventive care discussed in our brake pad replacement guide.
Step 3: Remove the Injectors
With the fuel rail out, you can now remove individual injectors. Each injector has an electrical connector on top—unplug these first. Then, carefully twist and pull each injector straight out of its port. They’re held in by friction and sometimes a small clip.
As you remove each injector, inspect the rubber O-ring around the base. These seals deteriorate over time and lose their ability to prevent fuel leaks. This is your chance to replace them with fresh ones. Slide the old O-ring off and install a new one lubricated with a tiny bit of clean fuel.
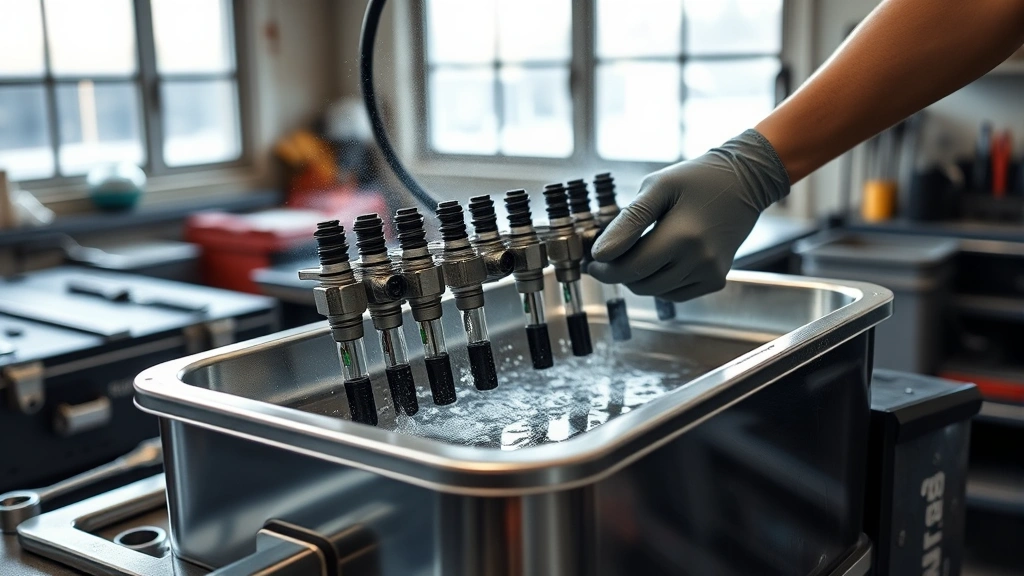
Place removed injectors in a clean container and don’t let them dry out completely. If you’re using an ultrasonic cleaner, you’ll submerge them in cleaning solution. If you’re using a pressurized system, you’ll reinstall them into a test fixture that connects to the cleaning unit.
Step 4: Deep Clean Process
This is where the magic happens. If you rented an ultrasonic cleaner, fill it with the recommended cleaning solution (usually a specialized fuel injector cleaning fluid), set the temperature to around 160°F, and submerge your injectors for 15-30 minutes depending on how cruddy they are.
The ultrasonic vibrations literally shake the carbon deposits loose from the nozzle tips and internal passages. You’ll see the solution turn dark as contamination releases. After the initial soak, run a second cycle with fresh solution for another 10-15 minutes to ensure complete cleaning.
If you’re using a pressurized cleaning system, you’ll install the injectors into a test stand that pressurizes cleaning solvent through them at fuel-system pressure. This simulates actual operating conditions and blasts deposits out. Run each injector through the cycle until the spray pattern looks clean and uniform.
Inspect each injector under a light when done. The nozzle tip should be shiny and free of black deposits. If you see stubborn buildup, repeat the cleaning cycle. Don’t rush this step—thorough cleaning is what separates a successful job from one that leaves you with the same problems.
Step 5: Reinstall and Test
Once your injectors are sparkling clean, it’s time to put everything back together. Install each injector back into the fuel rail, making sure the new O-ring seats properly. Push straight in until you feel it click or seat fully. Then reconnect the electrical connectors—they only fit one way, so you can’t mess this up.
Carefully guide the fuel rail back into position and install the bolts finger-tight first. Then use your torque wrench to tighten them to the manufacturer’s specification (usually 15-25 ft-lbs, but check your service manual). Don’t over-tighten—you’ll crack the rail.
Reconnect all fuel lines using your fuel line disconnect tool to ensure proper seating. Reattach the negative battery terminal. Prime the fuel pump by turning the key to the ‘On’ position for a few seconds without starting (you’ll hear the pump whine briefly), then turn it off. Repeat this two or three times to build fuel pressure.
Now fire up the engine. It might run rough for a few seconds as it adjusts to the newly cleaned injectors, but it should settle into a smooth idle within 30 seconds. Take it for a test drive and feel the difference—smoother acceleration, better fuel economy, and that satisfying responsiveness you’ve been missing.
Signs Your Injectors Need Cleaning
Don’t wait for total failure. Watch for these warning signs that your fuel injectors are getting clogged:
- Rough idle: Engine shakes or vibrates at stoplights
- Poor fuel economy: Noticeably worse MPG than usual
- Hesitation during acceleration: Lag when you press the gas pedal
- Check engine light: Often triggered by lean-running conditions caused by restricted fuel flow
- Hard starting: Engine cranks but takes longer to fire up
- Misfire: You feel a skip or stumble while driving
Some of these symptoms overlap with other issues (bad spark plugs, air leaks, etc.), but if you’ve ruled those out, dirty injectors are likely the culprit. A fuel system cleaning is often the first thing a good mechanic recommends before diving into more expensive diagnostics.

Prevention Tips for Long-Term Health
Once you’ve done the hard work of cleaning your injectors, keep them clean:
- Use quality fuel: Top-tier gasoline from major brands contains better detergents. Yes, it costs a bit more, but it’s cheap insurance.
- Add fuel system cleaner regularly: Bottles of fuel additive (like Techron or Chevron Techron) run $10-15 and help prevent buildup between cleanings.
- Replace your fuel filter: A clogged filter forces injectors to work harder. Change it every 15,000-30,000 miles depending on your vehicle.
- Keep your tank above a quarter full: Running too low draws sediment from the tank bottom into your fuel system.
- Avoid ethanol-blended fuel if possible: Ethanol attracts water and promotes gum formation. Straight gasoline is cleaner.
These preventive measures are similar to the maintenance approach we discuss when covering other automotive systems. Just as regular care prevents brake issues covered in our car painting guide, fuel system maintenance prevents injector problems.
Frequently Asked Questions
Can I clean fuel injectors without removing them?
Partially. You can add fuel system cleaner to your tank, which helps prevent new buildup and dissolves minor deposits. However, for serious carbon accumulation, you need to remove and soak them in an ultrasonic cleaner or pressurized system. The additive approach is maintenance, not a deep clean.
How often should I clean my fuel injectors?
Most vehicles need cleaning every 50,000-100,000 miles, depending on fuel quality and driving conditions. If you use quality gasoline and add fuel system cleaner regularly, you might stretch it to 100,000 miles or more. City driving and cheap gas shortens the interval.
Is it cheaper to replace injectors than clean them?
Usually not. A set of fuel injectors costs $300-1000+ depending on your vehicle, while a DIY cleaning costs $50-150 in supplies. Even paying a shop to clean them ($150-300 per injector) is cheaper than replacement. Only replace injectors if they’re damaged or won’t respond to cleaning.
What’s the difference between ultrasonic and pressurized cleaning?
Ultrasonic cleaners are more thorough—they use vibration to shake deposits loose. Pressurized systems are faster and closer to real-world operating conditions. Both work well. Ultrasonic takes 30-60 minutes total; pressurized takes 15-30 minutes.
Do I need a torque wrench to reinstall the fuel rail?
Yes, if you want to do it right. Over-tightening cracks the fuel rail; under-tightening causes fuel leaks. A torque wrench costs $20-50 and takes the guesswork out. Your service manual has the exact spec—usually 15-25 ft-lbs.
Can a clogged fuel filter cause the same symptoms as dirty injectors?
Yes, absolutely. A clogged filter restricts fuel flow and causes rough idle, hesitation, and poor economy. Always check and replace your fuel filter first before assuming it’s the injectors. It’s the easier fix and often solves the problem.
Wrapping It Up
Cleaning your fuel injectors is a manageable DIY project that delivers real results. You’ll save money compared to shop rates, learn something about your vehicle’s fuel system, and enjoy the satisfaction of fixing the problem yourself. Whether you go the ultrasonic route or use a pressurized cleaning system, the key is patience and attention to detail during reassembly.
Start with preparation and safety, take photos as you go, clean thoroughly, and reinstall carefully with new O-rings. Your engine will reward you with smooth running, better fuel economy, and the kind of performance that makes driving enjoyable again. And once you’ve got the fuel system dialed in, you’ll appreciate how all these maintenance tasks work together to keep your vehicle running right—from keeping your brakes in shape to maintaining clean fuel injectors.


