
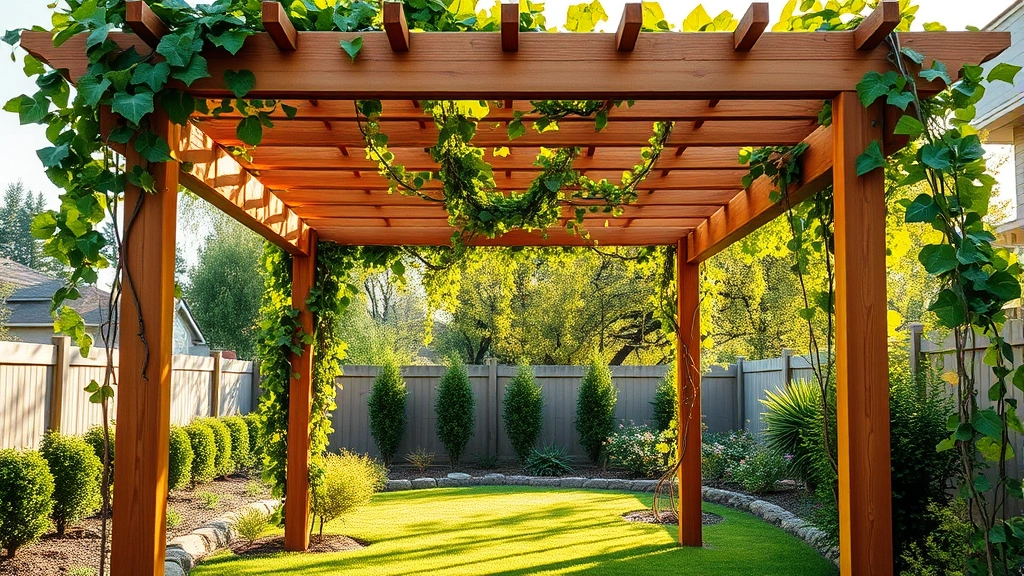
Learning how to build a pergola is one of those rewarding DIY projects that transforms your backyard into an actual destination. Whether you’re looking for shade, privacy, or just a spot to grow climbing vines, a pergola delivers on all fronts. The best part? You don’t need to be a master carpenter to pull this off. With some basic tools, decent lumber, and a weekend or two, you’ll have a structure that looks like you hired a professional.
Table of Contents
Planning and Site Selection
Before you touch a single board, spend time figuring out where your pergola actually needs to live. Walk around your yard at different times of day and observe how the sun moves across your space. You want to position your pergola where it’ll provide afternoon shade without blocking morning light if that matters to you. Check for existing trees, power lines, and underground utilities—seriously, call your local utility locating service. It’s free and prevents disasters.
Sketch out your design on paper or use simple measurements. Most beginner pergolas range from 8×8 feet to 12×12 feet—manageable sizes that don’t require engineering degrees. Measure your space twice, three times if you’re being honest. Mark the corners with stakes and string to visualize the footprint. This step saves you from expensive mistakes later.
Gathering Materials and Tools
You’ll need pressure-treated lumber for posts (4×4 is standard), 2×10 or 2×12 boards for beams, and 2×6 boards for rafters. Cedar or redwood look nicer if budget allows, but pressure-treated works fine and lasts longer. Calculate your exact lumber needs based on your pergola dimensions—most home improvement stores have calculators on their websites.
Essential tools include a circular saw, drill-driver, level, measuring tape, post hole digger (rent one—your back will thank you), concrete mix, and a square. You’ll also want safety gear: work gloves, safety glasses, and a dust mask. Don’t cheap out on the level; it’s worth every penny for keeping things square and true.
A helpful resource for understanding tool selection is checking out equipment guides, though for this project, you mainly need the basics listed above. Visit Family Handyman’s pergola guide for detailed material lists specific to different sizes.
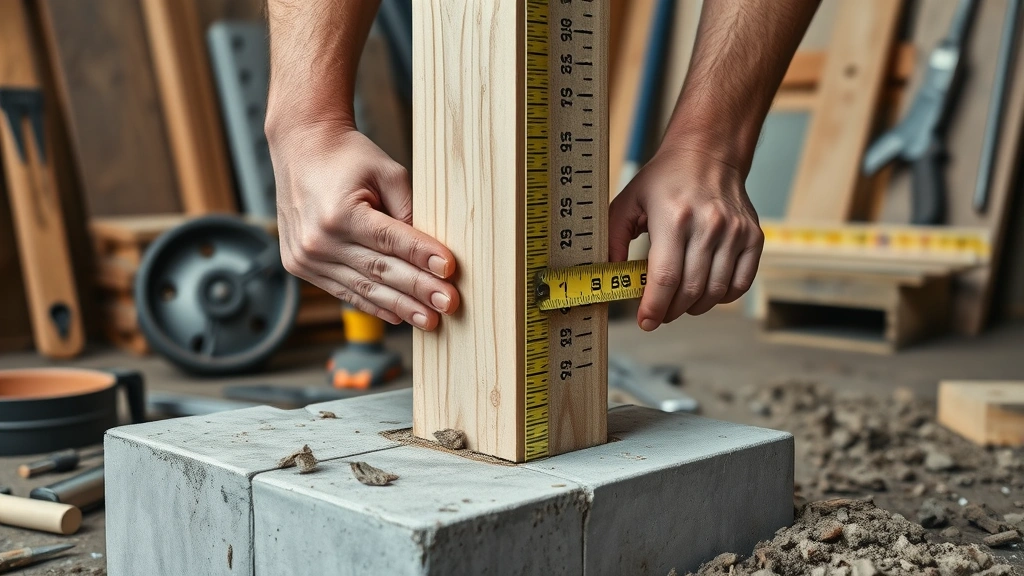
Building the Foundation Posts
This is where your pergola’s stability comes from, so don’t rush it. Mark your post locations at each corner, and if building a larger structure, add intermediate posts every 6-8 feet along the sides. Dig holes 2-3 feet deep—deeper in colder climates where frost heave is an issue. The general rule: go one-third the height of your post into the ground.
Set your 4×4 posts in the holes and brace them temporarily with scrap wood and stakes. Pour concrete around each post, making sure it’s level before the concrete sets. Use your level constantly—this is the foundation of everything above. Let concrete cure for 48 hours before proceeding. Yes, it’s boring to wait, but rushing this step means a wonky pergola that bugs you for years.
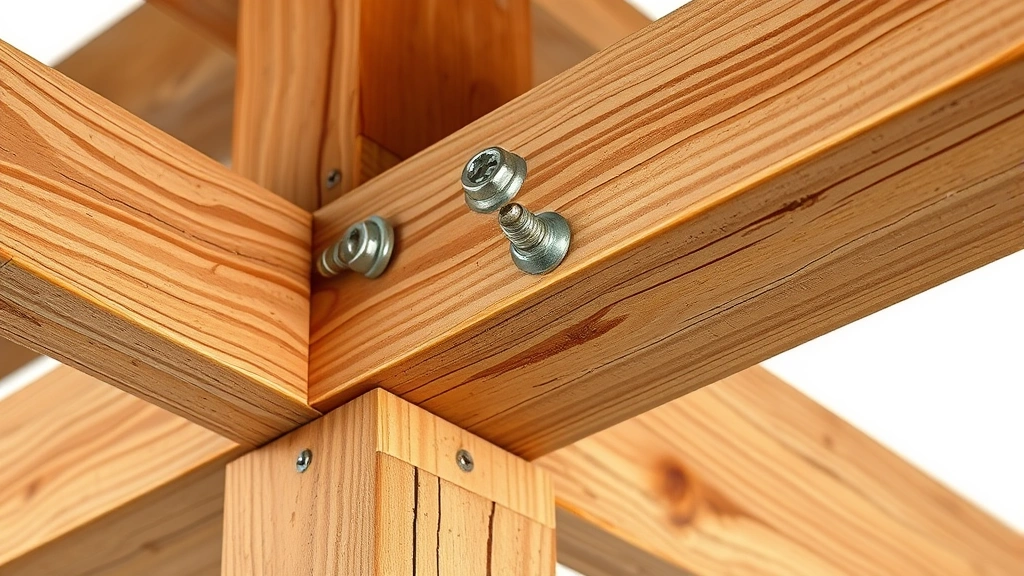
Installing Beams and Rafters
Once posts are solid, attach your main beams (2×10 or 2×12 boards) to the tops of the posts using lag bolts or heavy-duty brackets. Make sure these are level side-to-side and front-to-back. This is where that level becomes your best friend. Secure everything with galvanized or stainless steel fasteners to prevent rust and staining.
Next comes the rafter grid—the horizontal boards running perpendicular to your beams. Space these 12-18 inches apart depending on how much shade you want. Closer spacing blocks more sun but reduces airflow. Mark your spacing on the beams before cutting rafters to length, then attach them with 3-inch deck screws or bolts. Make sure everything is square as you go; it’s much easier to fix now than after you’ve fastened everything.
This Old House has excellent step-by-step photos showing proper rafter installation techniques that really help visualize the process.
Adding Finishing Touches
Sand down any rough edges and splinters, especially on surfaces where people will brush against them. If you’re using pressure-treated lumber, let it weather for a few months before staining or sealing—the treatment chemicals need time to stabilize. Once weathered, apply a quality exterior wood stain or sealant every 2-3 years to maintain appearance and longevity.
Consider adding decorative elements like curved rafter tails, lattice panels on the sides for privacy, or hooks for hanging planters and lights. These details transform a basic structure into something that looks intentional and finished. Just remember: every addition should serve a purpose or enhance the design, not just add clutter.
Common Mistakes to Avoid
The biggest mistake beginners make is skipping the concrete foundation work. Posts sitting on dirt will rot and shift, creating a safety hazard. Another common error is using undersized lumber—2x4s for beams might seem cheaper, but they’ll sag under their own weight or snow load. Your pergola needs to be structurally sound, not just look pretty.
Don’t forget about drainage either. If your pergola will sit in a low spot that collects water, you’re asking for rot and pest problems. Grade the soil away from your posts and ensure water runs away from the structure. Also, avoid using regular untreated lumber unless you’re replacing it every 3-4 years. Pressure-treated or naturally rot-resistant woods are worth the investment.
Maintenance and Longevity
A well-built pergola can last 15-20 years with minimal maintenance. Inspect it annually for signs of rot, particularly at ground level where moisture accumulates. Check fasteners to make sure nothing’s come loose, and clear debris from the rafter grid so water doesn’t pool. If you notice soft spots in the wood, that’s early rot—address it immediately by cutting out the damaged section and splicing in new wood.
Stain or seal your pergola every 2-3 years depending on your climate and wood type. This protects against UV damage and moisture penetration, which are the primary enemies of outdoor wood structures. A little preventive maintenance beats replacing an entire post years down the road.
Design Variations Worth Considering
Once you understand the basics of how to build a pergola, you can experiment with different styles. A louvered pergola has adjustable slats that open and close, giving you control over shade and sun exposure. An attached pergola connects to your house, saving you from building one full side. A curved or arched design looks stunning but requires more advanced carpentry skills.
You might also consider building a pergola over a patio or deck area, or positioning it to frame a view. Some people add a retractable shade cloth or install climbing vines like clematis or grape vines for natural cooling. The structural principles remain the same; you’re just adjusting the design to fit your specific needs and aesthetic preferences.
Bob Vila’s pergola designs showcase various styles that might inspire your own project.
Frequently Asked Questions
How long does it take to build a pergola?
A basic 10×10 pergola typically takes 2-3 days for one person working at a comfortable pace. If you’re working with a helper, you can cut that down to a weekend. The longest part is usually the concrete curing time, which you can’t rush.
Do I need a building permit for a pergola?
Requirements vary by location. Some jurisdictions require permits for any permanent structure, while others only require them if the pergola exceeds a certain size or height. Check with your local building department before starting—it’s worth the phone call to avoid fines or having to tear it down.
What’s the best wood for a pergola?
Pressure-treated lumber is affordable and lasts 15+ years. Cedar and redwood are naturally rot-resistant and age beautifully but cost more. Tropical hardwoods like ipe are extremely durable but expensive and difficult to work with. For most beginners, pressure-treated is the practical choice.
Can I build a pergola on concrete?
Yes, but you’ll need to use post brackets bolted to the concrete instead of digging holes. This works well for patios and decks. Make sure your concrete is in good condition and level before installing brackets.
How much shade does a pergola provide?
A standard pergola with 12-18 inch rafter spacing provides dappled shade—enough to reduce direct sun but not complete shade. If you want more shade, decrease rafter spacing, add a shade cloth, or plant climbing vines. For full shade, you’d want a solid roof, which is technically a gazebo or pavilion.
Should I treat my pergola with stain or paint?
Stain is generally better for pergolas because it shows the wood grain and doesn’t peel like paint does. Exterior-grade stain penetrates the wood and provides protection while allowing it to weather naturally. If you want a specific color, use exterior wood stain rather than paint.
Final Thoughts
Building a pergola is a legitimate DIY victory that you’ll enjoy every single time you step outside. The process teaches you fundamental carpentry skills—measuring, leveling, fastening—that transfer to other projects. Start with a simple rectangular design, focus on getting the foundation solid, and take your time with the installation. A pergola built right becomes part of your home’s character and adds real value to your outdoor space. You’ve got this.


