
Learning how to bake chicken drumsticks is one of those kitchen skills that feels fancy but is honestly dead simple—and once you nail it, you’ll be making them constantly. The trick isn’t some secret ingredient or complicated technique; it’s understanding how heat, seasoning, and timing work together to deliver drumsticks that are crispy on the outside, juicy on the inside, and packed with flavor.
Table of Contents
Choosing Quality Drumsticks
Start at the source. Not all drumsticks are created equal, and the quality you bring home directly impacts your final result. Look for drumsticks that feel firm and have skin that’s intact without tears or discoloration. Pale pink skin is what you want—avoid anything that looks gray or has dark spots.
Size matters too. Aim for drumsticks in the 3-4 ounce range if you can find them. Smaller ones cook faster and more evenly, while those massive drumsticks sometimes end up with overcooked skin and undercooked meat near the bone. If you’re buying from the butcher counter, ask them to grab you medium-sized ones—they’ll know what you mean.
Fresh versus frozen? Fresh is ideal, but frozen drumsticks work fine if you thaw them properly in the refrigerator overnight. Never thaw at room temperature—that’s asking for trouble with food safety.
Prep and Seasoning Strategy
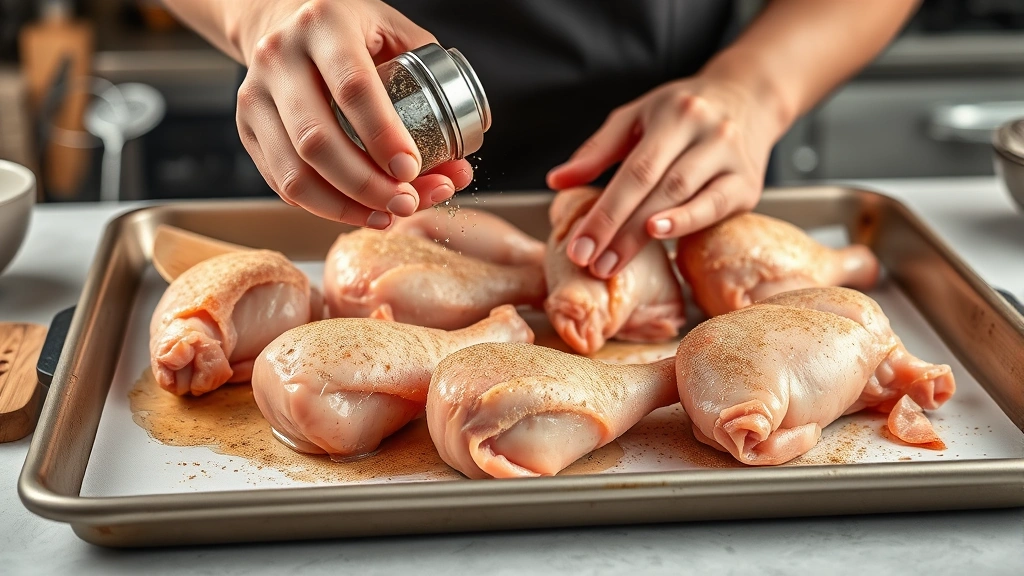
Pat your drumsticks completely dry with paper towels. This is non-negotiable if you want crispy skin. Moisture is the enemy of crispiness, so don’t skip this step. Once they’re dry, let them sit at room temperature for about 20 minutes before seasoning. Cold chicken straight from the fridge won’t cook as evenly.
For seasoning, keep it straightforward: kosher salt, black pepper, and garlic powder form the holy trinity. Use about 1 teaspoon of salt per pound of chicken, then add pepper and garlic powder to taste. Some folks like to add paprika for color and a subtle depth. The beauty of a simple seasoning approach is that you taste the chicken, not the rub.
Don’t be shy with seasoning—chicken needs it. Get the seasoning under the skin where you can, and make sure every surface gets coated. This is where your hands come in handy; massage the seasoning in and really work it into the meat.
Getting Oven Temperature Right
Temperature is where most home cooks go wrong with baked chicken. You need 425°F for drumsticks. Not 375°F, not 400°F—425°F. This temperature is hot enough to render the fat in the skin and get it crispy while still giving the meat time to cook through without drying out.
Make sure your oven is fully preheated. This takes about 15 minutes for most ovens, but if you have an older oven, give it 20. An oven thermometer is worth its weight in gold here; just set it on the rack where you’ll be cooking and verify the temperature before you put the drumsticks in.
Oven placement matters. Position your rack in the lower-middle section of the oven. This gives the drumsticks good heat from below while preventing the tops from burning. If your oven has hot spots (and most do), you might need to rotate the pan halfway through cooking.
The Baking Process Explained
Arrange your drumsticks on a sheet pan lined with foil or parchment paper. Don’t crowd them—they need space between each piece so air can circulate. If they’re touching, you’ll steam them instead of bake them, and steamed chicken is nobody’s goal.
Place the pan in your preheated 425°F oven. Set a timer for 25 minutes. At the 25-minute mark, pull the pan out and check the skin color. It should be starting to brown. If it’s still pale, give it another 5 minutes before rotating.
Rotate the pan at the halfway point if your oven has hot spots. This ensures even cooking and browning. The total cooking time is typically 35-45 minutes depending on drumstick size, but size variation means you can’t rely on time alone.
Achieving Crispy Skin
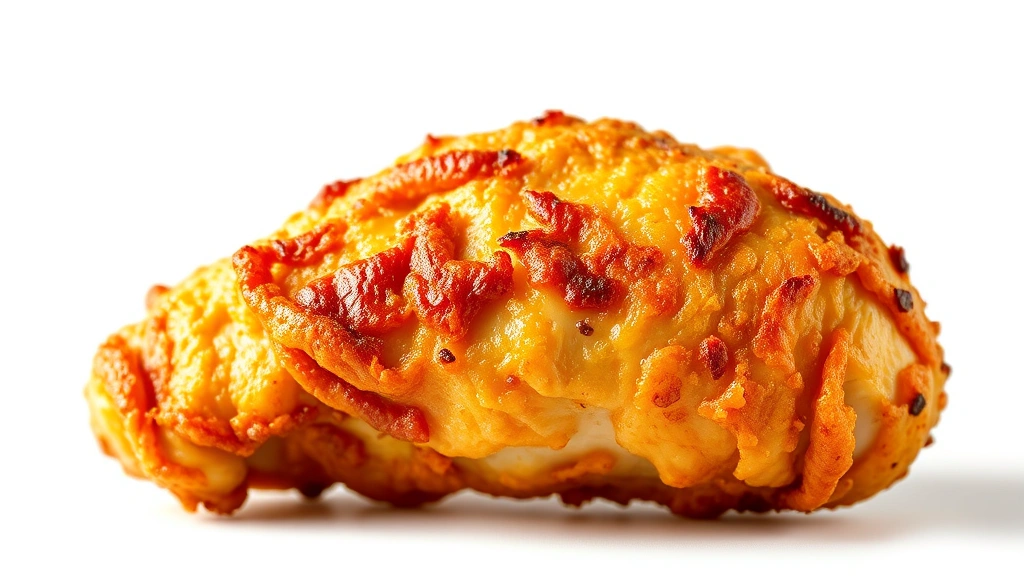
Crispy skin is the goal, and it requires understanding fat and heat. The skin has fat in it, and that fat needs to render out and crisp up. Here’s the secret: don’t use oil or butter on the skin. I know that sounds counterintuitive, but that fat in the skin is enough if you get the temperature right and cook long enough.
If you want to be extra sure about crispiness, try this move: after the drumsticks have cooked for about 30 minutes and the skin is starting to look golden, crank the oven to 500°F for the final 5-10 minutes. Watch them carefully—you want deep golden brown, not charred. This final blast of heat really crisps things up without drying out the meat.
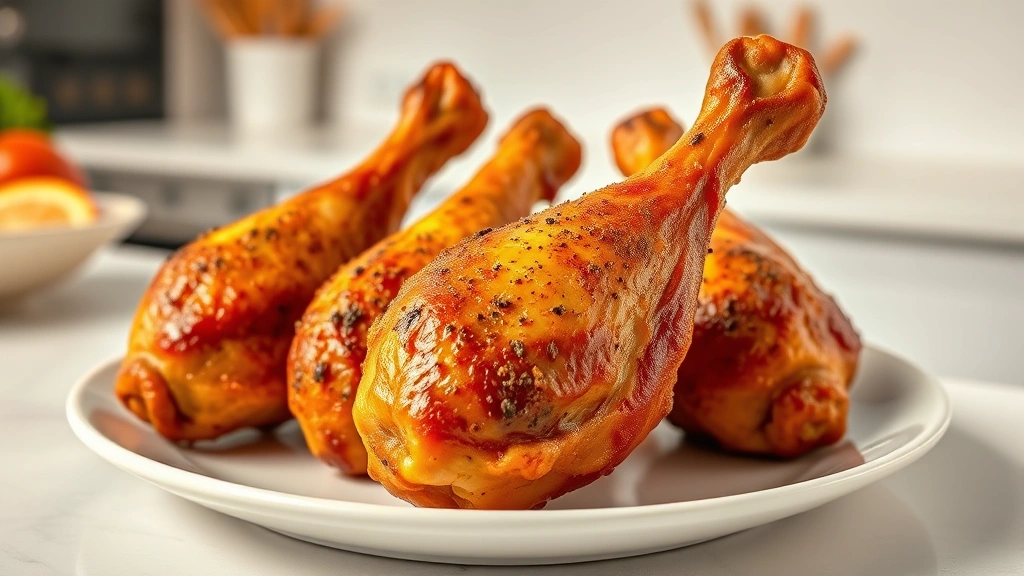
The skin should be so crispy it shatters when you bite into it. If it’s rubbery, you either didn’t cook it long enough or your oven temperature was too low. Make notes and adjust next time.
Checking for Doneness
Don’t rely on color alone—use a meat thermometer. Insert it into the thickest part of the largest drumstick without touching bone. You’re looking for 165°F internal temperature. This is the safe temperature for poultry according to food safety guidelines.
If you don’t have a thermometer, the old-fashioned method still works: pierce the thickest part with a fork or knife. The juices should run clear, not pink. If there’s any pink in the juices, the chicken needs more time.
Drumsticks cook unevenly because of their shape, so check multiple pieces. That one tiny drumstick might be done while the biggest one needs 5 more minutes. Pull them out when the smallest one hits 165°F, and the bigger ones will be perfect.
Resting and Serving
Here’s where patience pays off. Remove the drumsticks from the oven and let them rest for 5 minutes before serving. This allows the juices to redistribute through the meat instead of running all over your plate. It’s a short wait, but it makes a real difference in how juicy they taste.
Serve them right away while they’re still hot and the skin is still crispy. Cold baked drumsticks are fine for meal prep, but the magic happens when they’re fresh from the oven. Pair them with best summer recipes like fresh salads, or go with best fall recipes featuring roasted vegetables.
For sauce options, consider au jus recipes for a sophisticated dipping sauce, or keep things simple with hot sauce, barbecue sauce, or even just lemon wedges.
Flavor Variations to Try
Once you’ve mastered the basic technique, you can build on it. Try an Asian-inspired version with soy sauce, ginger, and sesame oil mixed into your seasoning. A Mediterranean approach uses oregano, lemon zest, and a touch of olive oil. Spice lovers can add cayenne, smoked paprika, and cumin for a Southwestern kick.
The technique stays the same; only the seasonings change. This is why nailing the basic method is so valuable—once you understand how to bake chicken drumsticks properly, you can apply any flavor profile you want.
Marinades work too, but keep them short—30 minutes to 1 hour maximum. Longer than that and the acid in the marinade can make the meat mushy. Pat the drumsticks dry after marinating before seasoning and baking.
Common Mistakes to Avoid
The biggest mistake is cooking at too low a temperature. People often think lower heat means juicier chicken, but that’s wrong. Low heat just gives you pale, rubbery skin and meat that takes forever to cook. Trust the 425°F temperature.
Crowding the pan is mistake number two. Drumsticks need space to bake properly. If you’re cooking for a crowd, use two pans or cook in batches. Your results will be better and you’ll actually save time because they’ll cook faster with proper air circulation.
Not patting them dry before cooking is another common error. Moisture prevents browning and crisping. Take the extra 30 seconds to dry them thoroughly.
Skipping the rest period means you lose all those juices. Five minutes might seem short, but it’s long enough for the residual heat to finish cooking the center while the juices settle. Don’t skip it.
Frequently Asked Questions
Can I bake frozen drumsticks without thawing?
Technically yes, but it’s not ideal. Frozen drumsticks need about 50-60 minutes at 425°F, and the cooking is less even. Thaw them overnight in the refrigerator for best results. It takes five minutes of planning and gives you dramatically better results.
Why are my drumsticks always dry?
You’re either cooking them too long or at too low a temperature. High heat (425°F) cooks them quickly so they don’t have time to dry out. Also, make sure you’re not overcooking—pull them at 165°F internal temperature, not 175°F.
Should I flip the drumsticks during cooking?
You don’t need to, but you can if you want. They cook fine without flipping. If you do flip them, do it just once at the halfway point. Flipping too much prevents proper browning.
Can I use a baking sheet without foil or parchment?
Sure, but foil or parchment makes cleanup way easier and prevents sticking. It’s not required for the cooking process, just for your sanity afterward.
How far in advance can I season the drumsticks?
Season them right before cooking for best results. If you season them hours ahead, the salt can start breaking down the proteins and make the texture weird. Fresh seasoning right before baking is the move.
What’s the best way to store leftovers?
Refrigerate in an airtight container for up to 4 days. They’re great cold straight from the fridge or reheated in a 350°F oven for about 10 minutes until warm.
Can I cook drumsticks on a grill instead?
Absolutely. Use medium heat (around 350-375°F) and cook for 30-40 minutes, turning occasionally. Grilling gives you slightly different flavor but the same basic approach applies.
Baking chicken drumsticks is genuinely foolproof once you understand the fundamentals. High heat, dry skin, proper seasoning, and patience—that’s the whole formula. You’ll be making these constantly because they’re cheap, reliable, and honestly delicious. Start with the basic technique, master it, then play around with seasonings and sauces. You’ve got this.


