
Getting how long to cook jalapeno poppers in oven right is the difference between crispy, golden perfection and soggy disappointment. I’ve made hundreds of these little guys, and I’m going to walk you through exactly what you need to know to nail it every single time.
Table of Contents
Prep Work Matters Most
Before we talk timing, let’s get real about prep. The foundation of great jalapeno poppers starts with selecting the right peppers. You want medium-sized jalapenos—not too small, not massive. Small ones cook too fast and can char before the filling gets hot. Big ones take forever and the pepper skin gets tough.
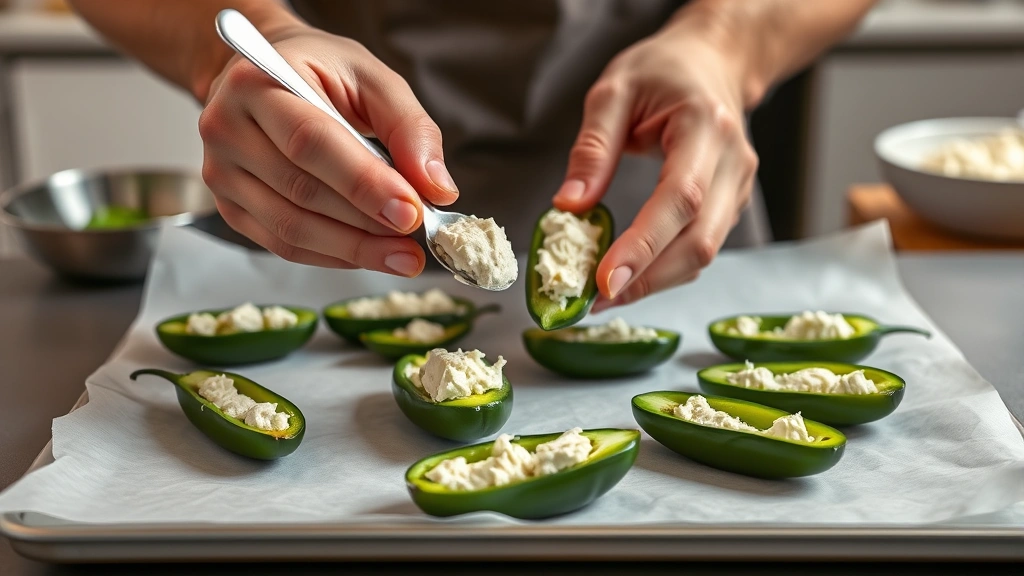
Here’s my process: I slice each jalapeno in half lengthwise, keeping the stem end intact so it acts like a little handle. Then I use a small spoon or melon baller to scoop out the seeds and white membrane. This is crucial because that white stuff is where most of the heat lives, and it can make your filling soggy if you leave it in.
Pat everything dry with paper towels. Moisture is your enemy when you’re trying to get a crispy exterior. I usually let the halves sit cut-side up on a paper towel for about 10 minutes while I prep the filling.
Oven Temperature Guide
Temperature is everything. Too low and your cheese melts but the pepper stays rubbery. Too high and the outside burns before the inside cooks through. The sweet spot is 375°F to 400°F.
I personally run mine at 385°F because it’s a nice middle ground. At this temperature, the pepper skin starts to blister and char just slightly, the cheese gets bubbly and golden, and the filling heats all the way through without any cold spots in the middle.
Make sure your oven is fully preheated. I mean fully—give it at least 15-20 minutes. A lot of people skip this step and wonder why their poppers cook unevenly. Your oven thermometer should be at target temperature before anything goes in.
Cooking Time Breakdown
At 385°F, standard-sized jalapeno poppers take 15 to 20 minutes to cook through completely. Here’s how to think about it:
Minutes 0-5: The cheese starts softening, the pepper begins to release moisture. Not much visible change yet.
Minutes 5-10: The cheese is getting bubbly, the pepper skin starts to show some char marks. The filling is warming up but not fully hot yet.
Minutes 10-15: The cheese is fully melted and starting to brown slightly. The pepper is getting tender. The filling should be hot throughout if you test it.
Minutes 15-20: Golden brown cheese, the pepper is soft but still holds its shape, and everything is piping hot. This is your target zone.
If you’re cooking at 375°F, add 2-3 minutes to these times. At 400°F, subtract about 2 minutes. Every oven is different, so the first batch is always a bit of an experiment.
Filling Variations Change Timing
Not all poppers are created equal. Your filling choice actually affects cooking time, and this is something most recipes gloss over.
Cream cheese only: This is the fastest filling. It’s already soft, so it just needs to heat through. Stick to the 15-20 minute range.
Cream cheese plus shredded cheddar: The shredded cheese takes slightly longer to melt evenly. You might need an extra minute or two, so aim for 17-22 minutes.
Cream cheese plus sausage: If you’re using cooked sausage crumbles, make sure they’re already cooked before stuffing. If you’re using raw sausage, you need to cook it all the way through, which can push you to 20-25 minutes depending on how much you stuff in there.
Cream cheese plus bacon: Bacon should be pre-cooked and crumbled. Same timing as the cheese-only version, around 15-20 minutes.
Cream cheese plus seafood: If you’re doing shrimp or crab, use cooked versions only. This doesn’t add much cooking time—stick with 15-20 minutes.
The key rule: if your filling ingredients need cooking, cook them first, then stuff them cold. Don’t try to cook raw ingredients inside the popper.
Checking for Doneness
Visual cues are your best friend here. You’re looking for three things:
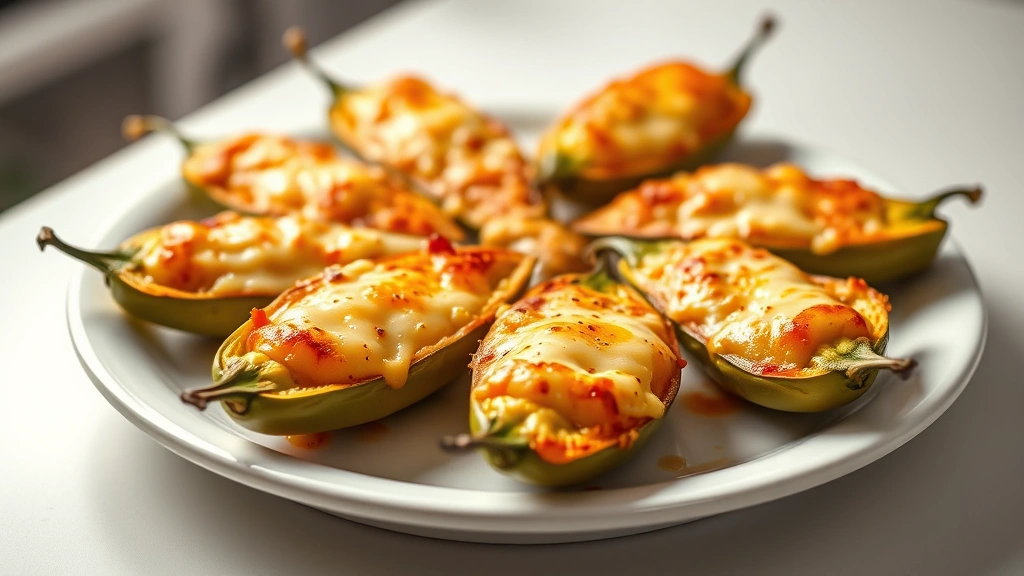
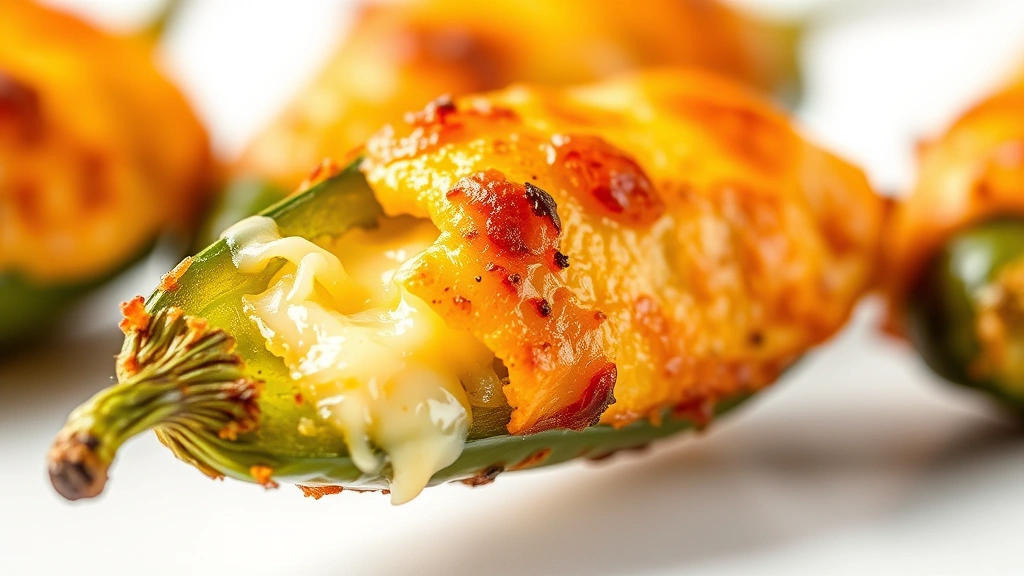
Cheese appearance: The cheese should be melted and bubbly, with golden-brown spots forming on top. If it’s still pale and flat, it needs more time. If it’s dark brown or black, you’ve gone too far.
Pepper skin: The skin should have some color change—either slight blistering or light charring. It should look like it’s been kissed by heat, not like it’s been through a fire.
Firmness test: Use a fork to gently press the thickest part of the pepper. It should give way easily but still hold its shape. If it’s mushy, you’ve overcooked it. If it feels firm and raw, keep going.
I also use the toothpick test for any poppers with meat filling. Insert a toothpick into the thickest part of the filling and hold it there for 3 seconds, then touch it to your inner wrist. If it’s hot, the filling is done. This is the only way to be 100% sure about internal temperature.
Pro Tips and Tricks
After making these hundreds of times, here are the tricks that actually work:
Line your baking sheet: Use parchment paper or aluminum foil. Poppers can stick, and cleanup is a nightmare if you don’t. Plus, the paper helps with even heat distribution.
Arrange them cut-side up: Never flip them or lay them on their side. Cut-side up means the cheese and filling get direct heat, and the pepper naturally cradles everything.
Space them properly: Leave about an inch between each popper. They need air circulation. Crowding them means uneven cooking and steaming instead of baking.
Use a wire rack: If you have a baking sheet with a wire rack, use it. This elevates the poppers slightly and lets heat circulate underneath. You’ll get crispier results.
Don’t cover them: No foil tent, no lid. You want the moisture to escape so the cheese browns properly.
Rotate halfway through: If your oven has hot spots (and most do), rotate the baking sheet 180 degrees at the 10-minute mark. This ensures even cooking.
For dinner recipes for picky eaters, jalapeno poppers are actually a great option because you can control the heat level by removing more seeds and using milder peppers.
Common Mistakes to Avoid
I see people mess this up in predictable ways. Let me save you the frustration:
Overstuffing: I get it—you want maximum filling. But overstuffed poppers don’t cook evenly. The pepper skin splits, the filling oozes out, and you end up with a mess. Fill them until you can see the filling, but not so much that it’s spilling out. Think generous but controlled.
Not drying the peppers: Wet peppers steam instead of bake. That moisture prevents the skin from getting any color and keeps the cheese from browning. Pat them dry and let them sit. This one change will improve your results dramatically.
Using cold filling: Room temperature filling cooks more evenly. If you’re making these ahead, let the filling come to room temperature before stuffing. Cold filling means you need longer cooking times, and by then the pepper is overdone.
Wrong oven rack position: Use the middle rack. Top rack and the cheese browns too fast while the inside stays cool. Bottom rack and the bottom burns before the top cooks. Middle is the Goldilocks zone.
Opening the oven door constantly: Every time you open that door, you drop the temperature and extend cooking time. Resist the urge to peek. Set a timer and trust it.
Storage and Reheating
Leftover poppers are actually great, and they reheat beautifully if you do it right.
Storing: Let them cool completely, then transfer to an airtight container. They’ll keep in the fridge for 3-4 days. You can also freeze them—either before or after cooking. If freezing raw, add 5-7 minutes to the cooking time.
Reheating: This is where most people mess up. Don’t microwave them (they get rubbery). Instead, preheat your oven to 350°F and bake them for 8-10 minutes until the cheese is warm and slightly bubbly again. This restores the texture.
For frozen poppers that were cooked before freezing, use 12-15 minutes at 350°F. For frozen raw poppers, bake at 385°F for 25-30 minutes.
An air fryer also works great for reheating. 350°F for 6-8 minutes and they’re perfect—crispy outside, warm inside.
Frequently Asked Questions
Can you cook jalapeno poppers at a higher temperature to speed things up?
Technically yes, but I don’t recommend it. At 425°F or higher, the cheese browns too fast and the pepper doesn’t cook through evenly. You end up with burnt cheese and crunchy peppers. Stick with 375-400°F and be patient. The extra 5 minutes is worth it.
How do you know if the filling is cooked through?
If your filling has meat or seafood, use the toothpick test I mentioned earlier. For cheese-only fillings, they’re done when the cheese is fully melted and bubbly—you can see it bubbling out slightly. The filling heats through faster than you’d think because the cheese conducts heat efficiently.
What’s the best cheese for poppers?
Cream cheese is the base you want—it’s smooth, creamy, and melts evenly. I mix it 50/50 with sharp cheddar for flavor. Monterey Jack works great too. Avoid soft cheeses like brie that can separate. Pre-shredded cheese works fine; just don’t use the stuff with anti-caking agents if you can help it.
Can you make poppers ahead of time?
Absolutely. Stuff them, arrange on a baking sheet, cover with plastic wrap, and refrigerate for up to 24 hours. When you’re ready to cook, add 2-3 minutes to the cooking time since they’re starting cold. You can also freeze them for up to 2 months and cook from frozen, adding 5-7 minutes.
Why are my poppers splitting open?
Two reasons: overstuffing or too high temperature. If you’re overstuffing, use less filling. If the temperature is too high, dial it back to 375°F. Also, make sure you’re removing enough seeds and membrane—the pepper needs room to expand as it cooks.
Should you blanch the peppers first?
You don’t need to, but some people do. Blanching for 2-3 minutes softens the pepper slightly and ensures it’s fully cooked. If you’re worried about peppers staying too firm, blanch them first, then stuff and bake. This adds about 5 minutes to your total time but guarantees tender peppers.


