
A harvest bowl recipe is your ticket to building nutrient-packed meals that taste like autumn in a bowl. Whether you’re meal prepping for the week or looking for a quick weeknight dinner, these colorful, veggie-forward bowls deliver serious flavor without the fuss. I’m talking roasted vegetables, protein options, whole grains, and drizzles of creamy sauce that make you forget you’re eating something this good for you.
Table of Contents
What Is a Harvest Bowl?
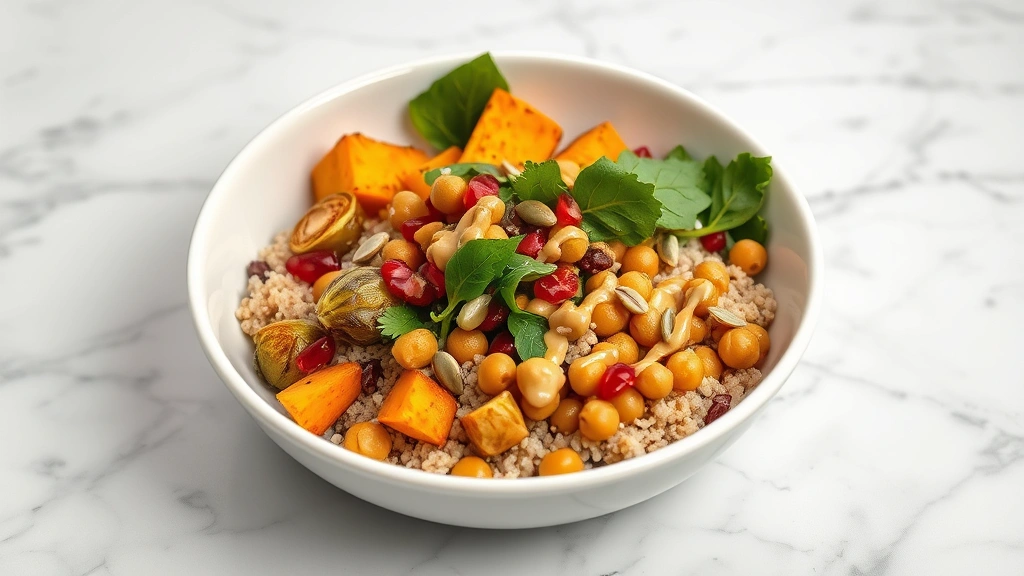
Think of a harvest bowl recipe as a customizable canvas where you’re the artist. It’s basically a deconstructed salad that celebrates seasonal produce—think roasted butternut squash, crispy Brussels sprouts, golden beets, and whatever’s at peak flavor when you’re cooking. The beauty here is that there’s no single “right” way to build one. You’re combining warm roasted vegetables with cool fresh elements, protein, and a sauce that ties everything together.
The concept gained serious traction in health-conscious restaurants, but here’s the thing: these bowls are way easier to make at home than ordering out. You control the ingredients, the portions, and most importantly, you skip the markup. A restaurant charges you $14-18 for something that costs maybe $4-5 to make yourself.
Build Your Base Layer
Your base is the foundation, and you’ve got options. Most harvest bowl recipes start with either a grain or leafy greens—sometimes both. Here’s what works:
Grain Bases: Quinoa, farro, wild rice, brown rice, or even couscous. These hold up well, add substance, and play nicely with warm roasted vegetables. Cook them ahead and store in the fridge for easy assembly.
Green Bases: Mixed greens, spinach, arugula, or kale. Fresh greens add brightness and won’t get soggy if you dress them right. The warm vegetables will slightly wilt the greens—that’s actually perfect.
Hybrid Approach: Use a smaller amount of both. Maybe a quarter cup of cooked farro with a handful of fresh arugula. This gives you the best of both worlds: substance and freshness.
Roasted Vegetables Done Right
Roasting is where the magic happens. You’re building flavor through caramelization—the Maillard reaction that makes vegetables taste incredible. Here’s my go-to approach:
The Roster: Butternut squash (cut into half-inch cubes), Brussels sprouts (halved), beets (cubed), carrots (chunked), and red onion (wedged). Toss everything with olive oil, salt, and pepper. Spread on a sheet pan in a single layer—don’t overcrowd it.
Temperature and Timing: Roast at 425°F for 25-35 minutes, stirring halfway through. You want caramelized edges and tender centers. The vegetables should have some char—that’s where the flavor lives.
Pro Move: Roast vegetables on different pans if they have different cooking times. Delicate items like zucchini need less time than dense items like beets. Or cut denser vegetables smaller so they cook at the same rate.
Once roasted, these vegetables actually improve over a couple days in the fridge. The flavors meld and deepen. This makes harvest bowl recipes perfect for meal prep.
Protein Options to Consider
You need protein to make this a complete meal. Your choices depend on your diet and what you’re craving:
Plant-Based: Air fried tofu recipe gives you crispy, golden cubes that add texture. Garbanzo beans recipe options include roasted chickpeas for crunch or warm chickpeas for creaminess. Lentils work beautifully too—they’re earthy and substantial.
Omnivore Options: Grilled chicken breast, roasted salmon, or even ground turkey all work. Cook these separately and add them to your bowl. For carnivore recipes, you might skip the grains entirely and load up on quality protein and vegetables instead.
Legume Advantage: Bean sprouts recipe variations add fresh crunch and additional protein without cooking. They’re enzyme-rich and add a living element to your bowl.
Pro tip: Cook your protein with intention. Season it well—bland protein ruins a great bowl. A little smoked paprika on roasted chickpeas or a squeeze of lemon on grilled chicken makes all the difference.
Grains and Starches Matter
The grain you choose affects texture, flavor, and how the bowl holds together. Here’s my breakdown:
Quinoa: Complete protein, fluffy texture, mild nutty flavor. Cooks in 15 minutes. It’s reliable and pairs with almost anything.

Farro: Chewy, nutty, substantial. Takes about 30 minutes but worth the wait. It’s got character and stands up to bold flavors.
Wild Rice: Earthy, chewy, visually interesting with its dark color. Longer cooking time (45 minutes) but stores beautifully.
Brown Rice: Familiar, affordable, forgiving. Takes 45 minutes but you can batch cook it.
Skip Grains?: Roasted sweet potatoes or regular potatoes work as your starch base if you want to skip traditional grains. They’re filling and pair perfectly with roasted vegetables.
Cook grains in vegetable or chicken broth instead of water. That simple swap adds flavor throughout your harvest bowl recipe without extra work.
Fresh Toppings and Crunch
Fresh toppings are what make people actually want to eat these bowls. They add brightness, crunch, and visual appeal:
Texture Elements: Toasted pumpkin seeds, sunflower seeds, or walnuts. Sliced almonds work too. Toast them dry in a pan for 3-4 minutes—they’ll smell incredible and taste even better.
Fresh Produce: Thinly sliced apple (Honeycrisp or Granny Smith), pomegranate arils, shredded cabbage (red or green), or microgreens. These add crunch and freshness that contrasts with warm roasted vegetables.
Cheese Options: Crumbled goat cheese, feta, or sharp cheddar. Don’t overdo it—a small handful goes a long way flavor-wise.
Herbs: Fresh parsley, cilantro, or chives scattered on top. They brighten everything and add aromatic complexity.
Sauce Game Changes Everything
Here’s what separates a good harvest bowl recipe from a great one: the sauce. This is where you tie all the elements together.
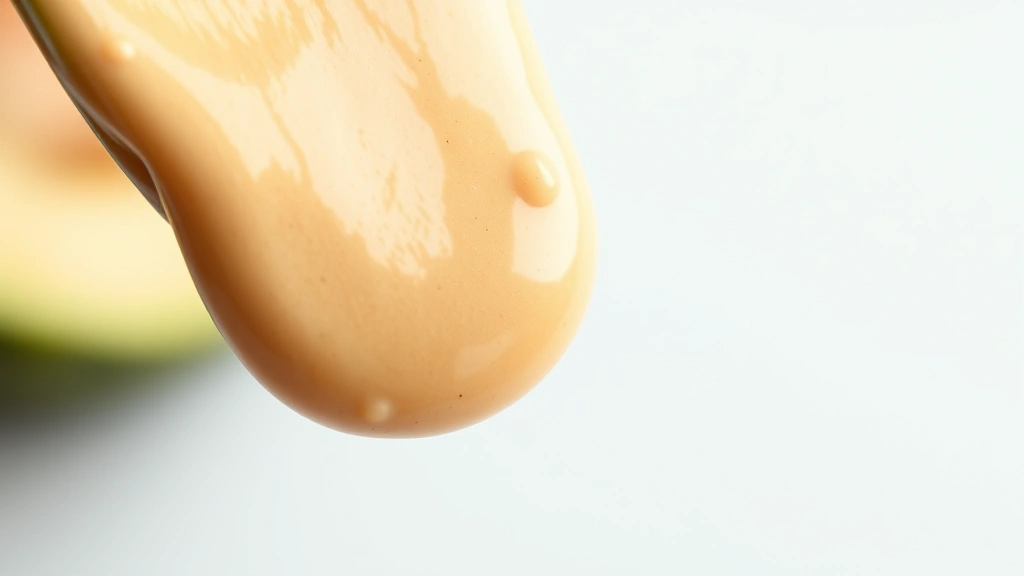
Tahini Dressing: Tahini, lemon juice, garlic, water, and salt. Blend until smooth. It’s creamy, earthy, and works with almost any vegetable combination.
Avocado Crema: Check out the avocado crema recipe for a rich, luxurious sauce that elevates everything. It’s basically avocado, lime, cilantro, and garlic blended smooth.
Maple-Mustard Vinaigrette: Whole grain mustard, maple syrup, apple cider vinegar, olive oil, and a pinch of thyme. It’s tangy, slightly sweet, and perfect for fall harvest bowls.
Yogurt-Based: Greek yogurt, lemon, garlic, and herbs. Lighter than creamy sauces but still satisfying.
Make sauce ahead and store it separately. Dress your bowl just before eating to prevent sogginess. If you’re meal prepping, pack sauce in a small container on the side.
Assembly and Storage Tips
The order you assemble matters more than you’d think:
Layer Strategy: Start with your grain or greens. Add warm roasted vegetables next—they’ll slightly warm the greens if you used them. Top with protein, fresh elements, seeds, and herbs. Drizzle sauce right before eating.
Meal Prep Method: Cook components separately and store in glass containers. Grains in one, roasted vegetables in another, protein separate, fresh toppings in their own container. Assemble each morning or when you’re ready to eat. Everything stays fresher this way.
Storage Timeline: Roasted vegetables last 4-5 days. Cooked grains last 5-6 days. Fresh greens last 3-4 days. Protein depends on the type—generally 3-5 days. Nuts and seeds stay fresh for weeks in airtight containers.
Temperature Consideration: Harvest bowls are delicious warm or at room temperature. Cold is fine too if you prefer. Experiment with what you like.
Seasonal Variations
The best harvest bowl recipes change with the seasons. Here’s how to adapt:
Fall: Butternut squash, Brussels sprouts, beets, carrots, apple, pumpkin seeds, maple-mustard vinaigrette.
Winter: Roasted cabbage, root vegetables, kale, pomegranate, dried cranberries, walnuts, tahini dressing.
Spring: Asparagus, peas, snap peas, radishes, fresh herbs, lighter greens, lemon vinaigrette.
Summer: Zucchini, corn, tomatoes, cucumber, fresh basil, sunflower seeds, lime vinaigrette.
The framework stays the same—you’re just swapping vegetables based on what’s available and in season. Seasonal produce tastes better and costs less.
Frequently Asked Questions
Can I make harvest bowl recipes ahead of time?
Absolutely. Cook all components and store them separately in glass containers. Assemble bowls as you need them, or pack everything in a container with dressing on the side for lunch at work. This method keeps everything fresh and prevents sogginess.
What’s the best way to reheat a harvest bowl?
If you’ve stored components separately, reheat just the roasted vegetables and grain in the microwave for 1-2 minutes. Add fresh toppings and sauce after reheating. If everything’s already mixed, reheat gently at 300°F for about 5 minutes, though this isn’t ideal for fresh greens.
Are harvest bowl recipes actually healthy?
Yes, when you build them right. You’re getting vegetables, whole grains, protein, and healthy fats. The calorie count depends on your portions and sauce—tahini and avocado are calorie-dense but nutrient-dense. If you’re tracking macros, weigh your components. For general health eating, fill half your bowl with vegetables and you’re golden.
Can I use frozen vegetables?
Frozen vegetables work fine for roasting. They often have more nutrients than fresh because they’re frozen at peak ripeness. The texture might be slightly softer, but honestly, in a harvest bowl recipe, you won’t notice. Thaw them first and pat dry before roasting so they get crispy.
What protein is best for beginners?
Start with chickpeas or lentils. They’re forgiving, require no special cooking technique, and pair with every flavor profile. Once you’re comfortable, branch out to tofu, beans, or animal proteins.
How do I keep my bowl from getting soggy?
Store components separately. Don’t dress greens until right before eating. Keep fresh toppings in a separate container. This is why meal prep containers are your friend—everything stays in its own space until assembly.
Final Thoughts on Harvest Bowls
A harvest bowl recipe is genuinely one of the easiest ways to eat well without feeling like you’re dieting. You’re building something colorful, satisfying, and packed with nutrients. The best part? Once you understand the framework—base, roasted vegetables, protein, fresh toppings, sauce—you can build infinite variations based on what you have and what you’re craving.
Start simple. Pick one base, three roasted vegetables, one protein, and one sauce. Make it twice. Then start experimenting. Add different seeds, try new grains, swap proteins. Before you know it, you’ll have a dozen harvest bowl recipes in your rotation that you actually want to eat.
For additional inspiration on specific components, explore the Family Handyman’s approach to meal preparation, check out This Old House’s kitchen guides, and reference Bob Vila’s food preparation techniques. These resources offer solid foundations for understanding ingredient quality and preparation methods that translate directly to better harvest bowl recipes.


