

A gipfeli recipe is your ticket to mastering one of Switzerland’s most beloved pastries—crispy on the outside, buttery and tender on the inside. If you’ve ever bitten into a fresh gipfeli at a Swiss bakery and wondered how to recreate that magic at home, you’re in the right place. This isn’t just another croissant guide; it’s a craftsman’s approach to building laminated dough that’ll make your kitchen smell like a professional patisserie.
Table of Contents
What Is Gipfeli?
Gipfeli—pronounced “GHIP-fuh-lee”—is the Swiss-German name for what most of us call a croissant. But here’s where it gets interesting: a traditional gipfeli recipe differs slightly from French croissants. Swiss gipfeli tend to be a bit smaller, slightly less buttery, and often feature a more pronounced crescent shape. They’re the breakfast staple you’ll find in every Swiss bakery, paired with strong coffee and a slice of good cheese.
The key difference in a gipfeli recipe versus standard croissants lies in the butter-to-flour ratio and the lamination layers. Swiss bakers have perfected a version that’s less rich than its Parisian cousin but equally satisfying. The pastry should shatter when you bite it, releasing layers that practically melt on your tongue.
Ingredients You Need
Let’s talk about what goes into a proper gipfeli recipe. You don’t need fancy equipment or exotic ingredients—just quality basics and patience.
For the Dough:
- 500g bread flour (or all-purpose with 12% protein)
- 250ml whole milk, slightly warmed
- 50g granulated sugar
- 10g salt
- 7g instant yeast (about 2 teaspoons)
- 30g softened butter (for the dough, not lamination)
For Lamination:
- 250g cold butter (European-style, 82% butterfat minimum)
- 15g flour (for dusting between folds)
For Finishing:
- 1 egg yolk mixed with 15ml water (egg wash)
- Coarse sea salt or pearl sugar (optional but traditional)
The butter quality matters more than you’d think. European-style butter with higher butterfat creates those distinct, crispy layers. Don’t skimp here—it’s the difference between a gipfeli recipe that impresses and one that disappoints.
Making the Dough
Start by combining your warm milk, yeast, and a pinch of sugar in a large mixing bowl. Let it sit for five minutes until you see foam forming on top—this confirms your yeast is alive and ready to work.
Add the flour, remaining sugar, and salt to the yeast mixture. Mix until a shaggy dough forms, then knead for about eight minutes until smooth and elastic. The dough should be slightly tacky but not sticky enough to stick to your hands permanently. Add the 30g of softened butter gradually while kneading, incorporating it fully before the dough becomes smooth.
Once your dough is ready, shape it into a ball, place it in a lightly oiled bowl, and cover with a damp cloth. Let it rise at room temperature for about 90 minutes until it’s roughly doubled in size. This first rise develops flavor and gluten structure—don’t rush it.
After the first rise, turn your dough onto a lightly floured surface and gently press out the gas. You’re not trying to deflate it completely; just create an even thickness. Wrap it in plastic wrap and refrigerate for at least two hours, ideally overnight. This chilling step is crucial for a gipfeli recipe because it relaxes the gluten and makes lamination easier.
Laminating Technique
This is where your gipfeli recipe transforms from basic dough to something special. Lamination—folding butter into dough—creates those hundreds of paper-thin layers that make croissants so irresistible.
Remove your chilled dough from the fridge and place it on a cool work surface (marble or granite is ideal, but a clean counter works fine). Roll it into a rectangle roughly 40cm x 20cm and about 1cm thick. The shape doesn’t need to be perfect, but consistency in thickness matters.
Take your cold butter block and pound it with a rolling pin until it’s pliable but still cold—you want it the same consistency as the dough so they laminate evenly. Spread this butter over two-thirds of your dough rectangle, leaving one-third uncovered.
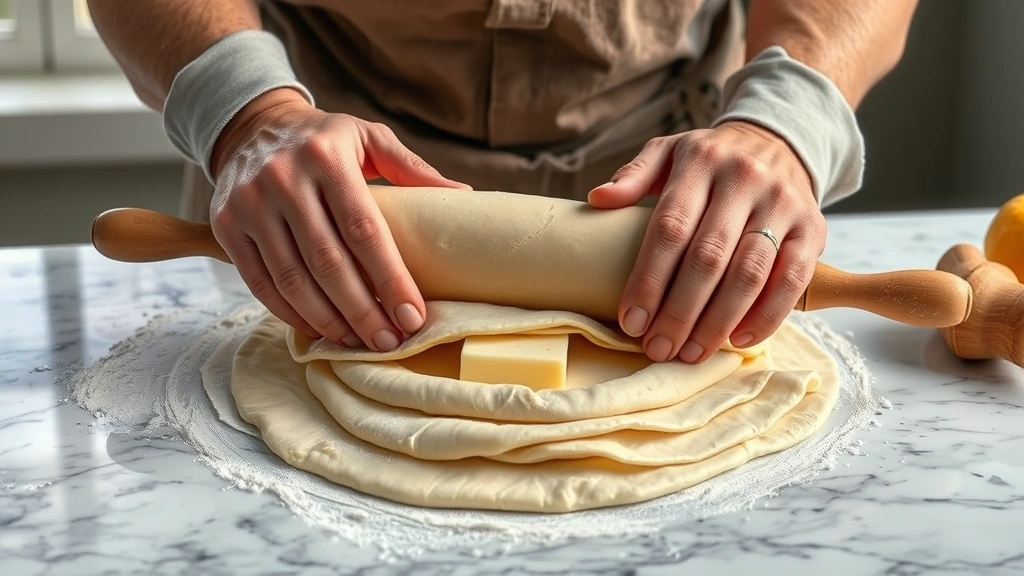
Now fold: bring the unbuttered third up and over the butter, then fold the remaining third down on top. You’ve just completed your first “turn.” Rotate the dough 90 degrees, seal the edges gently with your rolling pin, and roll it out again to the same dimensions. Repeat this folding process two more times, chilling for 30 minutes between each turn in the refrigerator.
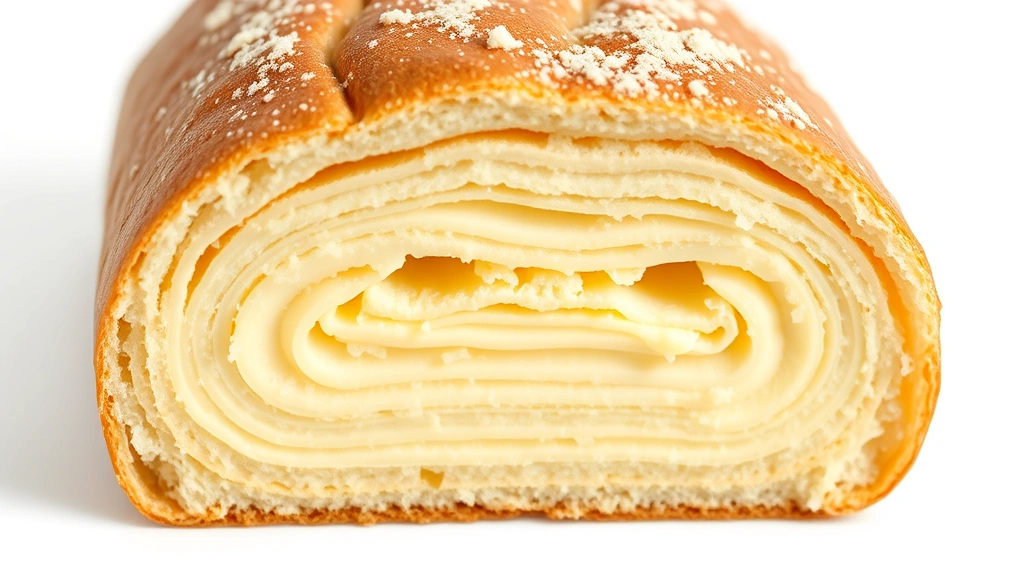
After three turns, you’ll have created 27 layers of butter and dough (each turn triples the layer count). That’s the secret behind a gipfeli recipe’s crispy, shattering texture. Some bakers do a fourth turn for even more layers, but three is the traditional Swiss method.
Shaping Your Gipfeli
After your final lamination turn and a 30-minute chill, roll your dough to about 3mm thickness. Using a sharp knife or pastry cutter, cut the dough into long triangles—roughly 10cm at the base and 15cm tall. The traditional crescent shape comes next.
Place a triangle on your work surface with the base toward you. Starting at the base, roll the dough tightly toward the point, then curve the two ends slightly to form that iconic crescent shape. This isn’t just for looks; the curve helps the gipfeli puff evenly during baking.
Place your shaped gipfeli on parchment-lined baking sheets, leaving about 5cm between each one. They’ll expand during proofing and baking, so don’t crowd them. Brush each one lightly with egg wash for that beautiful golden-brown finish.
Proofing Process
Here’s where patience pays dividends in your gipfeli recipe. Cover your shaped pastries with a clean cloth or plastic wrap and let them proof at room temperature for 60-90 minutes. They should increase in size by about 50% but shouldn’t be so puffy they look ready to burst.
The exact timing depends on your kitchen temperature. In winter, you might need the full 90 minutes; in summer, 60 might be plenty. The gipfeli should feel light and airy when you gently poke one with your finger—it should spring back slowly but not completely.
About 15 minutes before baking, preheat your oven to 200°C (390°F). If you want that traditional pearl sugar topping, sprinkle it on now while the egg wash is still tacky. Some Swiss bakers prefer a light coating of coarse sea salt instead.
Baking to Perfection
Slide your baking sheet into the preheated oven and bake for 18-22 minutes. You’re looking for a deep golden-brown color on the outside while the inside remains tender and moist. The gipfeli should sound hollow when tapped on the bottom—that’s your signal the inside has baked through.
About halfway through baking, if the tops are browning too quickly, tent them loosely with foil. Every oven is different, so watch carefully during your first batch. The goal is even, rich browning without any burnt spots.
Remove your gipfeli from the oven and let them cool on the baking sheet for five minutes, then transfer to a wire rack. They’ll continue to crisp up as they cool. Resist the urge to bite into one immediately—let them cool for at least 10 minutes so the interior structure sets properly.
Troubleshooting Tips
Even experienced bakers encounter issues with laminated dough. Here’s how to solve common problems in your gipfeli recipe:
Butter leaking out during baking: Your lamination wasn’t sealed properly, or the dough got too warm during shaping. Work faster and keep everything cold. If butter starts leaking during proofing, pop the sheet back in the fridge for 15 minutes.
Dense, heavy pastries: Either your proofing was too short, or your oven temperature was too low. Use an oven thermometer to verify accuracy. Gipfeli need a hot oven to puff properly in those first few minutes.
Layers aren’t visible: You might not be rolling evenly during lamination, or you’re not using cold enough butter. Keep everything chilled and roll with consistent pressure.
Dry, tough texture: Overbaking or using bread flour that’s too strong. Try all-purpose flour next time, and don’t exceed 22 minutes in the oven.
Storage and Serving
Fresh gipfeli are best eaten the same day they’re baked, ideally within a few hours. But here’s the good news: you can make them ahead and freeze the shaped, unproofed pastries for up to three weeks. Just proof them straight from the freezer—add about 30 minutes to the proofing time.
You can also bake them partially (about 12 minutes), cool completely, wrap individually, and freeze for up to two weeks. To finish, thaw slightly and bake at 180°C for another 8-10 minutes until golden.
Store cooled gipfeli in an airtight container at room temperature for up to two days, though they’ll gradually lose their crispness. Don’t refrigerate them—cold temperatures accelerate staling. If they do lose their crunch, pop them in a 160°C oven for five minutes to revive them.
Frequently Asked Questions
Can I make a gipfeli recipe without a stand mixer?
Absolutely. Mix by hand for the initial dough, kneading for about 10 minutes until smooth. Your arms will get a workout, but the result is identical. The lamination process doesn’t require any machinery—just a rolling pin and patience.
What’s the difference between gipfeli and croissants?
Gipfeli are the Swiss version of croissants. They’re typically slightly smaller, sometimes less butter-rich, and have a more pronounced crescent shape. The baking technique is essentially identical, but Swiss bakers have their own traditional proportions and methods.
Why do my gipfeli taste greasy?
You’re likely using butter that’s too soft during lamination, causing it to blend into the dough rather than creating distinct layers. Keep your butter cold and firm. Also, check that you’re not using more than 250g of lamination butter—the gipfeli recipe should be rich but not greasy.
Can I use margarine or oil instead of butter?
Not if you want authentic gipfeli. The specific properties of butter—how it melts, how it creates steam between layers—are essential to the recipe. Margarine or oil will produce a completely different texture. Use real butter; it’s worth it.
How do I know when my dough is properly laminated?
After three turns, unfold a small piece and you should see visible butter layers. If you do a cross-section, you’ll count roughly 27 distinct layers. If they’re not visible, you might need an extra turn or better temperature control.
What if my kitchen is too warm for lamination?
Work in the coolest part of your house, ideally early morning. Chill your work surface with ice packs before rolling. If you’re in a hot climate, reduce the time between turns and extend the chilling periods. Some bakers even work in an air-conditioned room or use a marble slab chilled in the freezer.
Final Thoughts
Mastering a gipfeli recipe takes practice, but it’s absolutely achievable for any home baker willing to invest the time. The lamination process is where the magic happens—those hundreds of butter layers creating that signature shatter and melt. Start with one batch, learn how your oven behaves, and adjust accordingly.
The beauty of this gipfeli recipe is that it rewards precision and patience. Every fold, every chill, every careful shaping decision shows up in the final product. Your first batch might not be perfect, but they’ll still be delicious. By your third or fourth attempt, you’ll be producing pastries that rival your local Swiss bakery.
Keep your workspace cool, your butter cold, and your expectations realistic. A gipfeli recipe is a marathon, not a sprint. But when you pull that golden-brown batch from the oven and bite into one while it’s still warm, you’ll understand why Swiss bakers have perfected this craft over generations. Now get in your workshop and start folding.


