
A fried flounder recipe is your ticket to restaurant-quality fish right in your own kitchen—crispy on the outside, tender and flaky on the inside, ready to eat in under 30 minutes. Whether you’re feeding a crowd or just craving that satisfying crunch, this straightforward approach breaks down exactly how to nail it every single time.
Table of Contents
Selecting Fresh Flounder
Start with quality fish—it’s the foundation of any solid fried flounder recipe. Hit your local fish counter and look for fillets that smell like the ocean, not fishy. Fresh flounder should have firm, translucent flesh with no browning or dull spots. If you’re buying frozen, that’s perfectly fine; just thaw it in the refrigerator overnight before cooking.
Flounder is a mild, delicate white fish that takes beautifully to frying because it stays moist inside while developing that golden crust. You’ll typically need about 1.5 to 2 pounds of fillets to serve four people generously. Pat your fillets completely dry with paper towels—this step is non-negotiable if you want crispy results instead of soggy fish.
Prep Work Matters Most
Don’t skip the prep phase. Season your flounder fillets with salt and pepper on both sides, then let them sit at room temperature for about 10 minutes. This allows the seasoning to penetrate the flesh rather than just sitting on the surface. While they’re resting, set up your breading station with three shallow bowls: one with all-purpose flour mixed with a pinch of cayenne and paprika, one with beaten eggs (about 2-3 eggs), and one with panko breadcrumbs mixed with a tablespoon of grated Parmesan cheese.
The triple-dredge method creates that restaurant-quality crust. Coat each fillet in flour first, shaking off excess, then dip it in egg, and finally press it into the breadcrumb mixture, making sure both sides are fully covered. Set breaded fillets on a plate and let them rest for 5 minutes—this helps the coating adhere during frying.
Breading Technique Secrets
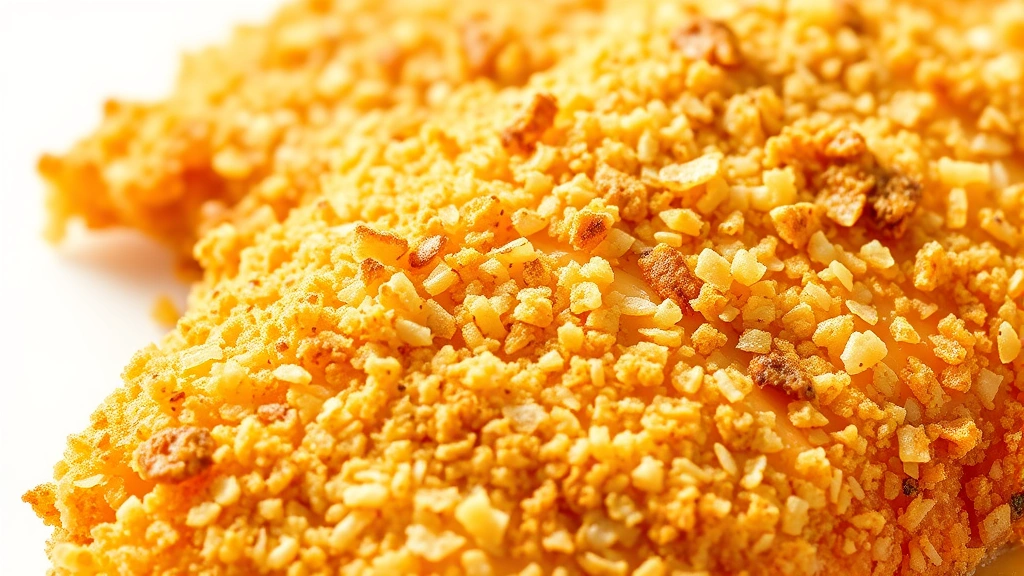
The breading is where magic happens. Regular breadcrumbs work, but panko gives you that superior crunch that keeps your fried flounder recipe memorable. Add a teaspoon of Old Bay seasoning to your breadcrumb mixture if you want that classic coastal flavor, or stick with just salt and pepper for a cleaner taste.
Here’s a pro move: after your initial dredging, let the coated fillets sit in the fridge for 15-20 minutes before frying. This allows the coating to set and adhere better, reducing the chance of it separating during cooking. If you’re short on time, even 5 minutes helps. Some cooks double-dip their fillets—a second quick dip in egg and breadcrumbs—for an extra-thick, extra-crunchy exterior.
Oil Temperature Control
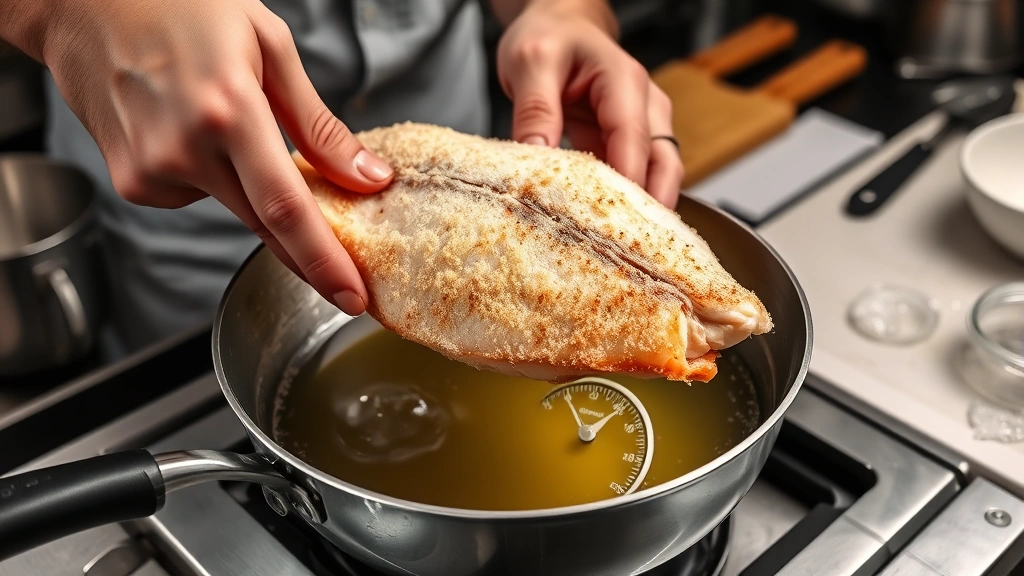
Temperature is everything when frying. You need your oil at 350°F (175°C) for perfect flounder. Too cool and you’ll get greasy fish; too hot and the outside burns before the inside cooks through. Invest in a reliable deep-fry or candy thermometer—it’s worth every penny. Place it in your oil and give it at least 5 minutes to stabilize before you start frying.
Use neutral oils with high smoke points: vegetable, canola, or peanut oil all work great. Avoid olive oil, which has a lower smoke point and will impart flavors you don’t want on delicate flounder. Fill your pot or Dutch oven with about 2-3 inches of oil—enough to submerge your fillets but not so much that it splashes when you add fish.
Frying Process Step-by-Step
Once your oil hits 350°F, you’re ready to go. Working in batches (don’t overcrowd the pan), carefully lay your breaded fillets away from you into the hot oil. They should sizzle immediately—if they don’t, your oil isn’t hot enough. Fry for 2-3 minutes per side until the coating turns golden brown and the fish flakes easily with a fork. You’re not looking for dark brown; aim for that perfect golden color.
Use a slotted spoon or spider skimmer to turn the fillets gently halfway through cooking. Avoid poking holes in the coating, which lets hot oil seep in. The entire process should take about 5-6 minutes total per batch. If you’re making a larger quantity, keep finished fillets warm on a wire rack set over a baking sheet in a 200°F oven while you finish the remaining batches.
Draining and Finishing Touches
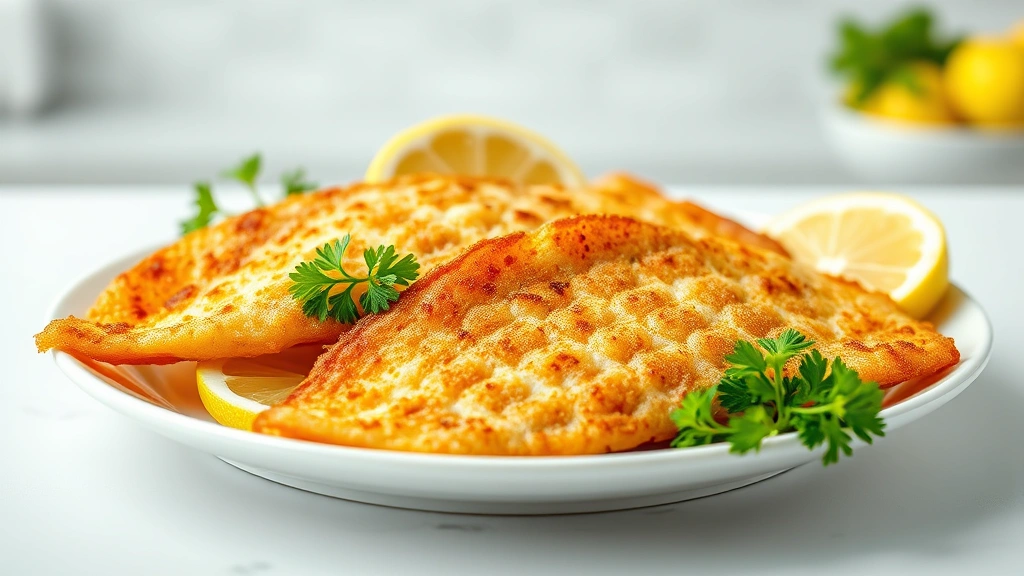
Remove your fried flounder with a slotted spoon and place it on a wire rack (not paper towels, which trap steam and make it soggy). Season immediately with fleur de sel or sea salt while the coating is still hot and slightly sticky—this helps the salt adhere. A squeeze of fresh lemon juice right before serving brightens the whole dish.
If you want to elevate your fried flounder recipe further, try a quick tartar sauce: mix mayo, minced dill pickles, capers, lemon juice, and a dash of hot sauce. Or go simple with malt vinegar and hot sauce on the side. The fish is so good on its own that sometimes less is more.
Serving Suggestions
Pair your crispy flounder with classic sides. Steam green beans for a fresh vegetable that won’t compete with the fish. Coleslaw adds crunch and cuts through the richness of the fried coating. A simple lemon rice pilaf or crispy french fries rounds out the plate beautifully.
For a more elegant presentation, serve with roasted asparagus and a buttery lemon beurre blanc. If you’re going casual, build fish tacos with crispy flounder, shredded cabbage, avocado, and chipotle crema in warm flour tortillas. The versatility of this fried flounder recipe means it works for weeknight dinners or dinner party centerpieces.
Storage and Reheating
Leftover fried flounder keeps in an airtight container in the refrigerator for up to 2 days, though it’s honestly best eaten fresh and hot. To reheat, place it on a wire rack in a 350°F oven for about 5-8 minutes until warmed through. This method preserves crispiness better than microwaving, which will make it soggy.
You can freeze uncooked, breaded fillets for up to 3 months. Lay them on a baking sheet, freeze until solid (about 2 hours), then transfer to a freezer bag. When you’re ready to cook, fry straight from frozen, adding about 1-2 minutes to the cooking time. This is a game-changer for meal prep—you’ll have restaurant-quality fried fish ready whenever the craving hits.
Recipe Variations
Once you master the basic fried flounder recipe, experiment with different coatings. Try air-fried versions using an air fryer set to 400°F for 10-12 minutes, flipping halfway through—you’ll get about 80% of the crispiness with way less oil. For a spicier kick, add cayenne, paprika, and garlic powder to your flour mixture. Go Cajun with a seasoning blend that includes thyme, oregano, and black pepper.
Some cooks love a cornmeal-flour blend for extra crunch, using half cornmeal and half flour in their dredging station. Others swear by a beer batter—combine flour, cornstarch, baking powder, salt, and cold beer for a lighter, airier coating. Each variation produces slightly different textures and flavors, so don’t be afraid to adapt this fried flounder recipe to your preferences.
If you’re looking for seafood inspiration beyond flounder, check out our crab bisque recipe for a complementary dish that uses similar coastal flavors. For complete meal planning, explore Betty Crocker recipes for classic sides that pair perfectly with fried fish.
Frequently Asked Questions
Can I use other white fish instead of flounder?
Absolutely. Cod, haddock, tilapia, and sole all work beautifully with this fried flounder recipe. Cod is slightly thicker and takes an extra minute or so to cook through. Just make sure whatever fish you choose is fresh and has a similar thickness so cooking times remain consistent.
What’s the best oil for deep frying fish?
Vegetable, canola, or peanut oil are your best bets. They have high smoke points (around 400°F or higher), neutral flavors, and won’t break down at frying temperatures. Avoid butter, olive oil, and coconut oil for this application—they’ll either burn or impart unwanted flavors to your delicate fish.
Why is my fried flounder soggy?
Three main culprits: your oil wasn’t hot enough when you started frying, you overcrowded the pan (which drops oil temperature), or you’re draining on paper towels instead of a wire rack. Check your thermometer, work in smaller batches, and always use a rack for draining.
How do I know when the flounder is done cooking?
The fish is done when the coating is golden brown and the flesh inside flakes easily with a fork. You can also check by gently pressing the thickest part of the fillet—it should feel firm and opaque, not translucent. For fillets about ½-inch thick, 2-3 minutes per side is usually perfect.
Can I make this fried flounder recipe ahead of time?
You can bread the fillets several hours ahead and refrigerate them until you’re ready to fry. This actually helps the coating adhere better. However, frying should happen right before serving for maximum crispiness. You can keep finished fillets warm in a 200°F oven for about 15-20 minutes if needed.
Is fried flounder healthy?
Fried flounder is definitely an indulgence, but flounder itself is lean and packed with protein and omega-3 fatty acids. The frying adds calories and fat, but used occasionally as part of a balanced diet, it’s a delicious treat. If you’re looking for a healthier preparation, the air fryer method cuts oil usage significantly while maintaining most of the crispy texture.
Final Thoughts
Mastering a fried flounder recipe opens up a world of possibilities for quick, impressive meals. The technique is straightforward, the ingredients are simple, and the results are consistently delicious. Start with fresh fish, nail your oil temperature, and don’t skip the breading station setup. Once you’ve made this a few times, you’ll develop the intuition to adjust based on your specific equipment and preferences.
The beauty of this recipe is that it’s forgiving enough for weeknight cooking but impressive enough to serve guests. Whether you’re a seasoned home cook or just getting comfortable in the kitchen, fried flounder delivers that satisfying crunch and tender fish that reminds you why this coastal classic has stayed popular for generations. Keep your thermometer handy, your oil clean, and your expectations high—you’ve got this.


