
An ezekiel bread recipe is your ticket to creating nutrient-dense, sprouted grain loaves that taste incredible and keep your kitchen smelling like a professional bakery. This ancient formula combines sprouted grains, legumes, and minimal processing to deliver bread that’s easier to digest and packed with complete proteins—something you won’t find in standard white or wheat loaves.
Table of Contents
What Is Ezekiel Bread?
Ezekiel bread traces back to the biblical grain blend mentioned in Ezekiel 4:9, and modern bakers have adapted this concept into a legitimate powerhouse loaf. Unlike conventional bread made from flour, Ezekiel bread starts with whole sprouted grains and legumes that you’ll process into a wet dough. The sprouting process dramatically increases nutrient bioavailability—your body actually absorbs the minerals and proteins rather than letting them pass through.
The magic happens because sprouting reduces phytic acid (which blocks mineral absorption) and activates enzymes that make the bread easier on your digestive system. You’re essentially pre-digesting the grains before baking, which is why people with grain sensitivities often tolerate Ezekiel bread better than standard loaves.
Sprouting Your Grains
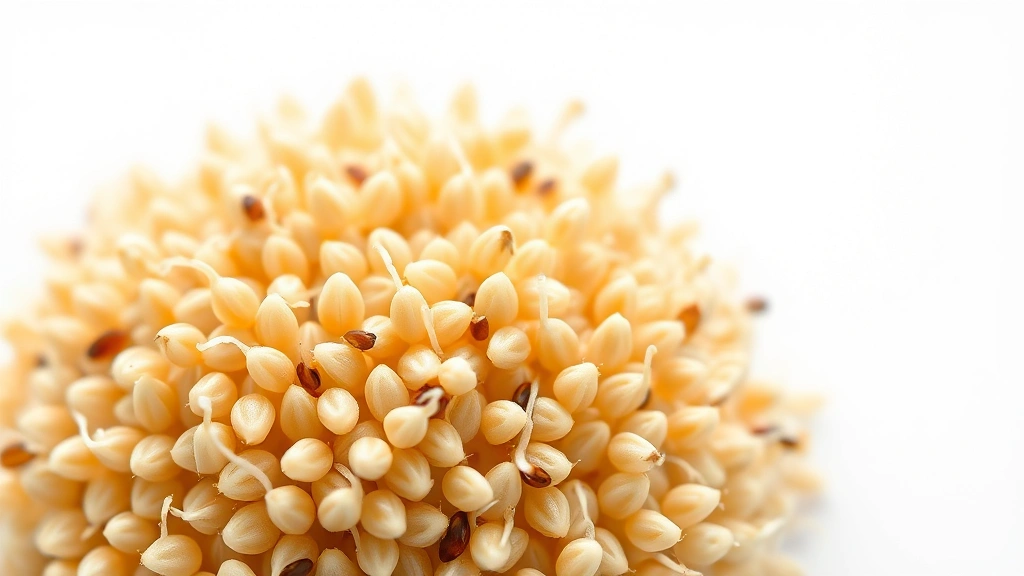
This is the foundation of your entire ezekiel bread recipe, and honestly, it’s simpler than most people think. You’ll need sproutable grains: spelt berries, millet, barley, lentils, soybeans, and sesame seeds are the traditional blend. Start with about 1 cup of mixed grains total.
The sprouting process:
- Rinse your grains thoroughly under cool water in a fine mesh strainer
- Soak them in a large jar with 3 cups of water for 8-12 hours
- Drain completely and rinse again
- Place the jar at an angle (use a sprouting jar with a mesh lid, or cover with cheesecloth) to allow air circulation
- Rinse and drain twice daily for 2-3 days until small white tails appear (about 1/8 inch)
- Once sprouted, spread on a towel to dry slightly for 2-4 hours before processing
Don’t let sprouts get too long—you want just the tiny tail to appear. Longer sprouts become bitter and make the dough harder to work with. The whole sprouting window typically takes 3-4 days from start to finish.
Ingredients You’ll Need
Here’s the complete ingredient list for one standard loaf:
- Sprouted grains: 1 cup (mixed variety, freshly sprouted)
- Whole wheat flour: 1/2 cup (for structure)
- Water: 1/4 to 1/2 cup (adjust based on sprout moisture)
- Honey or maple syrup: 2 tablespoons
- Sea salt: 1.5 teaspoons
- Olive oil: 2 tablespoons
- Optional: 1/2 teaspoon instant yeast (or use natural fermentation)
The beauty of this recipe is flexibility. Some bakers skip yeast entirely and rely on natural fermentation, similar to bread recipe no yeast methods. Others add seeds, nuts, or herbs. The sprouted grains are non-negotiable for authentic Ezekiel bread—that’s what makes it nutritionally superior to standard loaves.
Mixing and Preparing Dough
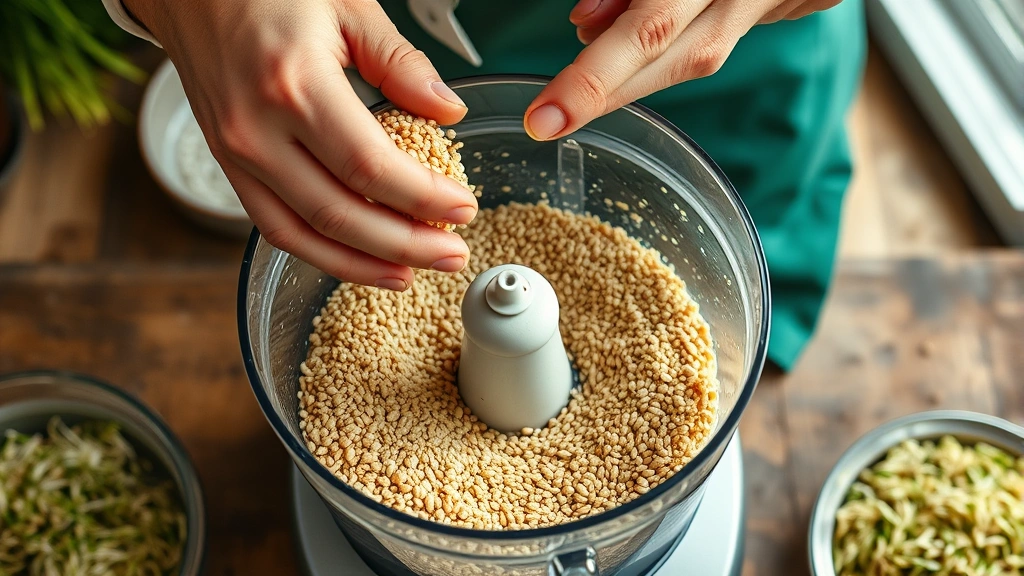
Process your freshly sprouted grains through a food processor until you get a thick, paste-like consistency. Don’t over-process—you want some texture, not baby food. This typically takes 2-3 minutes of pulsing.
Transfer the sprouted grain paste to a large mixing bowl. Add your whole wheat flour, honey, salt, and olive oil. If using yeast, dissolve it in the 1/4 cup of warm water first, then add. Mix by hand or with a stand mixer on low speed for about 5 minutes. The dough will be much wetter and stickier than standard bread dough—this is completely normal and correct.
Your dough should resemble thick oatmeal or wet cake batter. If it’s too dry (won’t hold together), add water one tablespoon at a time. If it’s soupy, add a bit more flour. This takes practice, and humidity in your kitchen matters.
Rising and Bulk Fermentation
Cover your mixing bowl with a damp towel and let it sit at room temperature for 8-12 hours (or overnight). If you’re using yeast, fermentation happens faster—typically 4-6 hours. Without yeast, rely on natural fermentation from wild yeasts and bacteria already present on the grains.
You’ll notice the dough becoming slightly more airy and developing a subtle sour smell. This is exactly what you want. The long fermentation time also makes the bread more digestible and develops better flavor. Many bakers let it ferment for 12-18 hours for maximum complexity.
Don’t expect dramatic rising like standard bread dough. Sprouted grain doughs rise more subtly because the structure is different. You’re looking for slight volume increase and visible bubbles when you peek under the towel.
Shaping and Baking
Preheat your oven to 350°F (175°C). Grease a loaf pan generously with oil or use parchment paper. Because the dough is wet, it won’t shape like standard bread—you’ll essentially pour it into the pan and smooth the top with a wet spatula.
Let the shaped dough rest in the loaf pan for 30-60 minutes at room temperature. This is your final proof. The dough should rise slightly above the rim of the pan.
Baking:
- Bake at 350°F for 45-60 minutes
- The top should be deep golden brown
- Use an instant-read thermometer—internal temperature should reach 205-210°F
- Tap the bottom; it should sound hollow
- If the top browns too quickly, tent with foil for the last 15 minutes
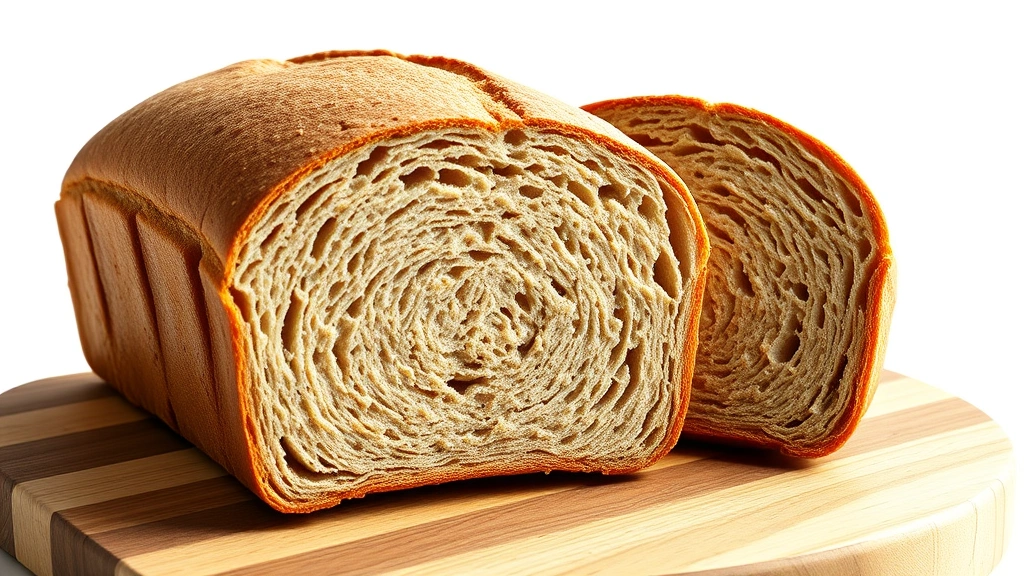
Remove from the pan immediately and cool on a wire rack for at least 30 minutes before slicing. This cooling period is critical—the crumb continues to set and firm up inside. Slice too early and you’ll get a gummy texture.
Storage and Shelf Life
Ezekiel bread keeps longer than standard loaves because of its density and lower moisture content. Store it in a paper bag on the counter for 2-3 days, or wrap tightly and refrigerate for up to a week. For longer storage, slice and freeze in an airtight container for up to 3 months.
Many people freeze their Ezekiel loaves immediately after cooling, then toast slices directly from frozen. The dense crumb actually toasts beautifully and becomes less dense when warmed. Pair it with avocado mayo recipe spreads or how to make apple sauce for breakfast.
Common Problems Solved
Dough too wet/soupy: Add flour one tablespoon at a time. You might have over-sprouted or your sprouts retained too much water. Pat them dry with a towel before processing.
Dense, heavy crumb: Your fermentation time was too short. Aim for 12+ hours of bulk fermentation. Also check that your sprouts were truly sprouted—unsprouted grains create denser bread.
Gummy interior: You’re slicing too early. Wait at least 45 minutes after removing from the oven. Also ensure your oven temperature is accurate with an oven thermometer.
Bread won’t rise: Sprouted grain doughs rise much less dramatically than yeast breads. This is normal. If using no yeast, ensure your kitchen is warm (70-75°F) for fermentation. Cold kitchens slow fermentation dramatically.
Sprouts molding during sprouting: You’re keeping them too wet. Ensure you’re draining completely and getting good air circulation. Use a proper sprouting jar or cheesecloth-covered jar at an angle.
Recipe Variations
Once you master the basic ezekiel bread recipe, experiment with these additions:
- Seeded version: Add 1/4 cup mixed seeds (sunflower, pumpkin, flax) after mixing
- Herb bread: Mix in 1 tablespoon dried herbs (rosemary, thyme, oregano)
- Sweeter loaf: Increase honey to 3-4 tablespoons for slightly sweeter bread
- No-yeast version: Simply omit yeast and rely on natural fermentation—extend fermentation to 18-24 hours
- Whole grain version: Replace white whole wheat flour with spelt flour for nuttier flavor
The sprouted grain base remains constant—it’s the supporting ingredients that give you creative freedom.
Frequently Asked Questions
Can I buy sprouted grain flour instead of sprouting myself?
Yes, absolutely. Sprouted grain flour is available at most health food stores and online retailers. It won’t have quite the same nutritional punch as fresh sprouted grains (some enzymes degrade during drying and storage), but it’s far more convenient. Use it as a 1:1 replacement for the processed fresh sprouts, though you may need slightly less water since the flour is already dry.
How long does sprouting actually take?
Typically 3-4 days from soaking to harvest. The timeline depends on temperature—warmer kitchens (75-80°F) sprout faster, while cooler environments take longer. You’re looking for just the tiny white tail to appear, not long sprouts. This usually happens by day 3 or 4.
Is Ezekiel bread actually better for digestion?
For many people, yes. The sprouting process reduces phytic acid and activates enzymes that make nutrients more bioavailable and easier to digest. Studies show sprouted grain breads have lower glycemic impact and better nutrient absorption than standard grain breads. However, if you have celiac disease or severe gluten sensitivity, sprouting doesn’t eliminate gluten—you’d need gluten-free grains.
Can I make this without yeast?
Completely. Skip the yeast and rely on natural fermentation from wild yeasts and bacteria on the grains. Extend fermentation to 18-24 hours. The bread will be slightly denser and more sour-flavored, but still delicious and authentic.
Why is my bread so dense?
Sprouted grain breads are naturally denser than standard yeast breads—that’s just the nature of the ingredient. However, if it’s excessively dense, you likely didn’t ferment long enough. Aim for 12+ hours of bulk fermentation. Also ensure your sprouts were truly sprouted (tiny tails visible) before processing.
Can I make multiple loaves at once?
Absolutely. Simply multiply the ingredient quantities. One batch of sprouted grains (about 1 cup dry) makes roughly 1-2 loaves depending on how much flour you add. Store extra dough in the refrigerator for up to 3 days before baking.
What’s the difference between Ezekiel and sprouted grain bread?
Ezekiel bread specifically refers to the biblical grain blend (spelt, millet, barley, lentils, soybeans, sesame). Sprouted grain bread is a broader category that includes any bread made from sprouted grains. All Ezekiel bread is sprouted grain bread, but not all sprouted grain bread is Ezekiel bread.


