
Let’s be honest—straight-from-the-can refried beans are fine, but they’re not exactly going to blow anyone away at dinner. That’s where this canned refried beans recipe guide comes in. I’m going to show you how to transform that humble can into something that tastes homemade, flavorful, and restaurant-quality with minimal effort. No complicated techniques, no weird ingredients you can’t pronounce. Just real, practical upgrades that actually work.
Table of Contents
The Basics: Why Upgrade?
Before we dive into the five methods, let’s talk about why canned beans need upgrading in the first place. Canned refried beans are shelf-stable convenience items—they’re preserved, often a bit bland, and sometimes have that metallic aftertaste if you’re sensitive to it. The good news? A few simple additions transform them completely. You’re looking at 10-15 minutes of actual work, and you’ll have something that tastes like you spent an hour cooking from scratch.
The key is understanding that canned beans are a base, not a finished product. Think of them like a blank canvas. We’re just adding the right colors and textures to make it pop.
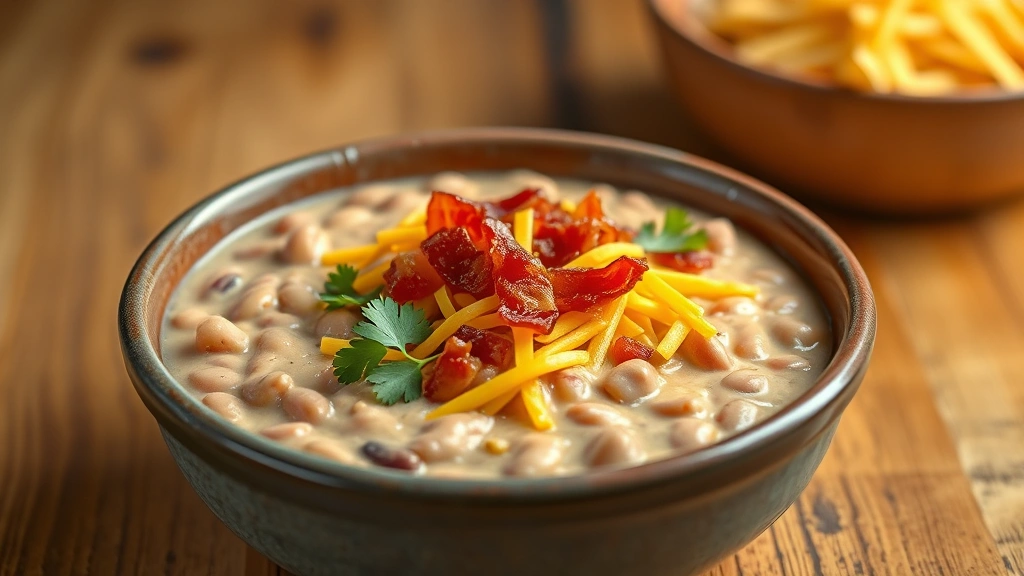
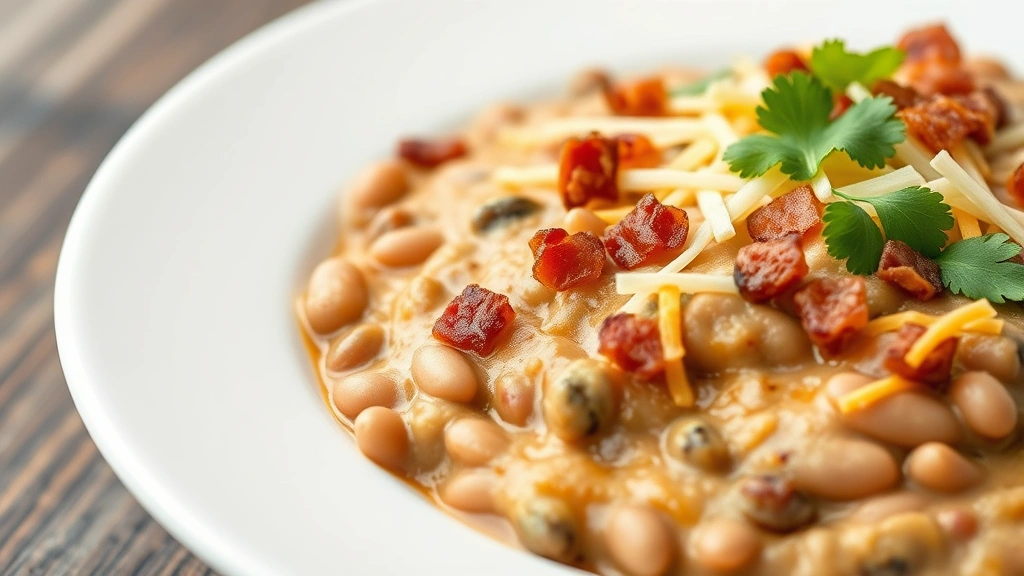
Method 1: The Bacon & Cheese
This is my go-to when I want maximum flavor impact with zero fussing around. Here’s what you do:
What you need:
- 1 can (16 oz) refried beans
- 4 strips bacon, chopped
- ½ cup shredded cheddar cheese
- 2 tablespoons butter
- ¼ teaspoon garlic powder
- Salt and pepper to taste
The process: Cook your bacon in a skillet over medium-high heat until crispy—about 5-7 minutes. Remove it and set aside, leaving about a tablespoon of bacon grease in the pan. Add your butter, then dump in the entire can of beans. Stir it around for 2-3 minutes until it’s warming through and loosening up a bit. Add the garlic powder, then fold in your cooked bacon and cheese. Let it sit for another minute until the cheese melts. That’s it. You’ve got beans that taste like they came from a proper restaurant kitchen.
The bacon fat adds richness, the cheese creates that creamy texture, and the whole thing comes together in one pan. Serve it with homemade guacamole and you’re golden.
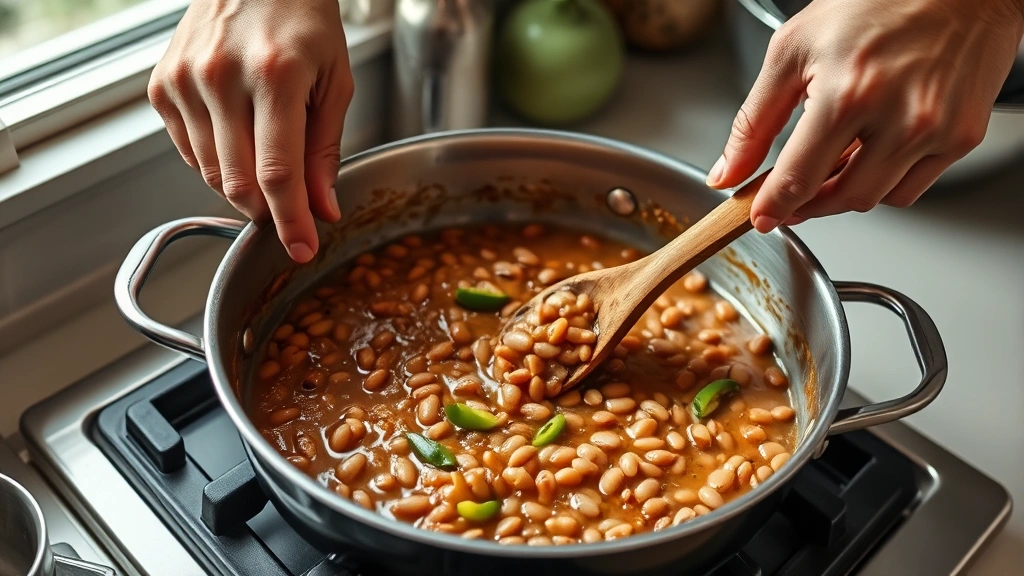
Method 2: The Spicy Kick
If you like heat, this method is your friend. This approach takes canned refried beans and gives them actual personality.
What you need:
- 1 can (16 oz) refried beans
- 1 jalapeño, diced (seeds removed if you want less heat)
- ½ teaspoon cumin
- ½ teaspoon chili powder
- ¼ teaspoon cayenne pepper
- 1 tablespoon olive oil
- Juice of half a lime
- Fresh cilantro
The process: Heat olive oil in a pan over medium heat. Sauté your diced jalapeño for about 2 minutes until it starts to soften. Add your spices—cumin, chili powder, and cayenne—and let them toast for about 30 seconds. This blooms the flavors and makes them way more potent. Then add your beans, stir everything together, and warm through for 3-4 minutes. Finish with lime juice and fresh cilantro. The lime brightens everything up and cuts through the richness of the beans.
This version works great as a side dish or stuffed into tacos. The spice builds gradually, so you get that nice lingering heat without it being overwhelming.
Method 3: The Creamy Dream
This method is for when you want something smooth, rich, and almost luxurious. It’s comfort food at its best.
What you need:
- 1 can (16 oz) refried beans
- ¼ cup sour cream or Mexican crema
- ¼ cup whole milk
- 2 tablespoons butter
- ½ teaspoon onion powder
- ¼ teaspoon white pepper
- Pinch of smoked paprika
The process: Melt your butter in a saucepan over medium-low heat. Add the beans and start breaking them down with a wooden spoon—you want to get them to a smoother consistency. Add your milk and sour cream, stirring constantly. The mixture will go from thick to creamy in about 2-3 minutes. Season with onion powder, white pepper, and smoked paprika. The whole thing should be velvety and spoonable, like a luxurious bean dip.
This version is perfect for serving alongside grilled meats or using as a base for nachos. The sour cream adds tang, the milk adds creaminess, and the smoked paprika adds just enough depth that people wonder what your secret ingredient is.
Method 4: The Fresh Herb Route
Sometimes simple is better. This method celebrates fresh flavors and keeps things light.
What you need:
- 1 can (16 oz) refried beans
- 2 tablespoons olive oil
- 3 cloves garlic, minced
- ¼ cup fresh cilantro, chopped
- 2 tablespoons fresh parsley, chopped
- 1 tablespoon fresh lime juice
- ½ teaspoon cumin
- Sea salt and pepper
The process: Heat your olive oil in a pan and sauté your minced garlic for about 1 minute until fragrant. Add your beans and cumin, stirring for 3-4 minutes. Remove from heat and fold in your fresh cilantro and parsley. The heat from the beans will slightly wilt the herbs, releasing their oils. Finish with lime juice, salt, and pepper. Fresh herbs make everything taste better—it’s not a secret, it’s just science.
This version is lighter than the others but no less flavorful. It pairs beautifully with fish dishes or simple grilled chicken.
Method 5: The Loaded Fiesta
This is the all-in approach. It’s not complicated, but it’s definitely the most involved of the five methods. Think of it as the “I’m feeding people and want to impress them” option.
What you need:
- 1 can (16 oz) refried beans
- 3 strips bacon, chopped
- ½ small onion, diced
- 2 cloves garlic, minced
- 1 jalapeño, diced
- ½ cup corn (fresh or frozen)
- ¼ cup diced tomatoes
- ½ teaspoon cumin
- ¼ teaspoon chili powder
- ¼ cup shredded cheese
- Fresh cilantro
The process: Cook your bacon until crispy, remove it, and set aside. In the same pan, sauté your onion and garlic for 2 minutes. Add jalapeño and cook for another minute. Add your corn and tomatoes, cooking for 2 minutes. Stir in your spices, then add the beans. Mix everything together and warm through for 3-4 minutes. Fold in your cooked bacon and cheese, then finish with fresh cilantro. This is basically a loaded bean situation that works as a dip, a side dish, or even a burrito filling.
The beauty of this method is that you can customize it based on what you have. Don’t have corn? Use black beans instead. No jalapeño? Add bell pepper. The formula is flexible.
Best Ways to Serve
Now that you’ve upgraded your beans, let’s talk about how to actually use them. These aren’t just side dishes—they’re versatile.
As a dip: Serve warm with tortilla chips. The creamier methods (especially Method 3) work best here.
In tacos: Spread them in your taco shells before adding meat and toppings. Methods 1, 2, and 5 are your best bets.
On nachos: Layer them under cheese and toppings. Method 3 (the creamy version) spreads beautifully and holds toppings well.
As a burrito filling: Mix with rice and protein. Method 5 works great here since it’s already loaded with vegetables.
With breakfast: Serve alongside eggs and toast. Method 1 with its bacon flavor is perfect for this application.
Under grilled meats: Use as a bed for fish, chicken, or steak. Methods 2 and 4 complement proteins really well without overwhelming them.
Storage & Make-Ahead
One of the best things about upgrading canned beans is that you can make them ahead. Store your finished beans in an airtight container in the refrigerator for up to 4 days. They actually taste better the next day as the flavors meld together.
If you’re making a big batch for a party, you can reheat them gently on the stovetop with a splash of water or broth to loosen them up. Don’t use the microwave if you can avoid it—the stovetop method keeps them from getting that weird rubbery texture.
You can also freeze them for up to 3 months. Let them cool completely first, then transfer to a freezer-safe container. Thaw overnight in the refrigerator and reheat gently. The texture stays pretty solid through the freeze-thaw cycle, especially with the creamier versions.
Frequently Asked Questions
Can I use refried black beans instead of pinto?
Absolutely. Black beans have a slightly earthier flavor, but all five methods work equally well. The cooking times stay the same, and the flavor profiles adapt beautifully. If you like bold seafood flavors, black beans actually pair even better with some proteins.
What if my beans are too thick?
Add liquid gradually. Use water, broth, or even a splash of milk depending on which method you’re using. Add a tablespoon at a time and stir until you reach your desired consistency. It’s easier to thin them out than to thicken them back up.
Can I make these in a slow cooker?
Yes, but it’s honestly overkill. Since you’re starting with canned beans that are already cooked, you don’t need slow cooking. Dump everything in a slow cooker on low for 30-45 minutes if you must, but the stovetop method is faster and gives you better texture control.
Are these recipes vegetarian?
Methods 2, 3, and 4 are vegetarian as written. Methods 1 and 5 include bacon, but you can substitute with smoked paprika or liquid smoke for a similar flavor profile if you want to keep them vegetarian.
How much do these recipes make?
Each method starts with one 16 oz can of beans, which typically serves 4-6 people as a side dish or 2-3 people as a main component (like in burritos or tacos).
Can I double these recipes?
Completely. Just double all the ingredients and adjust your cooking time slightly—you might need an extra 2-3 minutes for everything to heat through evenly. Use a larger pan so everything heats uniformly.
What’s the difference between refried beans and regular beans?
Refried beans are cooked beans that have been mashed or blended to create a smooth, creamy texture. They’re not actually “fried twice”—the name comes from Spanish “frijoles refritos” which means well-cooked beans. Canned versions are already in this state, which is why they’re such a convenient starting point.
Do I need to rinse canned beans?
Not for refried beans. They’re already in a creamy base that you want to keep. If you were using whole canned beans, rinsing would be standard practice, but with refried beans, that liquid is part of the texture you want.
Final thought: The beauty of upgrading canned refried beans is that you’re not doing anything complicated. You’re just adding flavors and textures that make something convenient taste like you actually put effort into it. Pick whichever method matches your mood—bacon and cheese when you want richness, spicy kick when you want heat, creamy dream when you want comfort, fresh herbs when you want bright flavors, or loaded fiesta when you want to go all-in. None of them take more than 15 minutes, and all of them taste genuinely good. That’s the real win here.


