
A buckwheat bread recipe is your ticket to baking delicious, naturally gluten-free loaves that rival any bakery product. Whether you’re dealing with celiac disease, gluten sensitivity, or just want to experiment with alternative grains, buckwheat flour delivers nutty flavor and impressive texture without the fuss. I’ve tested this recipe dozens of times in my kitchen workshop, and it consistently produces a moist, tender crumb with a beautiful golden crust.
Table of Contents
Why Buckwheat Works
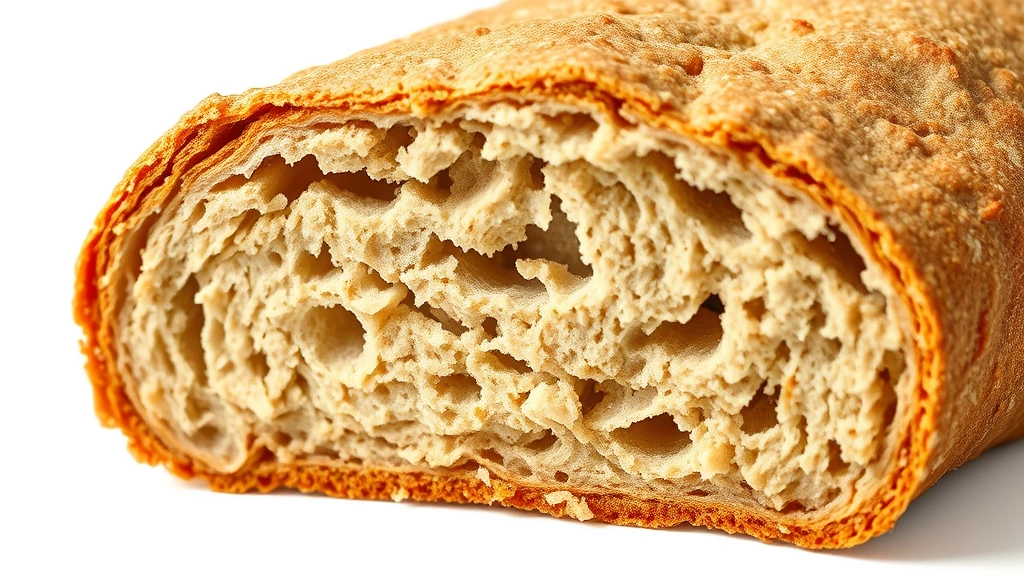
Buckwheat isn’t actually wheat—it’s a seed from a fruit plant, which makes it naturally gluten-free and packed with protein. When you’re building a buckwheat bread recipe, you’re working with a grain that has unique binding properties. The flour contains resistant starch and creates a denser crumb than wheat bread, but in the best way possible. It’s moist, satisfying, and keeps fresh longer than conventional loaves.
The nutty, slightly earthy flavor profile works beautifully on its own or paired with complementary dishes. Think about serving it alongside your favorite blueberry syrup recipe for breakfast, or toasting it for dinner. Buckwheat also digests more slowly than refined wheat, keeping you satisfied longer.
Ingredients You’ll Need
Here’s what goes into a solid buckwheat bread recipe that yields one 9-inch loaf:
- 2 cups buckwheat flour (finely milled)
- 1 cup all-purpose or brown rice flour (for structure)
- 1½ teaspoons salt
- 2 teaspoons instant yeast (or 1 teaspoon active dry yeast)
- 1 tablespoon honey or sugar
- 2 tablespoons vegetable oil or melted butter
- 1¼ cups warm water (110°F)
- 1 teaspoon xanthan gum (if using pure buckwheat flour without additives)
The supporting flour is crucial—buckwheat alone won’t rise properly because it lacks gluten’s elasticity. Rice flour, tapioca starch, or a gluten-free blend all work. The xanthan gum acts as a binder, mimicking what gluten does in traditional bread.
Prep Work Matters
Before you start mixing, get your workspace organized. This isn’t laziness—it’s the difference between smooth baking and frustration. Measure all dry ingredients into one bowl. Pour warm water into another. Have your oil ready to drizzle. Line your bread pan with parchment paper or lightly oil it.
Temperature control is non-negotiable with buckwheat bread. Your water should be 110°F—warm to the touch but not hot. Use a kitchen thermometer if you have one. Cold water slows fermentation; boiling water kills yeast. Get it right, and your dough rises predictably.
Mixing and Kneading
Combine your dry ingredients thoroughly in a large mixing bowl. Whisk the buckwheat flour, supporting flour, salt, yeast, honey, and xanthan gum together. This distributes the yeast evenly and prevents clumping.
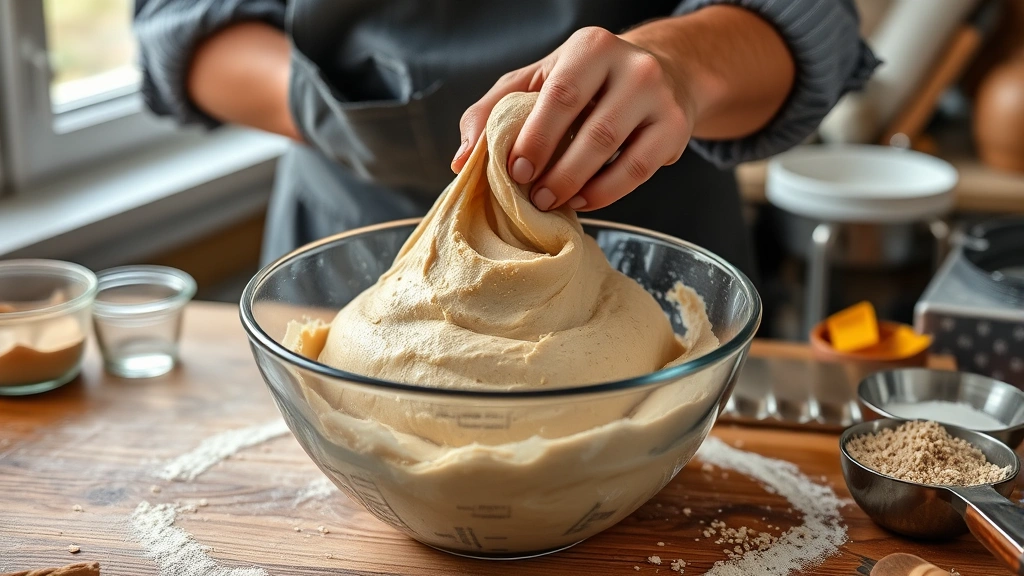
Create a well in the center. Pour your warm water in slowly while stirring with a sturdy wooden spoon or using an electric mixer with a paddle attachment. Buckwheat dough is stickier than wheat dough—this is normal. Keep mixing for 2-3 minutes until you have a shaggy mass with no dry flour pockets.
Add your oil and mix for another minute. The dough should be thick and slightly sticky, similar to cake batter but workable. If it’s too dry, add water one tablespoon at a time. If it’s soupy, sprinkle more supporting flour.
First Rise and Bulk Fermentation
Transfer your dough to a lightly oiled bowl, turning it to coat all sides. Cover with a damp kitchen towel or plastic wrap. Let it sit at room temperature (68-72°F is ideal) for 1 to 1.5 hours. You’re looking for about 50% volume increase—not a full double like wheat dough.
Buckwheat ferments differently than wheat. It rises more slowly and won’t achieve the dramatic puff you might expect. This is fine. The dough should feel airy and have visible bubbles when you gently press the surface. This bulk fermentation develops flavor and improves digestibility.
Shaping and Second Rise
Gently turn your dough onto a lightly floured surface (use rice flour or buckwheat flour for dusting—not wheat). Don’t punch it down aggressively. Shape it into a rough rectangle that fits your bread pan with an inch of clearance on all sides.
Roll it tightly from one short end, pinching the seam as you go. This creates surface tension and helps the bread rise upward rather than spreading sideways. Place it seam-side down in your prepared pan.
Cover loosely and let it rise for 45 minutes to 1 hour. The dough should rise about ¾ inch above the rim of the pan. Poke it gently with your finger—if the indentation springs back slowly, you’re ready to bake. If it springs back immediately, give it another 15 minutes.
Baking Your Loaf
Preheat your oven to 400°F for 20 minutes before baking. A hot oven gives you oven spring—that crucial rise in the first 10 minutes of baking.
For a crispy crust, spray your dough lightly with water or brush it with a mixture of water and honey. Slash the top with a sharp knife at a 45-degree angle, about ¼ inch deep. This controls where the bread expands and looks professional.
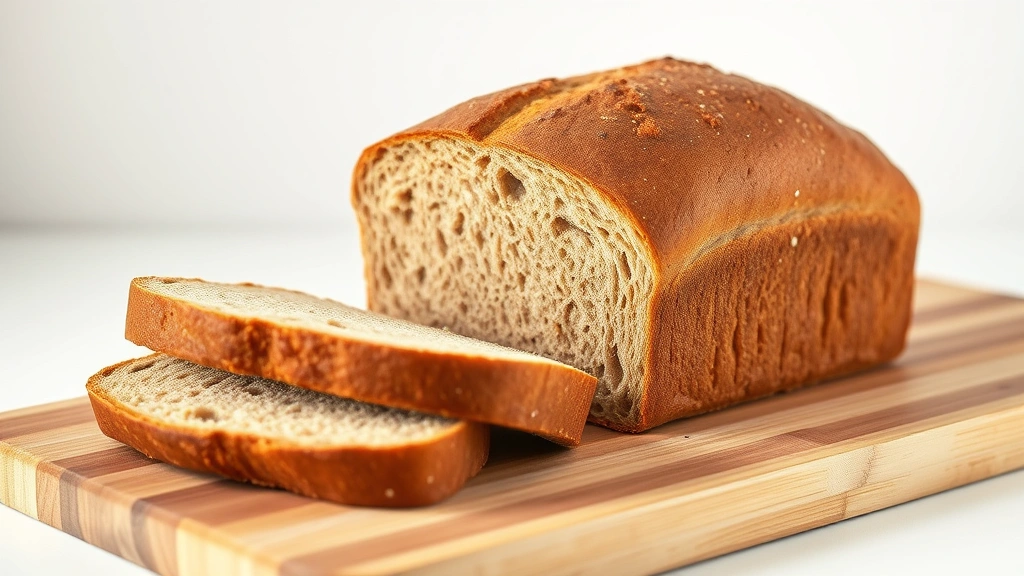
Bake for 35-40 minutes until the crust is deep golden brown and the loaf sounds hollow when tapped on the bottom. An internal thermometer should read 200-210°F. If the top browns too quickly, tent it loosely with foil after 25 minutes.
Cooling and Storage
Remove your buckwheat bread from the pan immediately and place it on a wire rack. Let it cool completely—at least 1 hour—before slicing. This allows the crumb to set properly. Slicing warm bread results in gummy texture.
Store cooled bread in an airtight container or wrapped tightly in plastic wrap at room temperature for up to 3 days. For longer storage, slice it and freeze in a freezer bag for up to 3 months. Toast frozen slices directly from the freezer for quick breakfast.
Common Problems Solved
Dense, Heavy Crumb: Your dough didn’t rise enough during bulk fermentation. Increase first rise time by 20-30 minutes. Buckwheat ferments slower than wheat, so patience pays off.
Bread Didn’t Rise in Pan: Second rise was too short, or your kitchen was too cold. Aim for 70°F ambient temperature. If your home is cooler, extend rise times by 15-20 minutes.
Gummy Interior Despite Cooling: You sliced too early or your oven wasn’t hot enough. Always cool completely. Ensure your oven reaches 400°F—use an oven thermometer to verify.
Flat Top, No Oven Spring: Your yeast might be dead (check expiration date), or your water was too hot. Start fresh with new yeast and verify water temperature with a thermometer.
Recipe Variations
Once you master the basic buckwheat bread recipe, experiment with additions. Fold in seeds (sunflower, pumpkin, sesame) during the final minute of mixing for texture and nutrition. Add 1 tablespoon of caraway seeds for a traditional Eastern European flavor.
For a sweeter loaf, increase honey to 2 tablespoons and add 1 teaspoon of vanilla extract. You can also create a buckwheat-based spread pairing by exploring birria sauce recipe options for savory applications, or use it alongside Betty Crocker recipes for traditional comfort food combinations.
Try substituting 25% of the buckwheat flour with millet flour or sorghum flour for different flavor notes. Each substitution changes fermentation slightly, so adjust rise times accordingly.
Frequently Asked Questions
Is buckwheat bread really gluten-free?
Yes, 100% gluten-free. Buckwheat is a seed, not a grain, so it contains zero gluten naturally. However, always verify your buckwheat flour is certified gluten-free if you have celiac disease, as cross-contamination can occur during milling.
Can I use 100% buckwheat flour?
Not recommended for beginners. Pure buckwheat lacks the binding properties needed for proper rise and crumb structure. Always combine it with at least 30-40% supporting flour (rice flour, tapioca, or certified gluten-free blend) for reliable results.
Why is my buckwheat dough so sticky?
Buckwheat flour absorbs less water than wheat flour. This stickiness is normal and necessary for a moist crumb. Resist the urge to add extra flour—it’ll result in a dense loaf. Work with slightly damp hands instead of flouring your surface heavily.
How long does buckwheat bread stay fresh?
At room temperature in an airtight container, 3 days maximum. Buckwheat bread doesn’t stale as quickly as wheat bread due to its moisture content, but it can develop mold if exposed to humidity. Freeze for longer storage.
Can I make this in a bread machine?
Yes, but use the gluten-free cycle if available. Add ingredients in the order your machine recommends (usually liquid first, then dry). The dough won’t knead like wheat dough—it’ll stay wetter. Don’t panic; this is correct.
What’s the difference between buckwheat flour and buckwheat groats?
Flour is ground buckwheat groats. For this recipe, you need flour. Groats are whole seeds and won’t work in bread baking—they’ll remain crunchy and won’t bind properly.
Can I substitute honey with other sweeteners?
Yes. Use maple syrup, agave, or regular sugar in equal amounts. Sugar dissolves quickly (use slightly warmer water), while syrups work identically to honey. Avoid artificial sweeteners—they ferment differently and can affect rise.
My bread came out too dark. What went wrong?
Buckwheat browns faster than wheat because of its natural sugars. Reduce oven temperature to 375°F or tent with foil after 25 minutes. Your oven might also run hot—verify temperature with an oven thermometer.
Final Thoughts
Baking a buckwheat bread recipe teaches you that gluten-free doesn’t mean compromising on flavor or texture. This loaf delivers nutty complexity, satisfying density, and genuine nutrition in every slice. Your first attempt might not be perfect—mine wasn’t—but you’ll learn quickly.
The key is understanding that buckwheat behaves differently than wheat. It ferments slower, rises less dramatically, and needs supporting flour for structure. Accept these differences, and you’ll produce bread that beats most store-bought gluten-free options.
Start with this basic recipe, nail the technique, then explore variations. Add seeds, experiment with supporting flours, or pair it with complementary dishes like baby red potato recipes for a complete meal. Your kitchen will smell incredible, and you’ll have fresh bread that lasts for days. That’s a win in my workshop.


